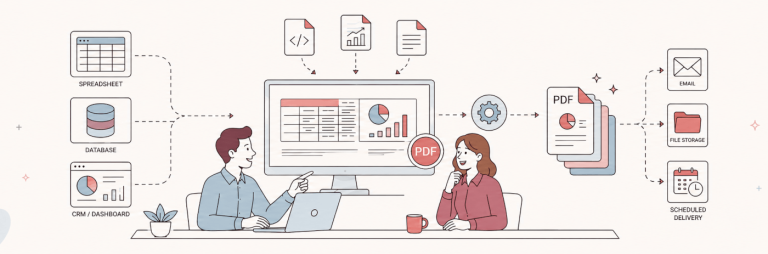
Are you tired of manually creating and managing PDF documents for your business? Do you wish there was a way to automate the process and save valuable time and resources? Look no further! In this tutorial, we will show you how to harness the power of Quickbase, a versatile low-code application development platform, and CraftMyPDF, a feature-rich PDF generation tool, to revolutionize your document workflow.

In this comprehensive tutorial, we will guide you through the step-by-step process of setting up both Quickbase and CraftMyPDF, demonstrating how to seamlessly integrate them and automate PDF document generation within your Quickbase workflow. Get ready to unlock the potential of these powerful tools and streamline your document management like never before.
1. What is Quickbase?
Quickbase is a robust low-code application development platform that empowers businesses to create custom solutions tailored to their unique needs, all without extensive programming knowledge. With Quickbase, you can build and deploy scalable web and mobile applications that streamline processes, automate workflows, and enhance collaboration across teams.
At its core, Quickbase offers a highly intuitive interface that enables users to design and customize their applications through a visual drag-and-drop interface. This means you don’t need to rely on traditional coding or development expertise to create powerful business applications. With Quickbase’s user-friendly platform, you can rapidly prototype, iterate, and deploy applications to address a wide range of business challenges.
Quickbase provides a vast array of pre-built templates and application frameworks that serve as a starting point for your projects. These templates cover a variety of common business scenarios such as project management, CRM, HR management, and more. You can leverage these templates to jumpstart your application development process, saving valuable time and effort.
2. Getting Started with Quickbase
To begin your journey with Quickbase, you’ll need to sign up for a free account. Follow these steps to get started:
1. Visit the Quickbase website and navigate to the sign-up page.

2. Fill out the sign-up form with the required information, including your name, email address, and desired password. Quickbase may also ask for additional details to better understand your needs and provide tailored recommendations.
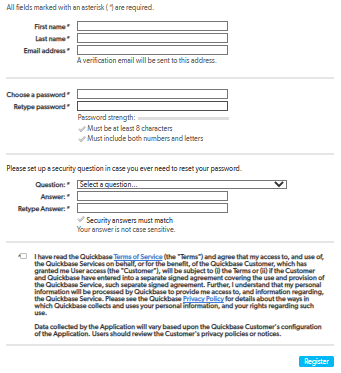
3. After submitting the form, you will receive a verification email at the provided email address. Click on the verification link within the email to verify your account.
4. Once your account is verified, you can log in to Quickbase using your credentials.
5. Upon logging in, you will be greeted by the Quickbase dashboard, which serves as your central hub for managing your applications and projects.
3. What is CraftMyPDF?
CraftMyPDF is a comprehensive PDF generation tool that provides pre-built templates, a drag-and-drop editor, and an API for creating dynamic PDF documents. It offers features like easy integration with no-code/low-code platforms, expressions and formatting support, and the ability to generate PDF documents and images at scale.
3.1 Benefits of Using CraftMyPDF
CraftMyPDF offers several advantages for generating PDF documents:
- Easy to Use Drag & Drop Editor: CraftMyPDF provides a user-friendly interface with a drag-and-drop editor, making it simple to design and customize PDF templates according to your specific requirements.
- PDF & Image Generation API: CraftMyPDF offers a cloud-based API that allows you to generate PDF documents or images (JPEG/PNG) synchronously or asynchronously at scale. This eliminates the need for maintaining your own infrastructure and reduces costs.
- Automate with No-code or Low-code Platforms: CraftMyPDF integrates seamlessly with popular no-code and low-code platforms like Zapier, Make.com, Bubble.io, and REST API. This enables you to automate your PDF content creation workflow without writing extensive code.
- Expressions & Formatting Support: CraftMyPDF’s template editor supports expressions and formatting for datetime, currency, and custom formats. You can utilize expressions in headers, footers, and other sections to dynamically populate data in your PDF documents.
3.2 Getting Started with CraftMyPDF
To begin generating PDF documents with CraftMyPDF, follow the steps outlined below:
- Visit the official CraftMyPDF website and click on the Sign Up button.
2. Fill out the registration form with the required information, such as your name, email address, and desired password. Alternatively, you may have the option to sign up using your existing Google account.
3. After completing the registration process, you will be redirected to the CraftMyPDF dashboard, where you can access various features and functionalities.
4. Navigate to the API Integration tab located in the top navigation bar of the dashboard. This is where you can find your API key, which is essential for integrating CraftMyPDF with Quickbase.
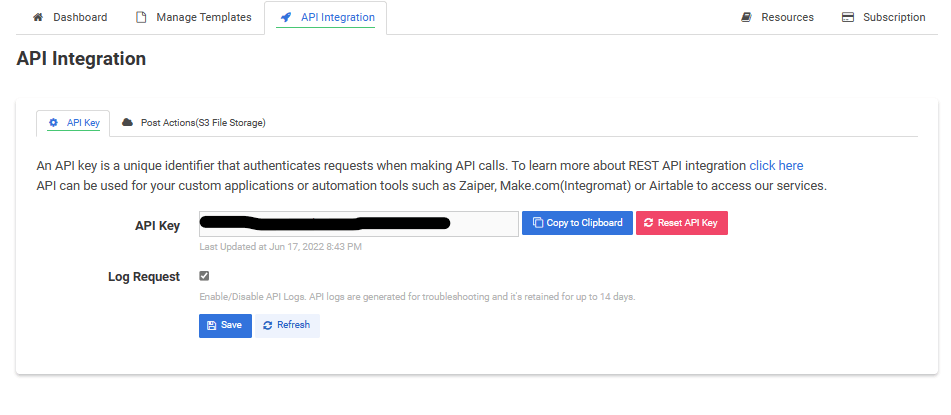
5. Copy the API key provided on the API Integration page. You will need to paste this key later when configuring the integration with Quickbase.
6. Next, go to the Manage Template section from the navigation bar. Here, you have the option to create a new PDF template from scratch or choose from a variety of pre-built templates available for different document types. Select the template that best suits your needs by clicking on the Create PDF Template button.
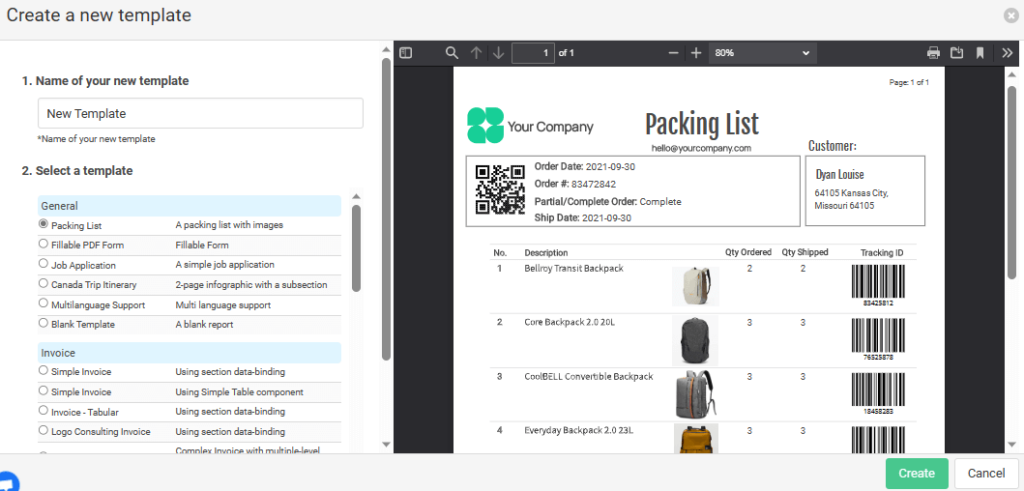
7. If you decide to create a custom template from scratch, CraftMyPDF offers a user-friendly drag-and-drop editor that allows you to design your template with ease. You can add text, images, tables, and other elements to create a visually appealing and informative layout.
8. Once you have created or chosen your template, navigate back to the Manage Template page. You will see a list of templates, and you need to copy the template ID of the template you just created. This ID will be required for the integration setup in Quickbase.
Now that you have set up your CraftMyPDF account and created a template, you are ready to integrate it with Quickbase and generate PDF documents seamlessly.
4. Generating PDF Documents with Quickbase
After creating an account on Quickbase, follow the steps below to generate a PDF document:
4.1 Setting up a Sample Project
Setting up a sample project in Quickbase is the first step towards generating PDF documents. Follow these instructions to create a new project and configure it for PDF generation:
1. From your Quickbase dashboard, you have the option to either create a new app or select from a list of pre-built sample apps. For this example, let’s choose the Customer Requests sample project. To do so, click on Explore Sample Apps in the dashboard.
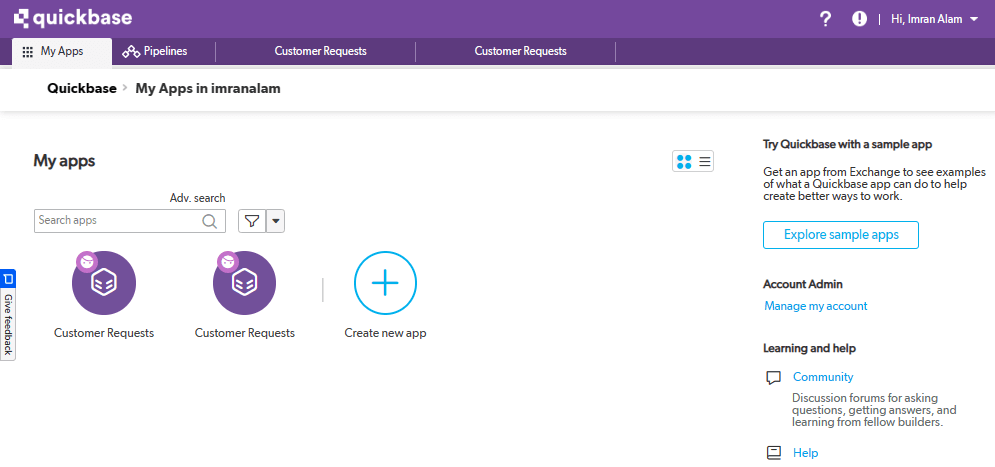
2. In the sample apps gallery, search for the Customer Requests app. This app is specifically designed to manage customer requests and serves as a suitable starting point for our demonstration. You can use any template that suits your needs.
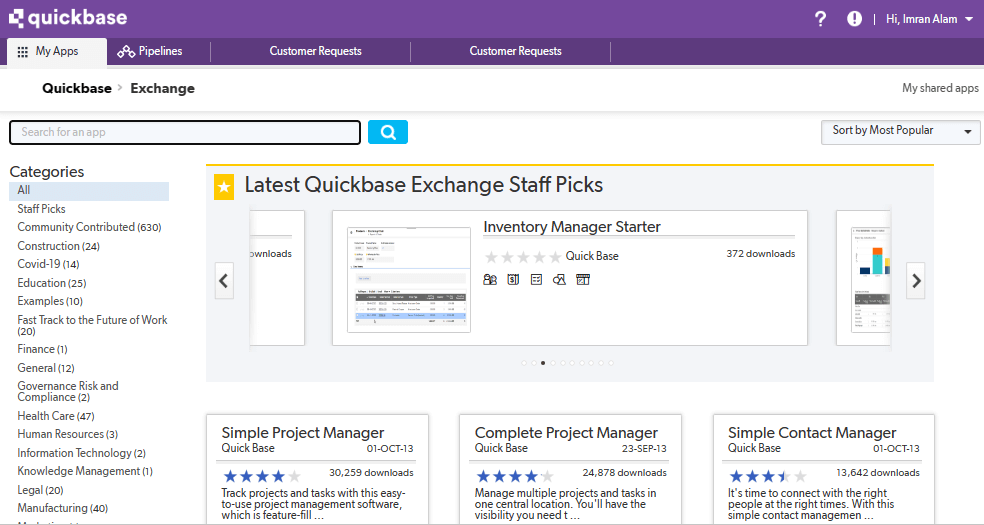
3. Click on the app details page. Here, you’ll find an overview of the app’s functionality and the option to create a new app based on this template.
4. Click on the Create an App button to create a new app. You can provide a name and customize the settings according to your preferences.
5. After creating the app, you will be redirected to the app’s main page. In the navigation bar at the top, you will see multiple tables associated with the app. For our purpose, we want to add the PDF functionality to the Requests table.

6. Click on the Requests table to access its settings. In the top-left corner, click on Settings and then select Structure. This will allow you to modify the table’s structure and add the necessary field for attaching PDF files.
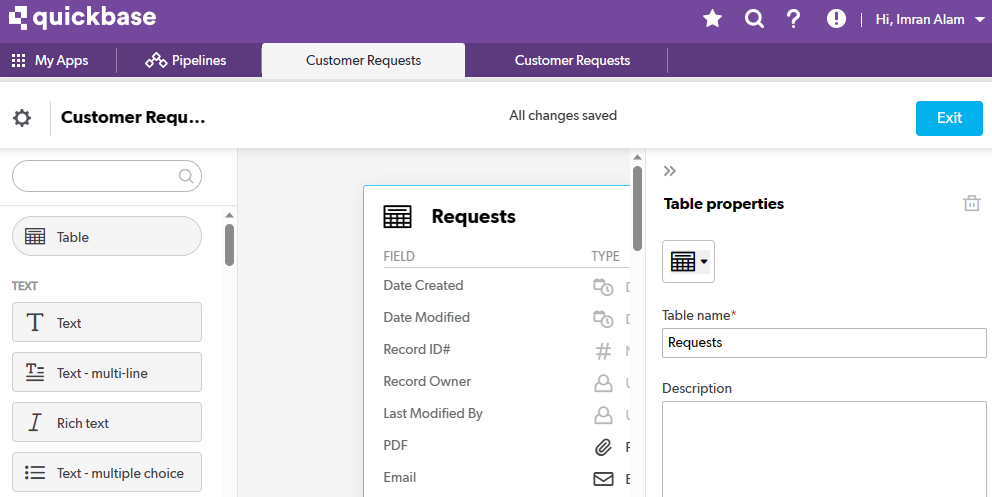
7. To add the PDF field, click on the Add a Field button. Provide a name for the field, such as PDF, and select the field type as File Attachment. This field will be used to store the generated PDF documents.
By following these steps, you have successfully set up a sample project in Quickbase and configured the Requests table with a PDF attachment field. This provides the foundation for integrating CraftMyPDF and automating PDF document generation within your Quickbase app.
4.2 Creating a Quickbase Pipeline
To generate PDF documents using CraftMyPDF within Quickbase, we will set up a Quickbase Pipeline. A pipeline allows you to automate workflows and define a series of steps to perform actions based on specific triggers. Follow the instructions below to create a Quickbase Pipeline:
1. To create a Quickbase pipeline, navigate to the Pipelines dashboard by selecting the corresponding option from the navigation bar in Quickbase. Once on the dashboard, locate the Create Pipeline button and click on it to initiate the pipeline creation process. Provide a name that accurately reflects the purpose of the pipeline and add a brief description to provide additional context. Click on the Create Pipeline button to proceed.

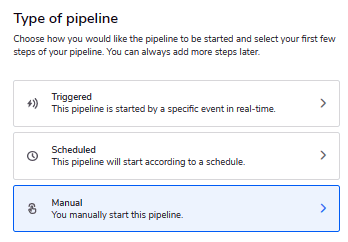
2. In the pipeline setup, you need to determine the trigger that initiates the pipeline’s execution. For this example, select the Triggered option, as we want the pipeline to start when a user adds a new record. However, depending on your specific needs, you can also choose other trigger types such as Scheduled or Manual triggers. These options allow you to activate the pipeline based on a predefined schedule or manually trigger it as needed.
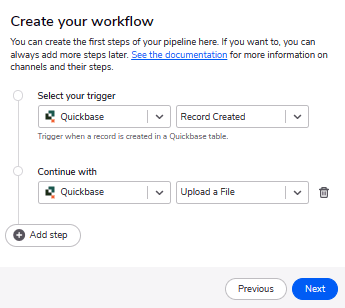
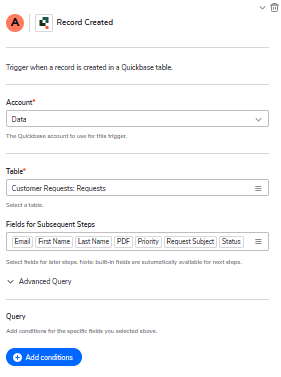
3. To define the workflow of the pipeline, you need to add steps that specify the actions to be performed. In the first step, as we want the pipeline to start when a user creates a new record, keep the second dropdown menu set to Record Created This ensures that the pipeline is triggered when a new record is added to the specified table.
In the second step, change the second dropdown menu to Make REQUEST This step allows you to make an API request to interact with external services or perform custom actions. Click on the Next button to proceed with configuring this step.
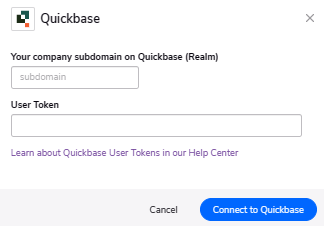
4. In Step A, you need to provide the Quickbase account details that will be used for the pipeline trigger. Locate your profile icon in the top right corner of the Quickbase interface and click on it. From the dropdown menu, select My Preferences and then navigate to Manage User Tokens. Here, you will find the necessary information, including your company subdomain and user token. Enter these details in the corresponding fields to authenticate your Quickbase account for the pipeline trigger.
After that, you also need to specify the table from which the pipeline will fetch data for subsequent steps. In this case, select the Requests table from the dropdown menu in the Table field. This ensures that the pipeline operates on the records within the specified table.
Furthermore, in the Fields for Subsequent Steps field, you can choose the specific field(s) from the Requests table that you want to use in the subsequent steps of the pipeline. Select the desired field(s) from the available options to include them as inputs for further actions.
5. In Step B of the pipeline, you will configure an API call to interact with the CraftMyPDF service. Fill in the necessary details as follows:
- In the URL field, paste the following URL:
https://api.craftmypdf.com/v1/create. This specifies the endpoint that the pipeline will communicate with when making the API call to CraftMyPDF. - Set the Method field to POST. This ensures that the API call utilizes the POST HTTP method, which is appropriate for sending data and generating the PDF document.
- In the Headers section, enter X-API-KEY as the name and your CraftMyPDF API key as the value. This header allows you to authenticate the API call by providing your API key, ensuring that it is associated with your CraftMyPDF account.
- Choose Application/json as the content type. This specifies that the data format of the API request will be in JSON.
- In the Body field, enter the provided JSON payload. This JSON payload includes the template_id field, which corresponds to the ID of the template you created in CraftMyPDF, and the data field, which contains the necessary data from the Quickbase record. Replace YOUR_TEMPLATE_ID with the actual template ID obtained from CraftMyPDF, and use the
{{a|to_json}}syntax to include the field data as a JSON object. This payload provides the required information to generate the PDF document using CraftMyPDF.
{
    "template_id":"YOUR_TEMPLATE_ID",
    "data": {{a|to_json}}
}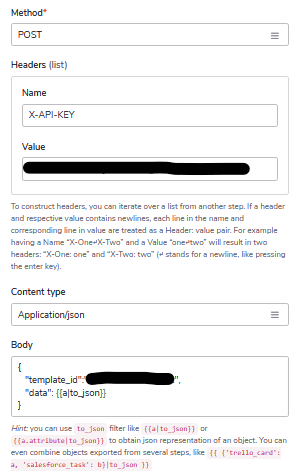
Here, you can use the to_json filter to obtain the JSON representation of an object. Combine objects exported from several steps using the filter, like {{ {'trello_card': a, 'salesforce_task': b}|to_json }}. By using {{a|to_json}}, we are sending all the field data as a JSON object to CraftMyPDF for PDF generation.
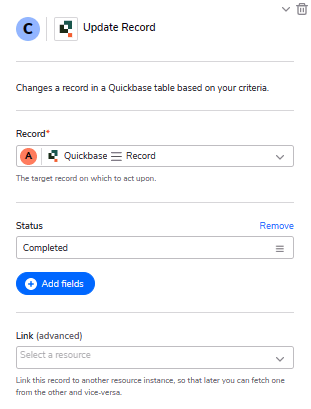
6. Now, we’ll add Step-C to update the status field to Completed. In the right section of the page, under Quickbase, select Records and drag the Update Record field below Step B. Click on the Add fields button in the Update Record field and select the field whose value you want to update. Enter the updated value for the field.
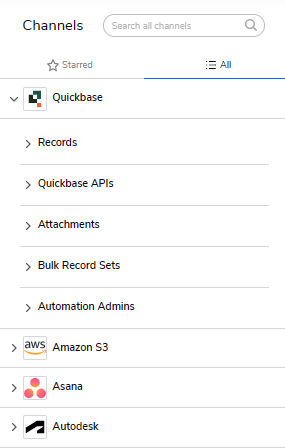
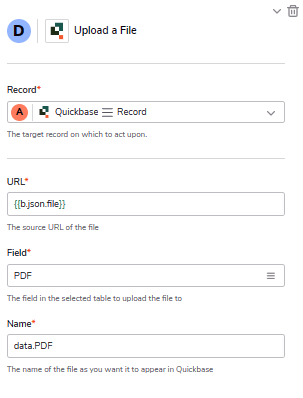
7. Lastly, we want to add the PDF generated in Step B to the PDF field in Quickbase. Again, in the right section, under Quickbase, select Attachments and drag Upload a File below Step C. In the URL field, enter {{b.json.file}}, which represents the URL returned from the API call in Step B. In the Field field, select the field where you want to upload the attachment (e.g., the PDF field). In the Name field, enter the desired name of the file with the appropriate extension (e.g., data.PDF).
Once you have completed the pipeline setup, click on the On button located in the top right corner to activate your pipeline. From now on, whenever a user adds a new record in the Requests table, the pipeline will be triggered, resulting in the generation of a new PDF document. This PDF document will be automatically uploaded to the specified field, such as the PDF field, within Quickbase.
5. Conclusion
By integrating Quickbase with CraftMyPDF, you can automate the process of generating PDF documents within your Quickbase workflows.
CraftMyPDF provides powerful features for designing templates, generating PDFs at scale, and easy integration with no-code/low-code platforms. With this integration, you can streamline your document generation process and improve efficiency in your business operations.