Ever found yourself struggling to take down someone’s email during a networking event? We can all agree that making meaningful connections remains an essential part of both personal and business growth. This is where name cards come in. Name cards, popularly known as business cards are portable cards that help you expand your network.
Name cards typically contain information such as your name, what you do, email, phone number, and address. A quick exchange of name cards eliminates the struggle of jotting down details or relying on smartphone apps. Plus, they’re less likely to get lost in the digital abyss of crowded contact lists.

Take for example: You meet a potential client, you both kick off on a really good note, the conversation gets interesting, and you’d like to follow up. Handing over your name card not only helps build your network, it also leaves you with a lasting impression by showcasing your brand identity.
This goes beyond business worlds to even social settings. Whether you’re an artist, a freelancer, or an entrepreneur, sharing your details via a name card adds a touch of professionalism to your brand.
Thinking of getting a business card already? Worry less. In this article, I will be showing you how to auto-generate name cards with Node.js, PHP, and Python using a pre-designed template from CraftMyPDF. So, next time you attend an event or meet someone new, you have your personalized name card ready to do the trick!
If you’re looking for a quick no-code way to design printable badges for conferences, exhibitions, or networking events, you can also use our event badge maker before automating your document generation workflow.
If you’re looking to build document generation into your own applications, the PDF generation API provides a flexible way to generate dynamic PDFs from reusable templates and JSON data. It supports multiple programming languages and is ideal for automating documents such as name cards, invoices, certificates, and reports.
What is CraftMyPDF?
You may be wondering: I know PHP, and Python as programming languages, and Node.js as a JavaScript framework, but haven’t heard of CraftMyPDF. Well, some of you may have, and for some, probably not. I’m here to show you a way to eliminate the stress of anything that has to do with PDF generation or Image generation.
CraftMyPDF is a no-code tool (yes, a tool that does not require any coding skill) that offers the auto-generation of PDF/Image documents using pre-designed templates that can be personalized to suit your needs. With its support for REST-APIs, generating eye-catching documents such as name cards, invoices, event tickets, social media images, banners, and more, becomes a breeze with our PDF generation API or image generation API.
We integrate with PHP, Python, CSS, JavaScript, C#, amongst others. In addition, we work with no-code tools like Zapier, Bubble.io, Airtable, and others, making it an outstanding tool.
Did I forget to mention the drag-and-drop editor that makes it easy to customize your documents? CraftMyPDF provides a template editor that makes document formatting easier. It also provides a cloud-based generation API making it possible for you to access your document anywhere, anytime.
CraftMyPDF comes bundled with powerful expressions and formatting support for DateTime, currency, and custom formats with support for over 25 languages in Latin, Greek, Arabic, Japanese, Chinese, and more which can be included in your document if you wish.
Now, let’s take a look at the steps to generate a PDF name card using CraftMyPDF.
Steps to Generate PDF name card with CraftMyPDF
Generating a PDF name card with CraftMyPDF is a very flexible process and does not require rigorous details and steps. Here’s how you can generate a PDF name card with the following steps:
- Create a CraftMyPDF account: To create a CraftMyPDF account, go to craftmypdf.com, navigate to the top of the website, and click on the Sign Up button. The registration process is seamless as you only need your name and email address to complete the process. It does not involve you inputting sensitive details like your credit card information.
- Log in to your account: After successfully creating your CraftMyPDF account, you can now log in to your dashboard. Your dashboard is a workspace that contains all the information about your template usage, and resources on how to get started with CraftMyPDF.

- Manage Templates: On the top of your dashboard, navigate to the Manage Templates link and click on it. The Manage Templates page contains details about all the templates we would be creating which include, the template id, name, when it was created, and so on.
- Create a PDF template: Now, to the interesting part. To create our name card, navigate to the New PDF Template button on your Manage Templates page and click on it. Here are the easy steps you need to follow:
i. Name your template: This can be any name you desire.
ii. Select a template: We will select the name card template because our goal is to create a name card.
iii. Create template: Click on the create button, and that’s it!
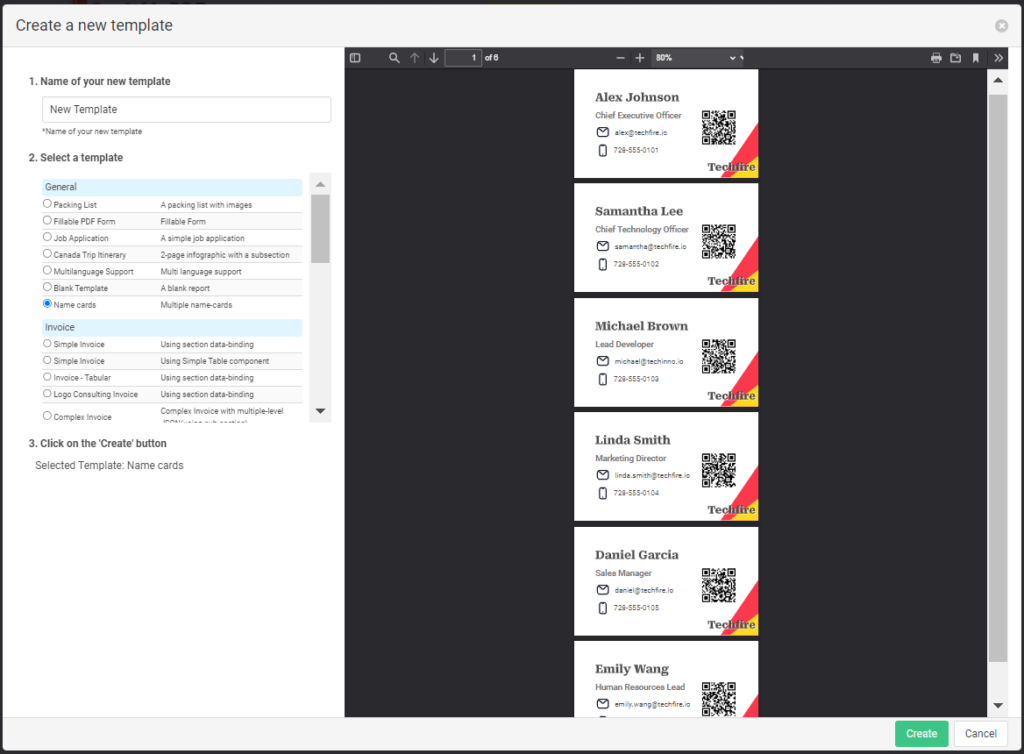
At the end of this, you should be redirected back to your Manage Templates page.
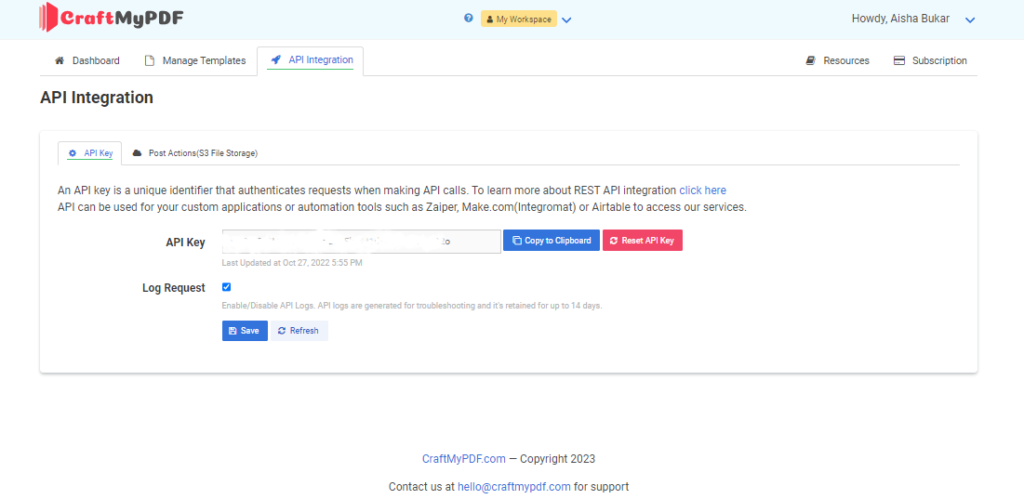
- Get API Key: On the top of the page, click on the API Integration toolbar, and copy the default API key that has been generated for you. We would be using this API key to create our API endpoint so make sure it’s copied on your clipboard.
- Prepare the JSON data: Now, go back to your Manage Templates page, you should be able to see the PDF template we just created. Navigate and click on the Edit link under Editor, this would take us to the drag-and-drop template editor. On the top page of the editor, click on the Data link. Here, we would see the JSON data used for the name cards, remember you can make changes to this data to suit your needs. Here’s an example of the sample JSON data
{
    "company_name": "techfire.io",
    "name_cards": [
        {
            "name": "Alex Johnson",
            "title": "Chief Executive Officer  ",
            "email": "alex@techfire.io",
            "mobile": "728-555-0101",
            "website": "https://techfire.io/team/alex"
        },
        {
            "name": "Samantha Lee",
            "title": "Chief Technology Officer",
            "email": "samantha@techfire.io",
            "mobile": "728-555-0102",
            "website": "https://techfire.io/team/samantha"
        },
        {
            "name": "Michael Brown",
            "title": "Lead Developer",
            "email": "michael@techinno.io",
            "mobile": "728-555-0103",
            "website": "https://techfire.io/team/michael"
        },
        {
            "name": "Linda Smith",
            "title": "Marketing Director",
            "email": "linda.smith@techfire.io",
            "mobile": "728-555-0104",
            "website": "https://techfire.io/team/linda"
        },
        {
            "name": "Daniel Garcia",
            "title": "Sales Manager",
            "email": "daniel@techfire.io",
            "mobile": "728-555-0105",
            "website": "https://techfire.io/team/daniel"
        },
        {
            "name": "Emily Wang",
            "title": "Human Resources Lead",
            "email": "emily.wang@techfire.io",
            "mobile": "728-555-0106",
            "website": "https://techfire.io/team/emily"
        }
    ]
}
PDF Generation with REST API
To generate the PDF name cards using CraftMyPDF’s REST API, you can make a POST request to the API endpoint with the necessary parameters.
This can be done using Node.js, PHP, or Python. The API endpoint should include the template ID of the name card template you created, along with the JSON data containing the details of the name cards you want to generate. Once the request is sent, you will receive the generated PDF name cards as a response, which you can then save or display as needed.
Generate PDF Name cards with Node.js
Generating a name card using Node.js is quite easy and straightforward. All you need to do is to install the axios JavaScript library and create a new Node.js project. Here’s an example of how to generate PDF name cards using Node.js:
1. Install the axios module: The axios module is a popular JavaScript library used for making HTTP requests from both the browser and Node.js. It provides a simple and elegant API that works asynchronously, allowing you to send HTTP requests with various methods (GET, POST, PUT, DELETE, etc.) and configuration options (headers, parameters, timeout, etc.) to REST endpoints. To install this library, use the following command:
npm install axios2. Create a new JavaScript file: Create a new JavaScript file in your integrated development environment (IDE), save and name it ‘name-card.js’. Now, copy and paste the following code snippet to the file
const axios = require('axios');

const requestData = {
  data: {
    company_name: "techfire.io",
    name_cards: [
      {
        name: "Alex Johnson",
        title: "Chief Executive Officer",
        email: "alex@techfire.io",
        mobile: "728-555-0101",
        website: "https://techfire.io/team/alex"
      },
      {
        name: "Samantha Lee",
        title: "Chief Technology Officer",
        email: "samantha@techfire.io",
        mobile: "728-555-0102",
        website: "https://techfire.io/team/samantha"
      },
      {
        name: "Michael Brown",
        title: "Lead Developer",
        email: "michael@techinno.io",
        mobile: "728-555-0103",
        website: "https://techfire.io/team/michael"
      },
      {
        name: "Linda Smith",
        title: "Marketing Director",
        email: "linda.smith@techfire.io",
        mobile: "728-555-0104",
        website: "https://techfire.io/team/linda"
      },
      {
        name: "Daniel Garcia",
        title: "Sales Manager",
        email: "daniel@techfire.io",
        mobile: "728-555-0105",
        website: "https://techfire.io/team/daniel"
      },
      {
        name: "Emily Wang",
        title: "Human Resources Lead",
        email: "emily.wang@techfire.io",
        mobile: "728-555-0106",
        website: "https://techfire.io/team/emily"
      }
    ]
  },
  template_id: "template-id-from-manage-templates-page",
  export_type: "json",
  expiration: 6000,
  output_file: "output.pdf",
  is_cmyk: false,
  image_resample_res: 600
};

const headers = {
  'Content-Type': 'application/json',
  'X-API-KEY': 'api-key-from-api-integrations-page'
};

axios.post('https://api.craftmypdf.com/v1/create', requestData, { headers })
  .then(response => {
    console.log(response.data);
  })
  .catch(error => {
    console.error('Error:', error.message);
  });
Make sure to replace 'template_id' with the actual template ID of the name card template you created (this can be found on the Manage Templates page) and 'X-API-KEY' with the API key copied from the API Integration dashboard.
3. Run the code: Open your terminal or command line and run the code using the following command:
node name-card.jsThe generated PDF name cards will return a URL, which you can download or display as needed.
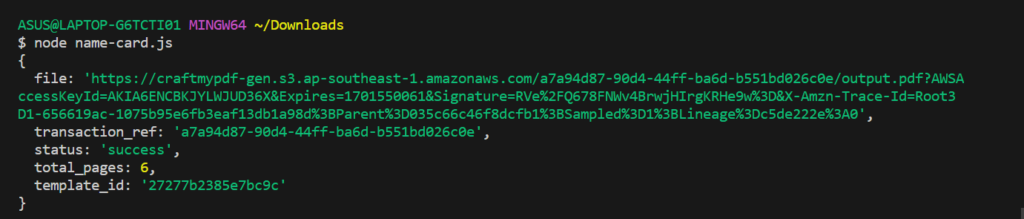
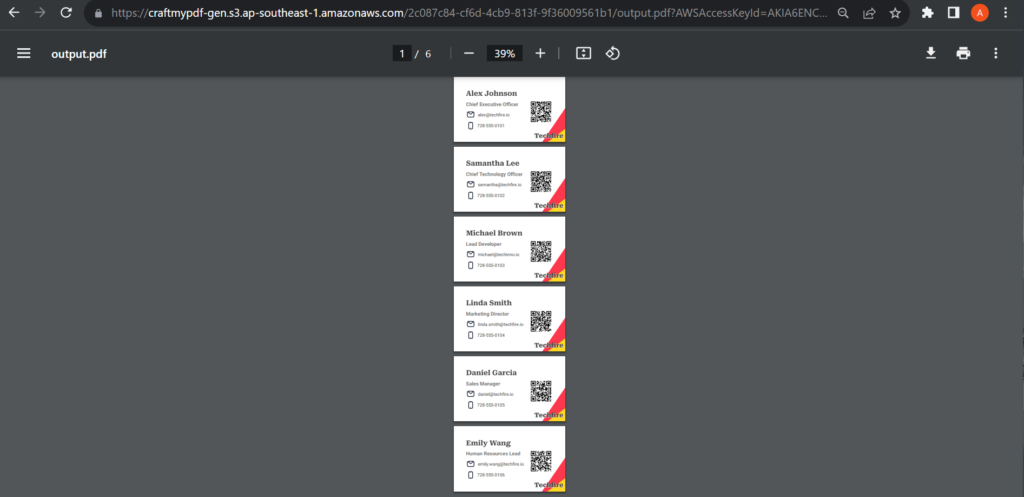
Copy and paste the URL on your browser to download the name-card PDF.
Generate PDF Name cards with PHP
To generate a PDF name card, you can make a POST request to the CraftMyPDF API endpoint using PHP. Here’s an example of how to generate PDF name cards with PHP:
- Create a PHP file: Create a PHP file in your IDE, save and name it test.php
- Add code: Copy and paste the following code snippet into your file
<?php
function main() {
    $api_key = "a4b8MTg3MzoxODczOnd2SEkwM1d3QUxnWUpwQ2o";
    $data = [
        'company_name' => 'techfire.io',
        'name_cards' => [
            [
                'name' => 'Alex Johnson',
                'title' => 'Chief Executive Officer',
                'email' => 'alex@techfire.io',
                'mobile' => '728-555-0101',
                'website' => '<https://techfire.io/team/alex>'
            ],
            [
                'name' => 'Samantha Lee',
                'title' => 'Chief Technology Officer',
                'email' => 'samantha@techfire.io',
                'mobile' => '728-555-0102',
                'website' => '<https://techfire.io/team/samantha>'
            ],
            [
                'name' => "Michael Brown",
                'title' => "Lead Developer",
                'email' =>"michael@techinno.io",
                'mobile' => "728-555-0103",
                'website' => "https://techfire.io/team/michael"
            ],
            [
                'name' => "Linda Smith",
                'title' => "Marketing Director",
                'email' => "linda.smith@techfire.io",
                'mobile' => "728-555-0104",
                'website' => "https://techfire.io/team/linda"
            ],
            [
                'name' => "Daniel Garcia",
                'title' => "Sales Manager",
                'email' => "daniel@techfire.io",
                'mobile' => "728-555-0105",
                'website' => "https://techfire.io/team/daniel"
            ],
            [
                'name' =>  "Emily Wang",
                'title' => "Human Resources Lead",
                'email' => "emily.wang@techfire.io",
                'mobile' => "728-555-0106",
                'website' => "https://techfire.io/team/emily"
            ]

        ]
    ]
      ;

    $json_payload = [
        "data" => json_encode($data),
        "output_file" => "output.pdf",
        "export_type" => "json",
        "expiration" => 100,
        "template_id" => "27277b2385e7bc9c"
    ];

    $url = "https://api.craftmypdf.com/v1/create";
    $headers = ["X-API-KEY: $api_key"];
    $ch = curl_init($url);
    curl_setopt($ch, CURLOPT_POST, true);
    curl_setopt($ch, CURLOPT_POSTFIELDS, json_encode($json_payload));
    curl_setopt($ch, CURLOPT_HTTPHEADER, $headers);
    curl_setopt($ch, CURLOPT_RETURNTRANSFER, true);
    $response = curl_exec($ch);
    curl_close($ch);

    echo $response;
}

main();
?>
Make sure to replace 'your-template-id' with the actual template ID of the name card template you created (this can be found on the Manage Templates page) and 'api-key-from-api-integrations-page' with the API key copied from the API Integration dashboard.
3. Save and run: Save the PHP file in your desired folder and run the PHP script on your localhost machine.\

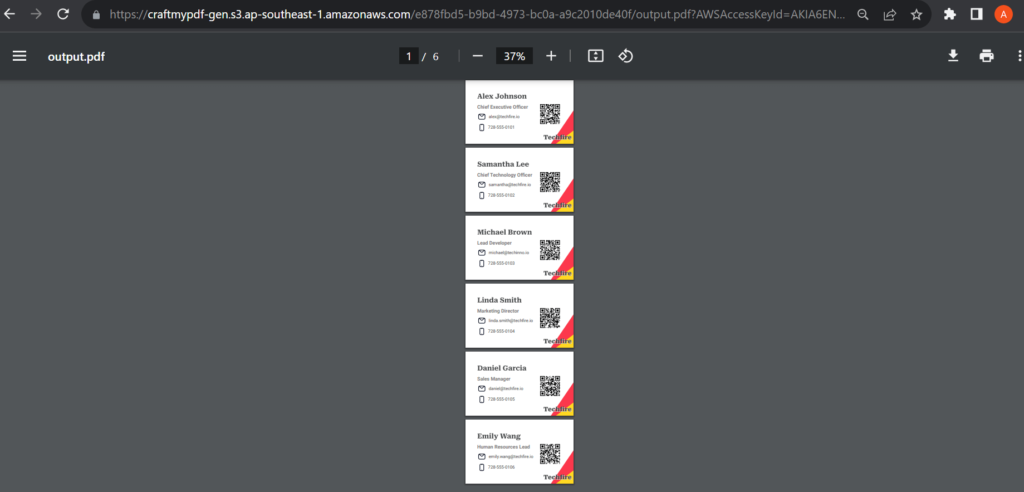
The generated PDF name cards will be returned as a response.
Generate PDF Name cards with Python
To generate PDF name cards with Python, you can use the requests library to make a POST request to the CraftMyPDF API endpoint. Here’s an example of how to generate PDF name cards using Python:
1. Install requests library: Install the requests library using the following command:
pip install requests2. Verify installation: To verify the installation, run the following command:
pip show requests3. Create new python file: Create a new python file called name-card.py, and copy the following code snippet into it.
import requests
import json

api_key = "your-api-key"
template_id = "your-template-id"

data = {
    "company_name": "techfire.io",
    "name_cards": [
        {
            "name": "Alex Johnson",
            "title": "Chief Executive Officer",
            "email": "alex@techfire.io",
            "mobile": "728-555-0101",
            "website": "<https://techfire.io/team/alex>"
        },
        {
            "name": "Samantha Lee",
            "title": "Chief Technology Officer",
            "email": "samantha@techfire.io",
            "mobile": "728-555-0102",
            "website": "<https://techfire.io/team/samantha>"
        },
        {
            "name": "Michael Brown",
            "title": "Lead Developer",
            "email": "michael@techinno.io",
            "mobile": "728-555-0103",
            "website": "<https://techfire.io/team/michael>"
        },
        {
            "name": "Linda Smith",
            "title": "Marketing Director",
            "email": "linda.smith@techfire.io",
            "mobile": "728-555-0104",
            "website": "<https://techfire.io/team/linda>"
        },
        {
            "name": "Daniel Garcia",
            "title": "Sales Manager",
            "email": "daniel@techfire.io",
            "mobile": "728-555-0105",
            "website": "<https://techfire.io/team/daniel>"
        },
        {
            "name": "Emily Wang",
            "title": "Human Resources Lead",
            "email": "emily.wang@techfire.io",
            "mobile": "728-555-0106",
            "website": "<https://techfire.io/team/emily>"
        }
    ]
}

payload = {
    "data": json.dumps(data),
    "template_id": template_id,
    "output_file": "output.pdf",
    "export_type": "json",
    "expiration": 6000,
}

headers = {
    "X-API-KEY": api_key,
    "Content-Type": "application/json",
}

url = 'https://api.craftmypdf.com/v1/create'

response = requests.post(url, json=payload, headers=headers)

if response.status_code == 200:
    print("PDF name cards generated successfully!", response.content)
else:
    print("Error generating PDF name cards:", response.text)
Make sure to replace 'your-api-key' with your actual API key and 'your-template-id' with the template ID of the name card template you created.
4. Save and run: Save and run the python file using the following command:
python name-card.py
The generated PDF name cards will be returned as a response.

If you’re working with Microsoft’s ecosystem, check out 5 ways to generate PDFs with C# to explore additional PDF generation methods and workflows.
Conclusion
Automating the creation of PDF name cards through Node.js, PHP, or Python offers a streamlined and time-saving solution. With CraftMyPDF’s tools, you can easily make and personalize name cards with your desired details.
Whether you’re a programmer or a business wanting to make name cards quickly, this method can help you do it easily and make the cards look perfect.
To discover more about how CraftMyPDF can transform your approach to creating professional and personalized name cards, we invite you to sign up at CraftMyPDF.