Today, developers and even non-developers employ strong tools to speed up their job. Documents in PDF format are necessary for work. They can be manually created, but why would you put yourself through that stress?
With the aid of some tools, you may easily manufacture almost everything you need to carry out complicated activities. You don’t even need to know how to code to use them, but even if you do know how to code, you don’t necessarily have to build from scratch.

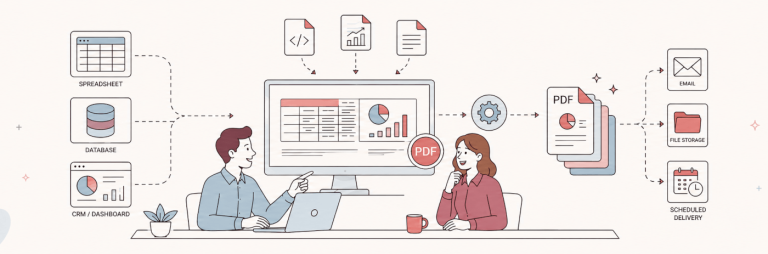
This is why products like Retool were developed. Retool is a low-code platform that is used by businesses to build applications faster, these applications include creating admin panels, dashboards, and even PDFs. Yes, you can create them with the help of mostly drag-and-drop tools available in Retool. If you need more control over your PDF layouts, a report designer can help you build reusable templates before connecting them to Retool. Although, you would most likely enjoy using Retool when you have basic knowledge of APIs, JavaScript, or databases. You may learn more about Retool at boldtech.dev: What is Retool and what is it good for?
The good news is that I would be showing you how to easily generate PDFs in Retool like ABC. So, let’s dive right in!
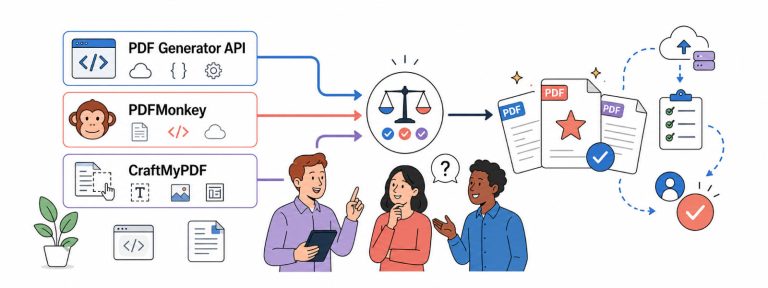
Why use CraftMyPDF for PDF Generation?
Taking advantage of external APIs is a great way to generate PDFs because they make life so much easier by providing pre-designed templates you can edit according to your needs.
If you’re building applications programmatically, you can also explore generating a PDF in C# using API-driven workflows.
CraftMyPDF offers a very sophisticated way of generating PDF documents, let’s look at some benefits this service provides:
- Cloud-based PDF generation: We provide cloud-based PDF generation API and Image generation API.
- A drag-and-drop template editor that makes it easy for you to create PDFs and images from reusable templates.
- CraftMyPDF supports JavaScript expressions similar to Retool and allows you to create dynamic PDFs and images with Javascript.
- Powerful expressions and formatting support for DateTime, currency, and custom formats.
- Regional API endpoints that are designed for clients in the same region.
Steps to Generate Dynamic PDFs with Retool
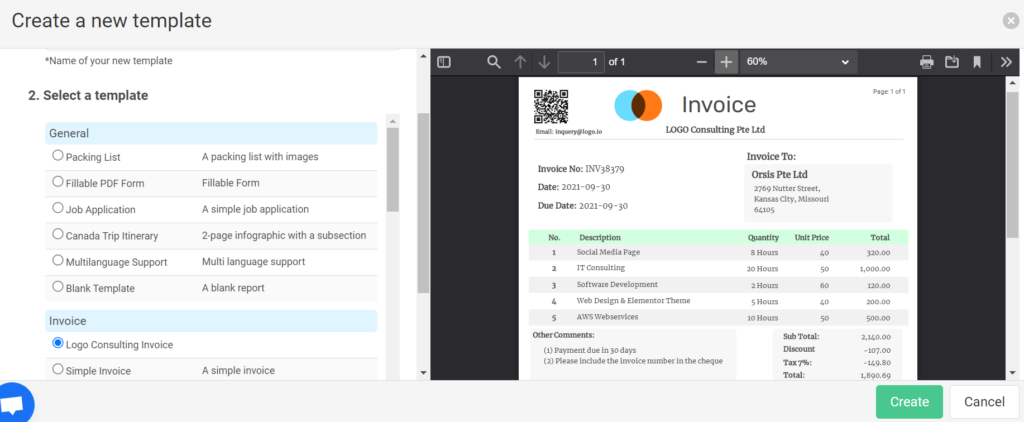
1. Register and create a new PDF template
The first step in this process is to register (if you haven’t), not to worry the registration is free and doesn’t require your credit card details.
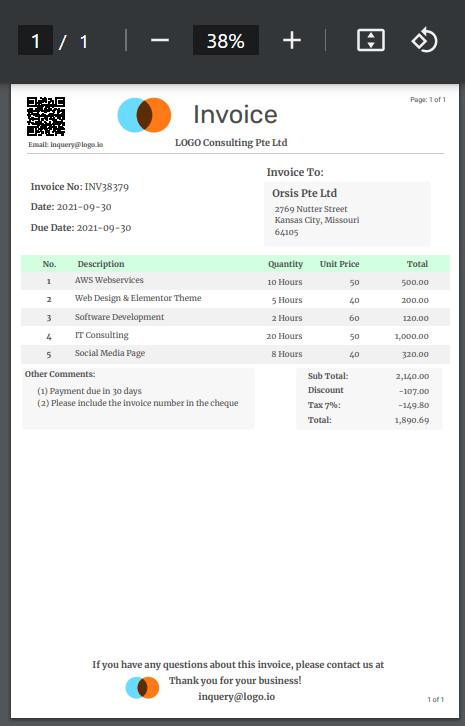
After registration, login, and you would be directed to your dashboard which contains your workspaces. On your toolbar, go to Manage Templates and then click on New PDF Template to create a new PDF template. In this example, I’d be creating a logo consulting invoice. Here’s what you need to do:
- Give your template a name, left mine as the default name (New Template)
- Select a template of your choice (I chose the logo consulting invoice)
- Click on the Create button to generate your PDF. After creating, you’d be referred back to your dashboard.
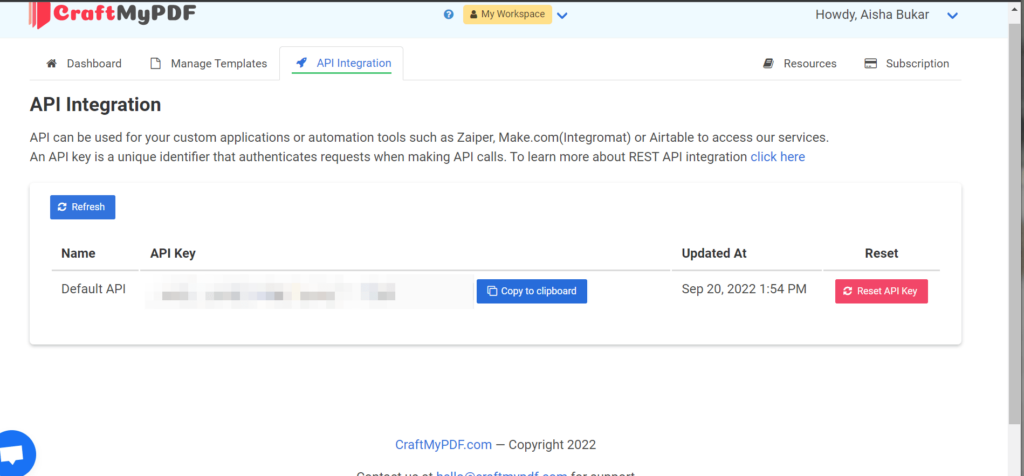
2. Get API Key from “API Integration”
Now, back to your dashboard, click on the API Integration toolbar and copy the default API key that has been generated for you. We would be using this API key to create a resource on Retool so make sure it’s copied on your clipboard.
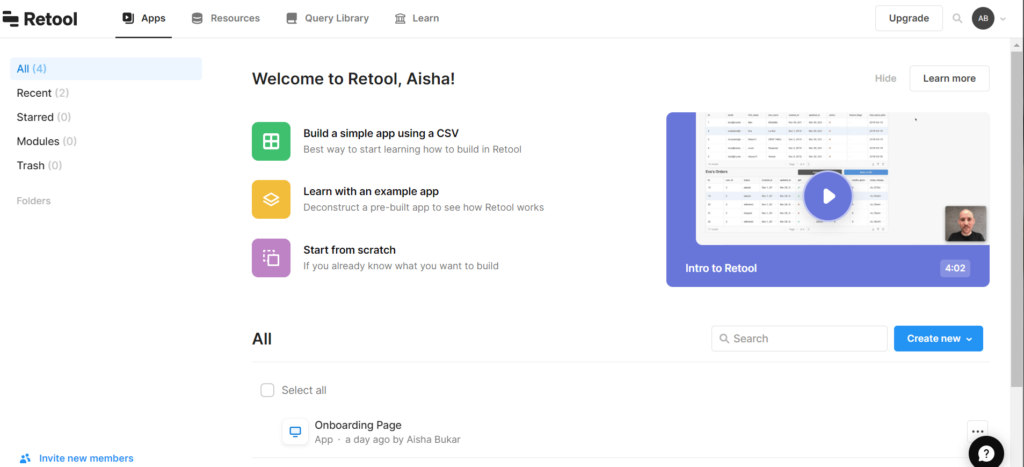
3. Create or sign in Retool
Go to retool.com, and create an account if you haven’t, if you have already, sign in to your retool account. You should see a page similar to the screenshot below
4. Create REST-API in resource
On your toolbar, click on Resources, you should see a button at the top-right called “Create new”, select it, and then resource. The next step is to choose a resource type from the list of available APIs. After choosing the REST API, you should be directed to a page where you configure the REST API. You would need to do the following:
- Choose a name for the resource (Ignore the folder root for now)
- Add a base URL for the API, mine is http://api.craftmypdf.com/v1
- Add a header name along with the API key copied from your CraftMyPDF dashboard, in my case the header name was X-API-KEY. If you’re wondering why we need this, a header essentially acts as an additional source of information for every API call you make. You can quickly identify problems with an API thanks to them.
- Click on create resource button. You should get a prompt saying you should create an app, ignore it for now and click go back to resources. You should get something similar to the screenshot below

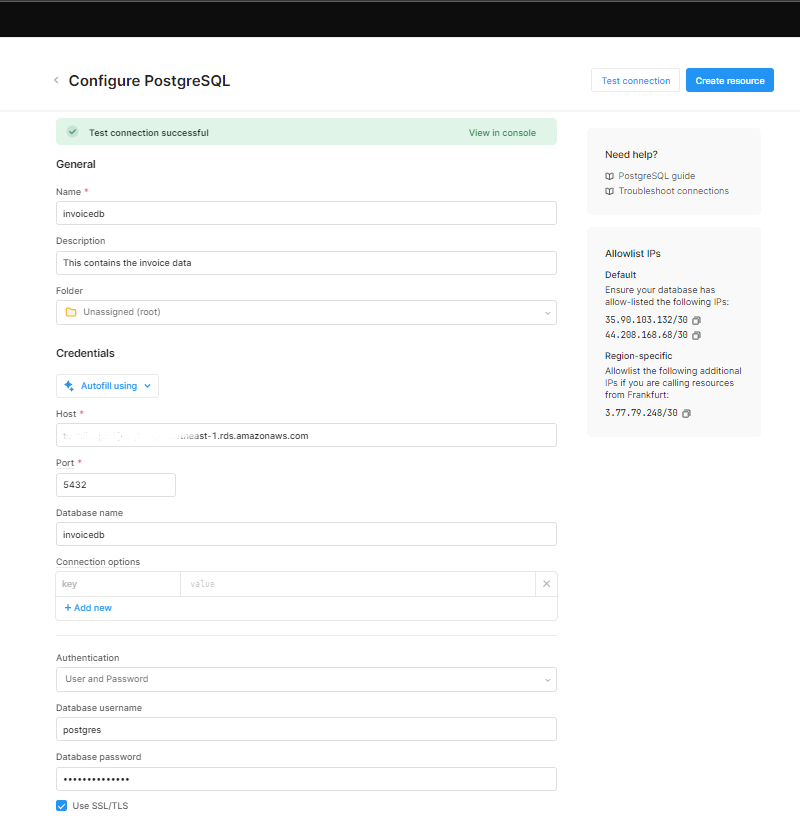
5. Create PostgreSQL in resource
On your toolbar click on Resources, you should see a button at the top-right called “Create new”, select it, and then resource. The next thing to do is to select a resource type from the database list, select the PostgreSQL database and you should be taken to a page where you configure the database. You would need to do the following:
- Name: Choose a name for your resource
- Add host: This must be a valid existing hostname
- Add your database name: This must be an existing database that has already been created alongside your valid host.
- Add authentication method: Choose the user and password authentication method.
- SSL/TLS: Enable SSL (Secure Socket Layer) and TLS (Transport Layer Security).
- Test connection: Test your connection to make sure everything works fine.
- Create resource: Click on the create resource button and go back to resources. Voila! You are getting there.
6. Create a new app
Go to your Apps dashboard on your toolbar. On the bottom right, locate and click on the Create button, choose App and add a name of your choice. This allows us to create an application interface where we can design our workflow. That’s it! You will be directed to your app’s dashboard.
7. Setup a query for invoice data
After creating your app, the next step is configuring it to handle the invoice data. Here’s what you need to do:
- Go to your app and click on the edit button in the top right corner.
- Locate the third button with a code symbol (</>) in the top left corner and click on it.
- Click the plus (+) sign to add a query, and then select “resource query” to include a resource in your app.
- Find the PostgreSQL database resource you named ‘invoicedb’ earlier and select it as your resource.
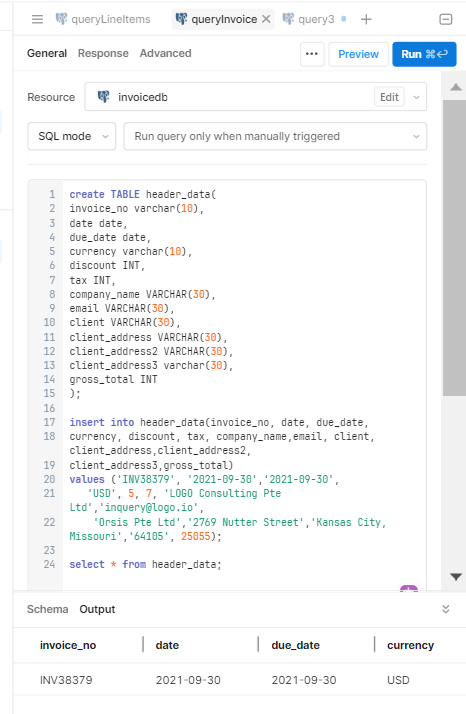
- Change the name of your query by clicking on the three dots (…) next to the query name in the top left corner. I renamed mine to ‘queryInvoice‘
- To create a table for your invoice data, copy and paste the provided SQL command into your query interface.
create TABLE header_data(
invoice_no varchar(10),
date date,
due_date date,
currency varchar(10),
discount INT,
tax INT,
company_name VARCHAR(30),
email VARCHAR(30),
client VARCHAR(30),
client_address VARCHAR(30),
client_address2 VARCHAR(30),
client_address3 varchar(30),
gross_total INT
);

insert into header_data(invoice_no, date, due_date,
currency, discount, tax, company_name,email, client, client_address,client_address2,
client_address3,gross_total)
values ('INV38379', '2021-09-30','2021-09-30',
   'USD', 5, 7, 'LOGO Consulting Pte Ltd','inquery@logo.io',
    'Orsis Pte Ltd','2769 Nutter Street','Kansas City, Missouri','64105', 25055);

select * from header_data;
7. Save and run to make sure everything works fine
8. Set up a table component for invoice data
After setting up the queries, the next step is to design the user interface of our app using the drag-and-drop components provided in our Retool editor. To begin, click on the Add (+) icon positioned in the top left corner of the app to reveal the available components in Retool. You can find all the components we need at the top right corner of the editor, such as tables, buttons, text inputs, PDF, and more. There’s no specific order for this, so let’s start creating our user interface.
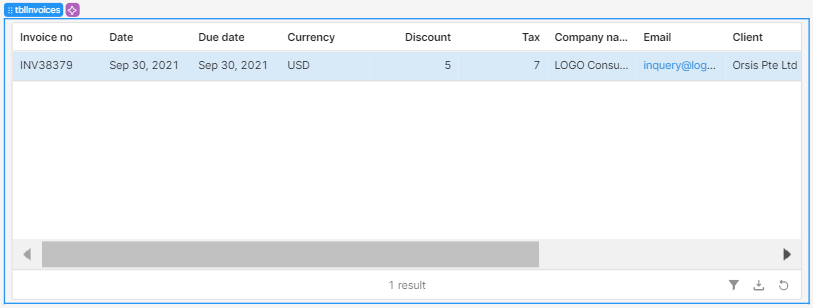
- On the top left corner of the app, drag a table component. This will automatically store the data from our query invoice.
- To rename the table, simply right-click on the table component and select the “rename” option. I chose to name mine “tblInvoices” for clarity and easy reference.
9. Setup a query for invoice line items
The next step is to access the list of items linked with the invoice number. Let’s create another PostgreSQL resource to do that
- In the top left corner, locate the third button with a code symbol (</>) and click on it.
- Click the plus (+) sign to add a query, and then select “resource query” to include a resource in your app.
- Find the PostgreSQL database resource you named ‘invoicedb’ earlier and select it as your resource.
- Change the name of your query by clicking on the three dots (…) next to the query name in the top left corner. I renamed mine to ‘queryLineItems‘
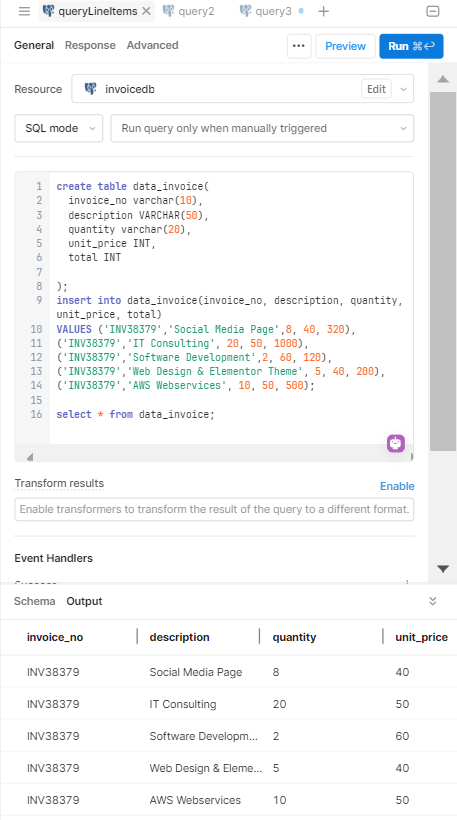
- To create a table for your invoice line items, copy and paste the provided SQL command into your query interface.
create table data_invoice(
  invoice_no varchar(10),
	description VARCHAR(50),
  quantity varchar(20),
  unit_price INT,
  total INT

);
insert into data_invoice(invoice_no, description, quantity, unit_price, total)
VALUES ('INV38379','Social Media Page',8, 40, 320),
('INV38379','IT Consulting', 20, 50, 1000),
('INV38379','Software Development',2, 60, 120),
('INV38379','Web Design & Elementor Theme', 5, 40, 200),
('INV38379','AWS Webservices', 10, 50, 500);

select * from data_invoice;
6. Run the command to make sure everything works fine. You should get something similar to the screenshot below
10. Setup table component for line items
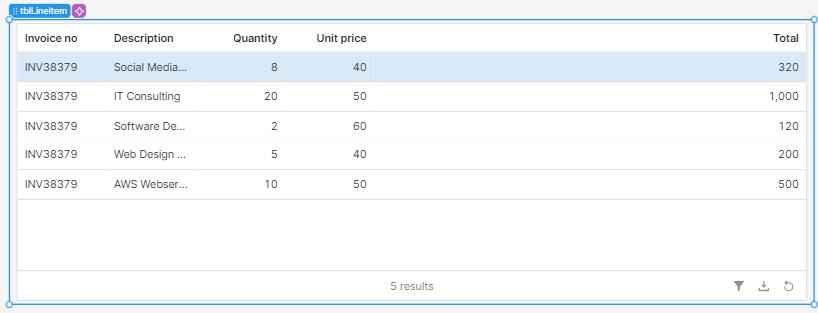
The next step is to create a table component to display the line items associated with the invoice number we are trying to fetch. Here’s what you need to do:
- In the top left corner of the app, drag a table component. This will automatically store the data from our queryLineItems.
- To rename the table, simply right-click on the table component and select the “rename” option. I chose to name mine “tblLineItem” for clarity.
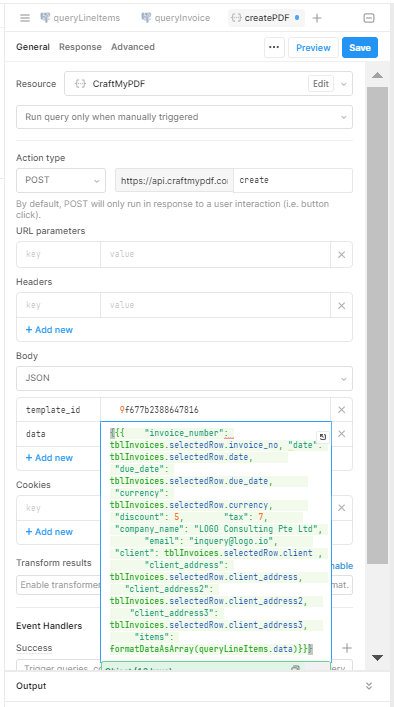
11. Create JSON and send API to CraftMyPDF
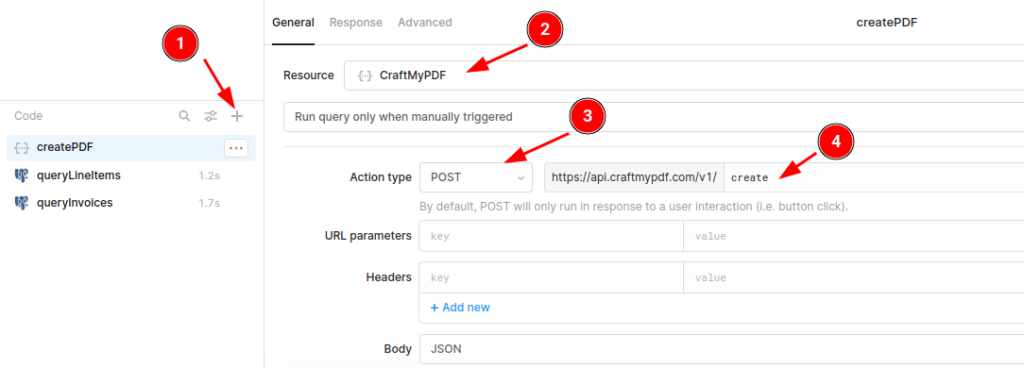
The next step is to set up your REST API. Here’s what you need to do:
Step 1: In the top left corner, locate the third button with a code symbol (</>) and click on it.
Step 2: Click the plus (+) sign to add a query, and then select “resource query” to include a resource in your app.
Step 3: Click on the Resource name and search for the name of the resource REST-API you created earlier which was (in my case) CraftMyPDF. You can also give your REST API a new name if you like, or you can choose to stick with the default name (changed mine to CreatePDF)
Step 4: Change the action type to POST
Step 5: Enter create in the URL, the complete URL is https://api.craftmypdf.com/v1/create
For more details on REST APIs in CraftMyPDF, please check at our API reference documentation.
If you’re looking for a complete overview of authentication, request payloads, templates, and supported features, the PDF generation API guide walks you through everything you need to start generating documents programmatically.
Next, in the Body select JSON. You need to pass two things:
(i) template_id field: The template ID of the PDF template which is located in the Manage Templates page on CraftMyPDF.
(ii) data field: The JSON data, you would need to manually write out the JSON in an external editor. The following is the JSON data
{{{    "invoice_number": tblInvoices.selectedRow.invoice_no,
       "date": tblInvoices.selectedRow.date,
       "due_date": tblInvoices.selectedRow.due_date,
       "currency": tblInvoices.selectedRow.currency,
       "discount": 5,
       "tax": 7,
       "company_name": "LOGO Consulting Pte Ltd",
       "email": "inquery@logo.io",
       "client": tblInvoices.selectedRow.client ,
       "client_address": tblInvoices.selectedRow.client_address,
       "client_address2": tblInvoices.selectedRow.client_address2,
       "client_address3": tblInvoices.selectedRow.client_address3,
       "items": formatDataAsArray(queryLineItems.data)}}}
We need to find a way to convert the data from the queries into an array of objects that we can access. Retool supports two data conversion methods which are formatDataAsArray and formatDataAsObject.
We would be using the formatDataAsArray, in this case, each key is a column name that points to an array of column values, that is we are going to display the data as an array of objects.
Notice how I passed in the table component tblInvoices that was created earlier in our Retool app by using the formatDataAsArray JSON format.
The following is the complete setup for passing data into our invoice.
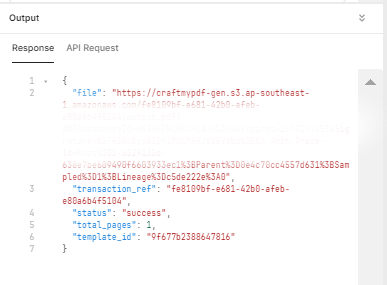
Step 6: Save and Run the command to make sure everything works fine. You should get a respone similar to the screenshot below.
12. Add a component to view generated PDF
On the top left corner of the app, search for the PDF component and drag it into your app. This allows us to view our invoices in the app. Add your file URL, which is the URL link to the PDF that was generated in the output response.

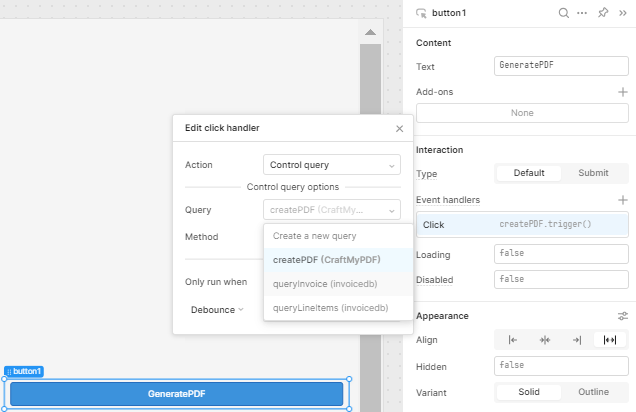
13. Create a button to generate PDFs
To make it easy to generate our PDF invoice, let’s add a button and set it up to run our query when clicked. Here’s how:
- In the top left corner of the app, find the button component and drag it into your app.
- Rename the button for clarity. I named mine “Generate PDF.”
- Go to the event handler, which you can find in the top right corner, and add the “createPDF (CraftMyPDF)” REST-API resource to make the button trigger the action.
14. Add a text for URL
Let’s add a text URL that would allow us to easily download the generated invoice PDF. Here’s how:
- In the top left corner of the app, find the text component and drag it into your app.
- Rename the text component for clarity. I named mine “Download”.
- Swap out the current text URL with the generated PDF invoice URL that you got from the REST API.
- Test to make sure it works.
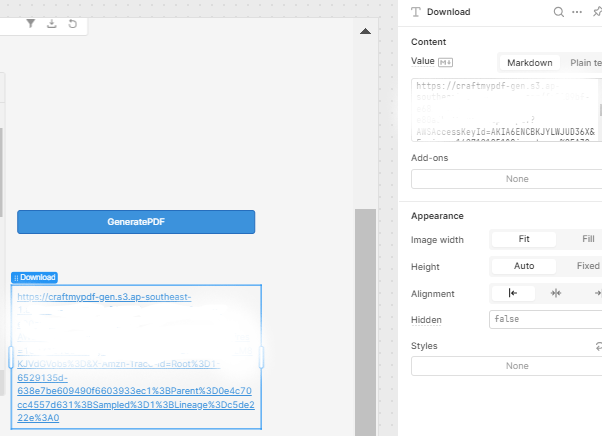
The PDF invoice that was generated in your CraftMyPDF template should be available for download.
Conclusion
Creating PDF documents using Retool and CraftMyPDF is an easy and flexible process. This guide offers a step-by-step explanation to assist you in making and personalizing PDF templates.
Whew! I know that was a lot to process, take your time to understand each process. Once it clicks, life becomes easier. Thank you for reading!