I normally would have started out with the definition of chatGPT, but I thought it was befitting for it (chatGPT) to answer a few questions about itself. So, let’s see what it says:
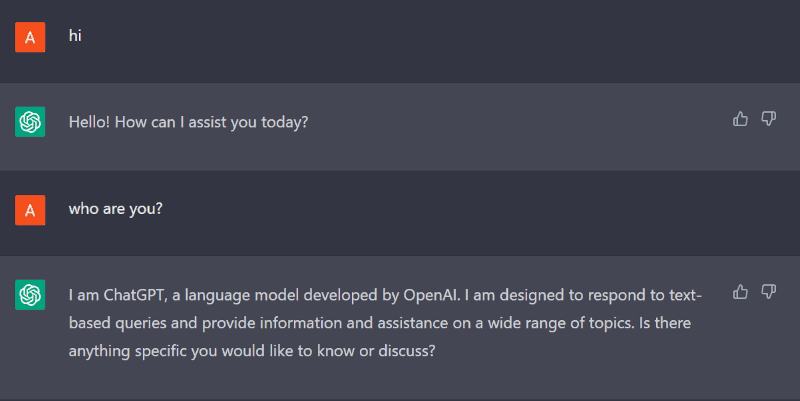
But what is a language model? A language model analyzes text data and predicts the answers based on previous conversations. The language model learns from its users.
This is how chatGPT works. It converses with the user through textual input, learns what you want, then gathers data from different sources thereby predicting the answer to your question.
In this article, I will be discussing some of the use cases and steps to automate social media posts using chatGPT. Grab a cup of tea and stick with me.
What are the applications of chatGPT?
ChatGPT can help you with a variety of use cases, but some of the most popular ones are as follows:
1. Personal Recommendation Systems: ChatGPT was designed in such a way that it learns from users. It can be used to provide personal recommendations based on your preference. Here’s a slight example of how it can do this.
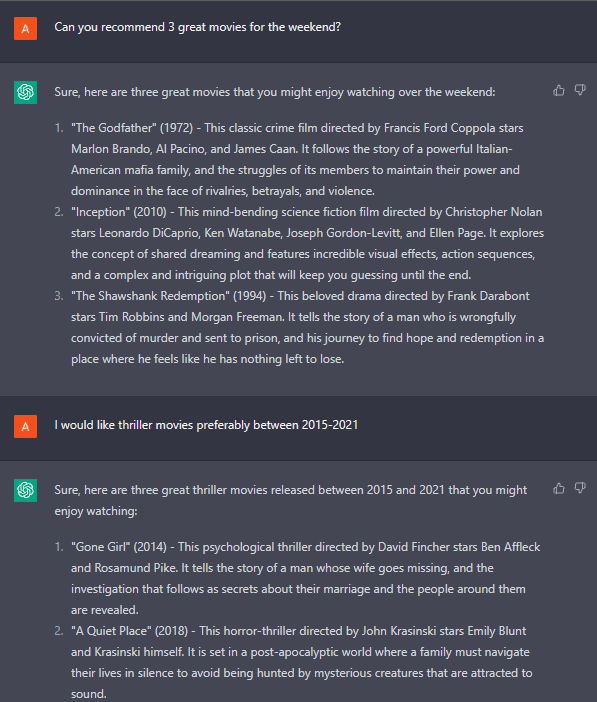
It did a pretty good job of providing some great thriller movie recommendations for the weekend. However, there was a slight issue where one of the recommended movies was from 2014, despite the request for movies between 2015 and 2021. Nonetheless, this shows how ChatGPT is able to provide personalized recommendations tailored to individual preferences.
2. Generating social media content: One great thing I love about chatGPT is that it could help you generate social media content for your businesses or personal use in case you are running out of ideas. It could even go as far as curating an outline or a step-by-step process on the content and how it should be structured. You could even make it sound exactly the way you want it to. For example, let’s say you are trying to generate social media content for teenagers, it could give you ideas and responses that sound like things a teenager would be interested in or find cool. You can get an idea from GPT Image 2 but always run it through an AI detector to ensure your content feels authentic and truly resonates with your audience. If you’re repurposing this AI-generated content for your website or blog, it’s worth reviewing it with an on page seo checker to ensure elements like headings, keyword placement, meta tags, and internal linking are properly optimized for search engines.
3. Writing professional emails: ChatGPT can assist you in writing professional emails. All you need to do is feed it with ideas and help it learn what you want to achieve and it could generate your desired result. Better still it could help you review them in case you do not have anyone to help review your message. Let’s take a look at how you can do this
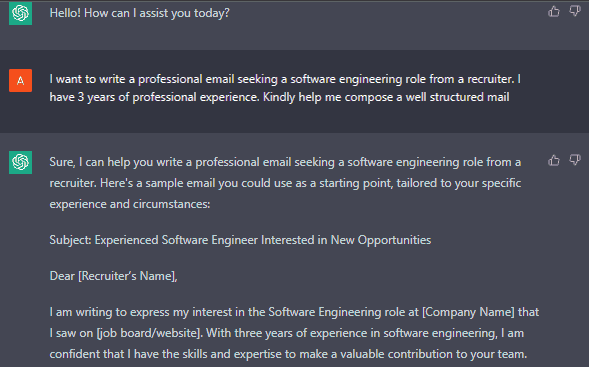
Here, it helped me generate a comprehensive email, all I needed to do was feed it some details and it did the work for me. Cool right?
4. Virtual Assistants: ChatGPT can help you with all of the things a virtual assistant can do such as tracking unattended emails, sending out reminders, answering questions, or giving you advice on how to effectively use your time, make travel reservations, and more. Although, it has its limitations such as – A real virtual assistant can help with answering phone calls or creating presentation slides, chatGPT can’t. Generally, it is great and can help you fast-track your work.
5. Customer Service Chatbots: You can use chatGPT to create conversation AI chatbots. This can handle customer queries, provide support and services, and interact with users by collecting information from its own interactions through textual inputs.
6. Language translation: You can use chatGPT to translate a source language by taking in input and converting it to its target language by generating an output. ChatGPT can help you do this, here’s an example
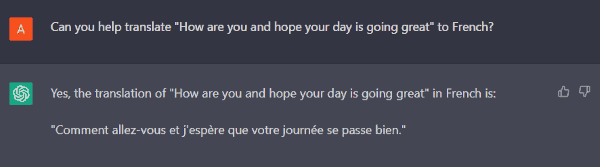
It translated the following English language to the French language. I was surprised by how seamless the process was.
7. Handling queries: ChatGPT is effective in handling queries or questions by gathering data from different sources and combining it into a single output. Although there are limitations when handling queries as it has limited information about events after 2021
8. Hashtags and Captions: It can help you generate relevant hashtags that can be used to drive engagement to your posts, thereby increasing the visibility and awareness of your brand. It can also help you generate captions that are catchy to your audience.
9. Sentiment Analysis: ChatGPT can be used to analyze the meaning of texts thereby performing sentiment analysis. It does this by extracting useful meanings from the text and helps the user understand key information from the input.
10. Generate quotes: It can help you generate different quotes according to what you prefer, it may be movie quotes, funny quotes, tech-related quotes, marketing quotes, and many more. Let’s try out some of these use cases
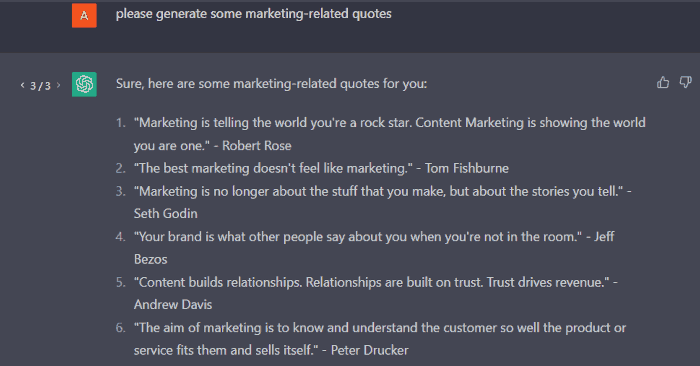
It helped generate some really cool marketing quotes that you could add to your social media posts.
Step 1: Generate social media content from chatGPT
We would be using chatGPT to generate content for our social media posts by feeding it data, then it generates the output we want. Here’s an example on how this is done:
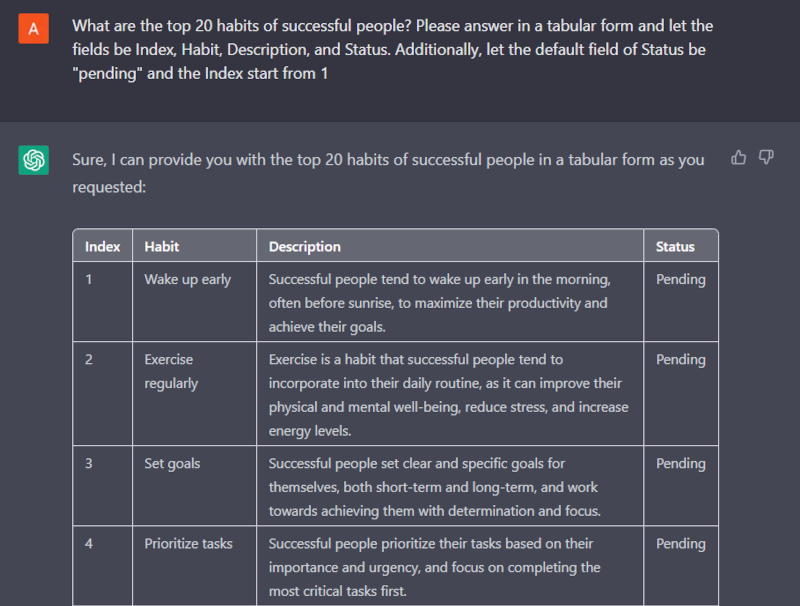
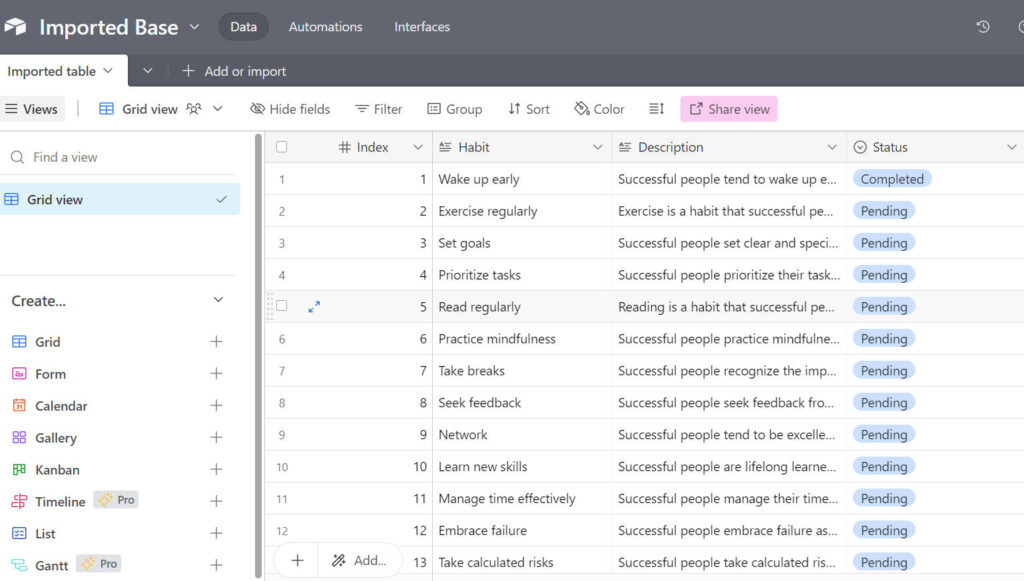
It generated 20 habits of successful people in a tabular form and customized the fields to be Index (starting from 1), Habit, Description, and Status and set it’s default field to “pending” just as we requested.
Step 2: Paste the content into Airtable
Airtable is a low-code database solution that allows you to create relationships between two or more tables. It interacts perfectly with other applications, hence why it is my database choice. Here’s what you need to do to get started:
- Go to Airtable and create an account
- After logging in, choose “Add a base” to create and add your Airtable fields. You can choose to rename your Airtable base from the default name (Untitled Base). I renamed mine to “Imported Base”.
- Copy the content from chatGPT
- On your Airtable base, go to “Add or Import” on the top left corner then search for paste table data, you should get something similar to the screenshot below.
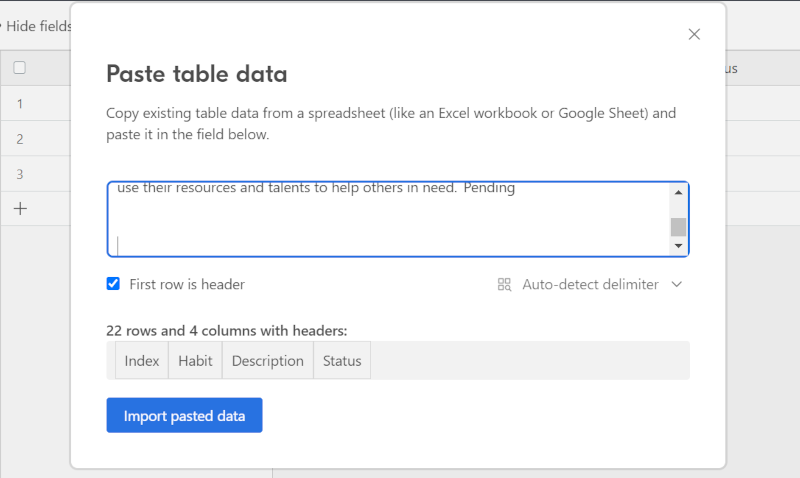
Paste the data into your Airtable and “Import Pasted Data”. Easy right?
Step 3: Design a template
CraftMyPDF can be used to create well-structured PDF and image templates. You can create everything related to design including social media content. We would be using CraftMyPDF to design our template. Here’s what we need to do:
- Sign in/Register an account: If you have a registered CraftMyPDF account, then you can skip this step, but if you don’t, go to craftmypdf.com and click on Sign Up at the top of the page, follow the necessary details required to create your account.
- Go to “Manage Templates”: After your registration is complete, you would be automatically directed to your dashboard. Go to Manage Templates which is located at the top of the page, on your “Manage Templates” page, select New Image Template.
- Click on “New Image template”: After selecting “New Image”, you would be directed to a “Create a new template” page. You can decide to choose whatever template suits you best with the possibility of modifying it as you wish. I would be choosing the “Happy birthday” template and tweaking the content a bit.
Step 4: Use Zapier
We’d be using Zapier to automate our template, here’s what we need to do:
1 Signup or create an account on Zapier: If you already have a Zapier account, then skip this step, but if you don’t, go to zapier.com and click on Sign Up at the top of the page, follow the instructions to create your account.
2 Create “Zap”: Click on the create “Zap” button at the top left of the page. You can change the Zap’s name from its default, “Untitled Zap,” to anything you want.
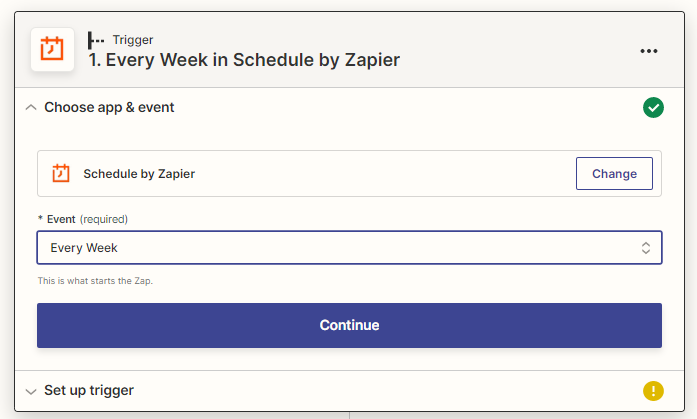
3. Schedule the Zap: We would be creating a trigger to schedule our social media posts so we can post an image once a week on our social media application (Facebook).
i. Choose an app: Type and choose “Schedule by Zapier” as your app.
ii. Choose an event: In this case, we would be choosing “Every week” as our event. You can decide to choose something else, let’s say every day or every hour, it all depends on your preference.
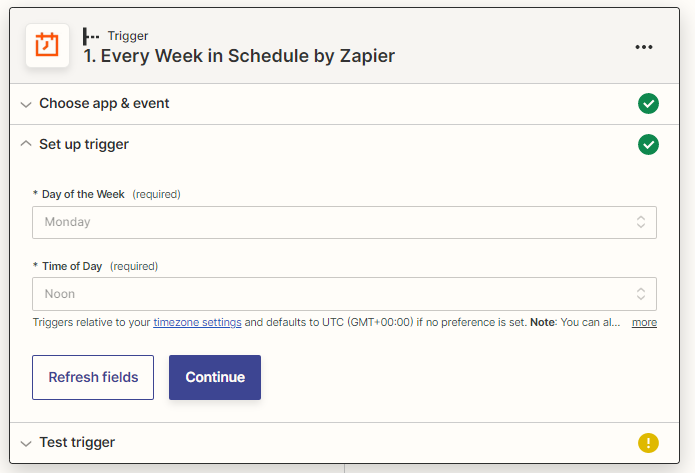
iii. Set up trigger: To set up our trigger, here are the few things we need to do:
- Day of the week: Select a day in the week you would like to post the image on your social media account
- Time of Day: Select your preferred time. Click on “continue” to test the trigger
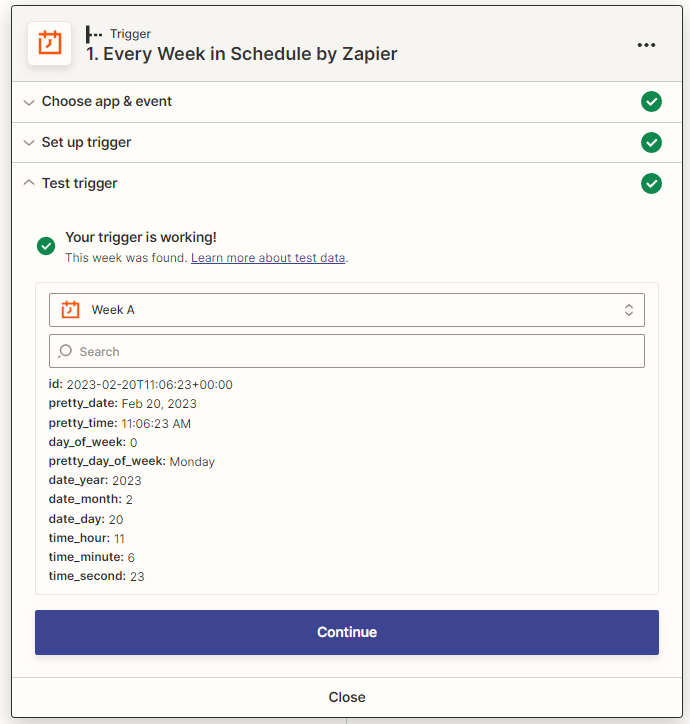
iv. Test Trigger: You should get an output that is similar to the screenshot below
4. Find Record: We would need to “Add a new action” to find a new record in our Airtable where the status of our post is “pending”. Here’s what you need to do:
i. Choose an app: Type and choose “Airtable” as your app.
ii. Choose an event: Type and choose “Find Record” as your event. Click on “Continue”.
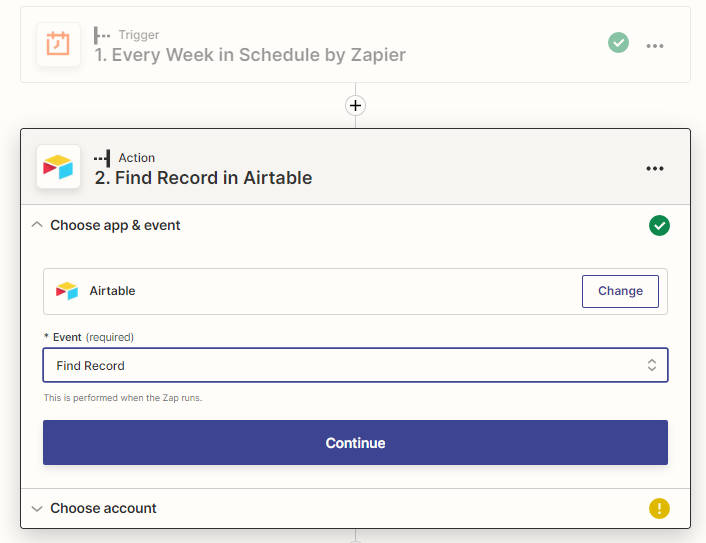
iii. Choose account: Choose your Airtable account and click on continue.

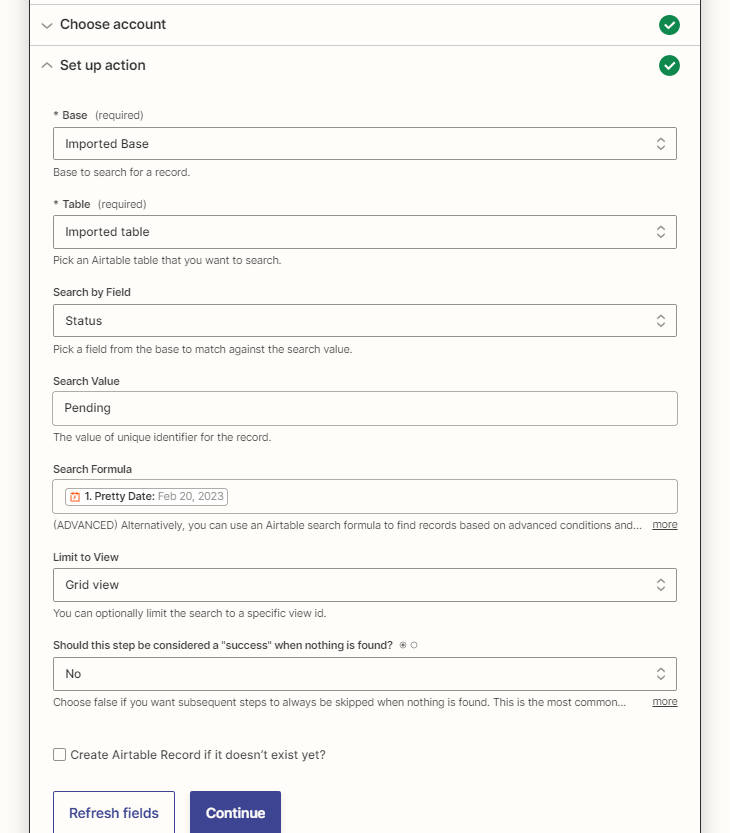
iv. Set up action: We would need to connect a few things:
- Base: Choose the Airtable base containing the record you wish to update, remember my Airtable base was renamed to “Imported base”
- Table: Choose the Airtable table containing the record you wish to update
- Search by Field: We would need to get the first record from Airtable where status=Pending, so we would be choosing “Status”
- Search Value: Type “Pending” as your search value
- Search formula: Choose your preferred search formula. I chose the Date
- Limit to view: Choose “Grid view”. Click on “Continue”.
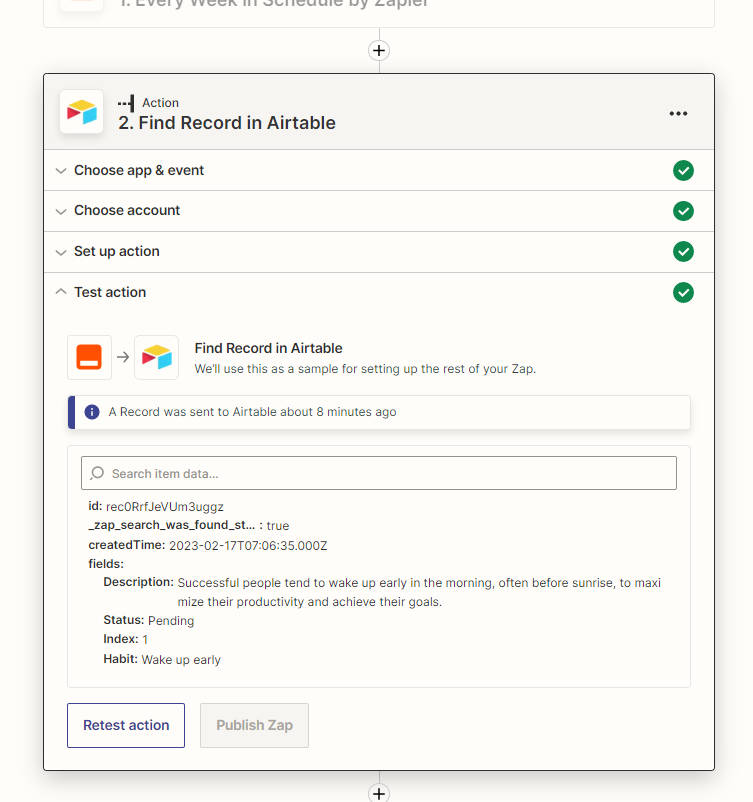
v. Test action: You should get a message saying your record was sent to Airtable.
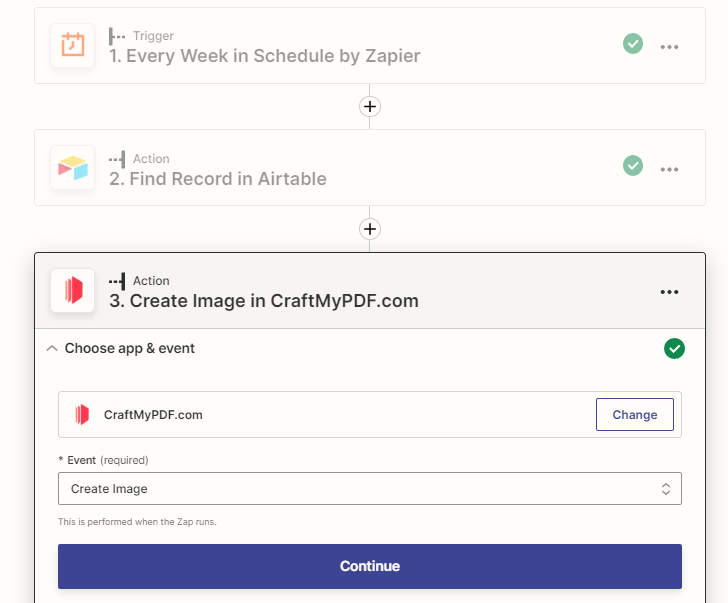
Step 5: Create an Image with CraftMyPDF
We need to “Add a new action” to create an image using CraftMyPDF. Here are the few steps you need to take:
- i. Choose an app: Type and choose “CraftMyPDF” as your app.
- ii. Choose an event: Type and choose “Create Image” as your event. Click on “Continue”.
- iii. Choose account: Choose your CraftMyPDF account and click on continue.
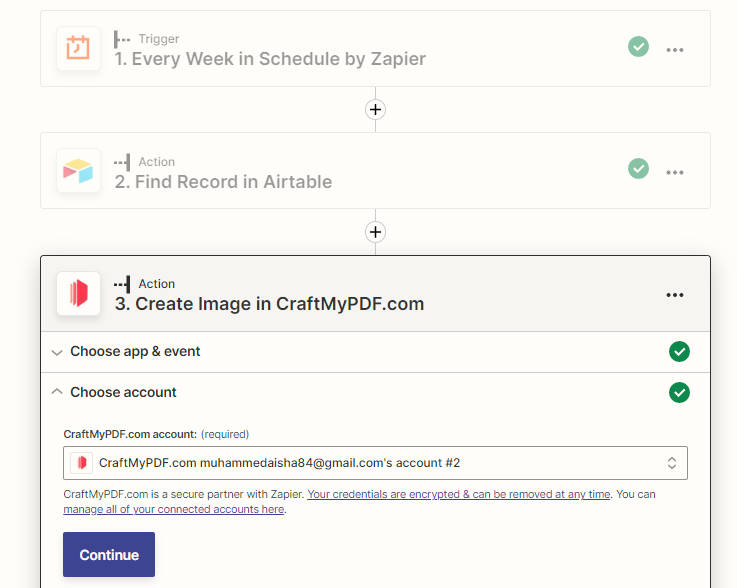
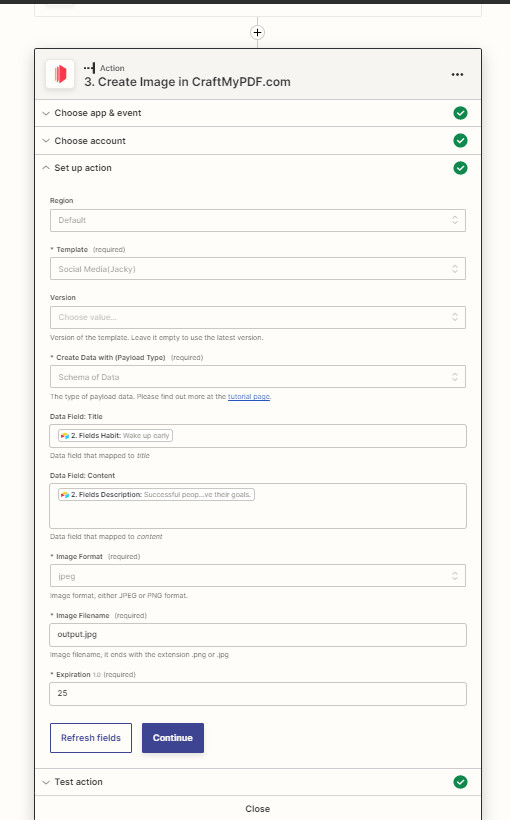
iv. Set up action: We would need to connect a few things:
- Region: Choose your preferred region, I used the default region.
- Template: Select the template we created earlier on CraftMyPDF
- Create Data with (Payload type): Select “Schema of data” as your payload type. This is because this payload type handles nested objects and arrays.
- Data Field: We’d be selecting our Airtable data for our data fields.
- Expiration: The default expiration time is 5 minutes, however, we can increase the expiration time. I increased mine to 1440 minutes, this is so that the image doesn’t expire before we post it. Click on “Continue”
- Test Action: Click on “Test Action”. You should get a result similar to the screenshot below.
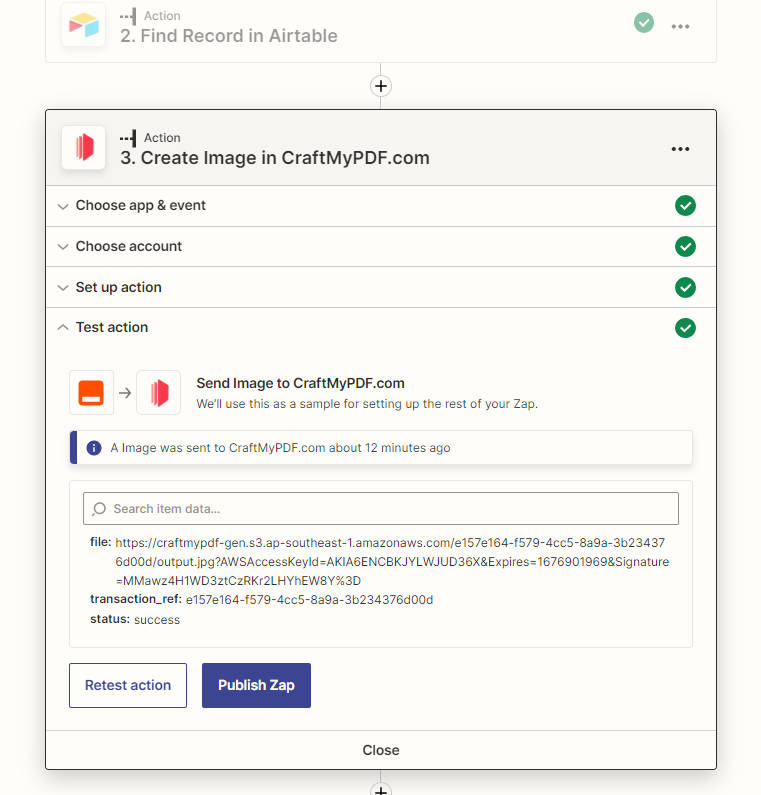
Copy the file link and paste it into your browser to download your Image.
Step 6: Post the image on Facebook
We need to automate the post on Facebook using Zapier. Here’s what you need to do:
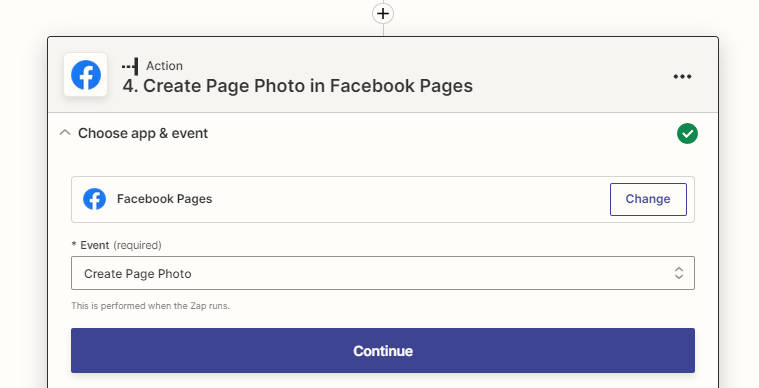
i. Choose an app: Type and choose “Facebook Pages” as your app.
ii. Choose an event: Type and choose “Create Page Photo” as your event. Click on “Continue”.
iii. Choose account: Link your Facebook account to Zapier following the default steps. Click on “Continue”.
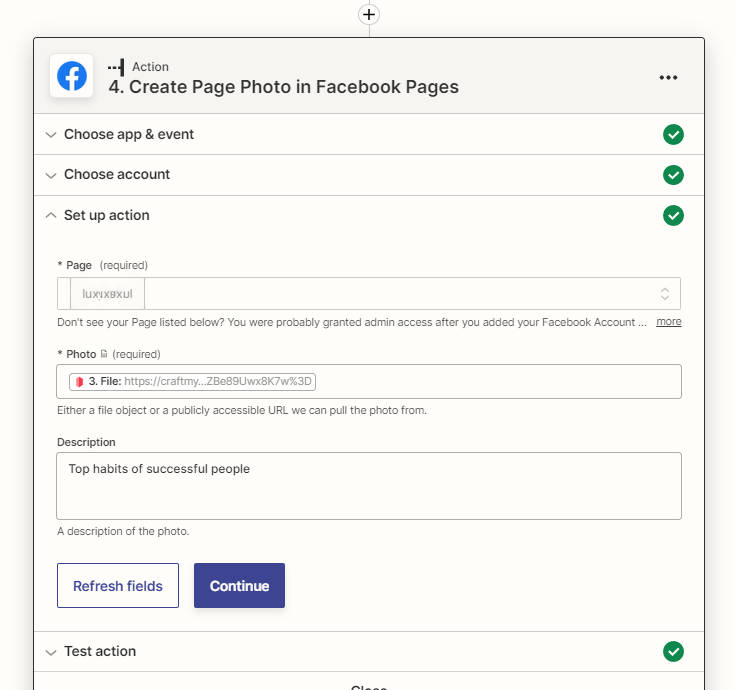
iv. Set up action: We would need to connect a few things:
- Page: Choose the Facebook page you’d like to post the image on.
- Photo: Choose the CraftMyPDF image file.
- Description: Add your preferred description. Click on “Continue”.
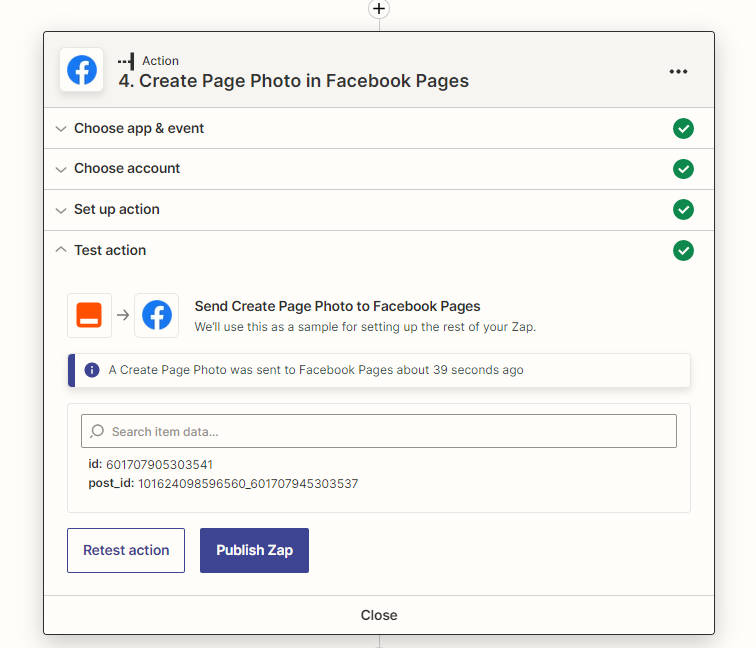
v. Test Action: Click on “Test Action”. You should get a result similar to the screenshot below.
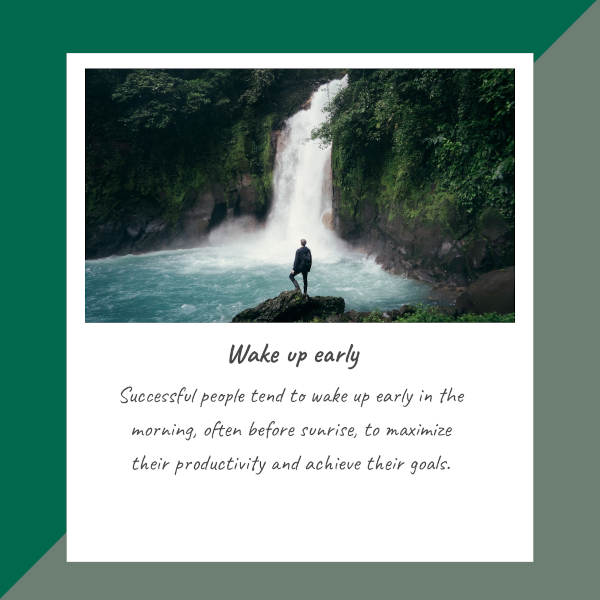
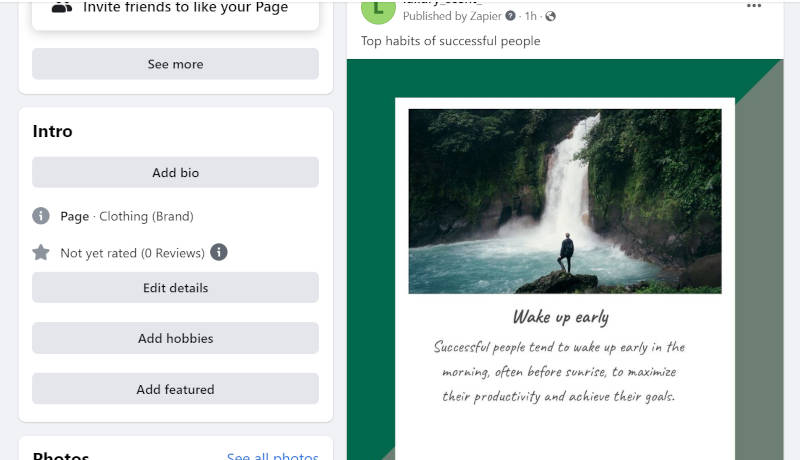
You can go to your Facebook page to verify that the image actually posted. Here’s what mine looked like
Step 7: Update the Airtable status
We would need to “Add a new action” to update the status record in our Airtable to “completed”. Here’s what you need to do:
i. Choose an app: Type and choose “Airtable” as your app.
ii. Choose an event: Type and choose “Update Record” as your event. Click on “Continue”.
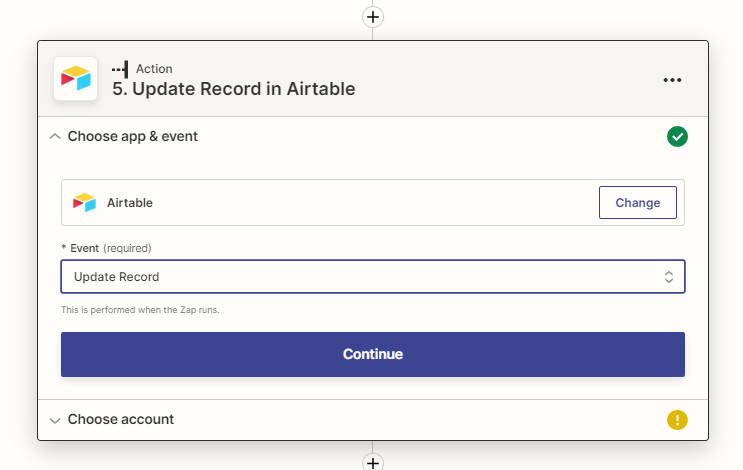
iii. Choose account: Choose your Airtable account and click on continue.
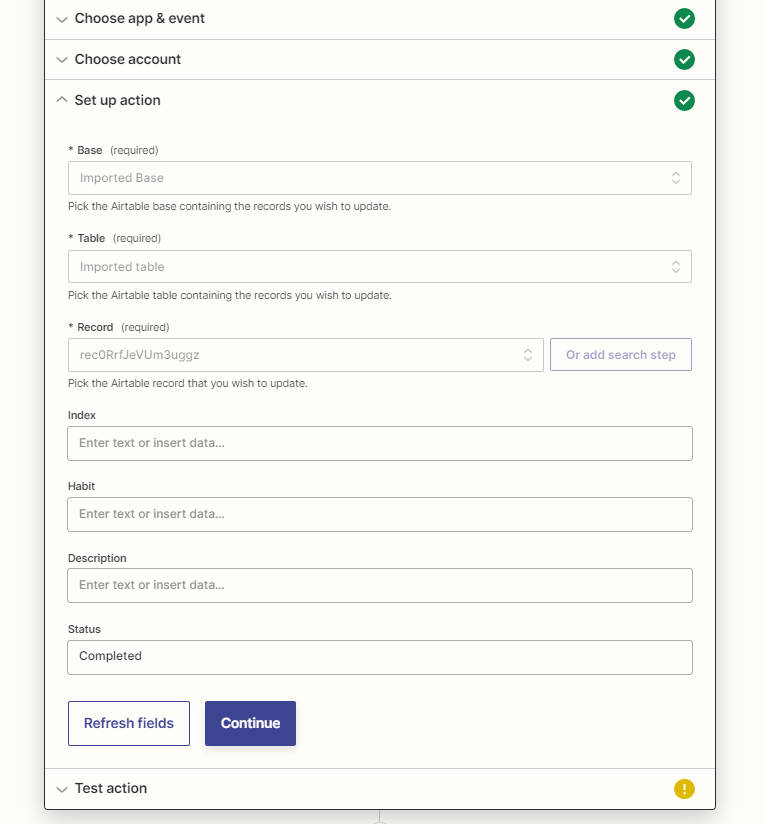
iv. Set up action: We would need to connect a few things:
- Base: Choose your Airtable base containing the record you wish to update(my Airtable base was renamed to “Imported base”)
- Table: Choose the Airtable table containing the record you wish to update.
- Record: Choose the Airtable record containing the record you wish to update. If you are not sure of the name of the Airtable record, you can check the “Find record” test action fields.
- Status: Type “Completed” as your new status value. Click on “Continue”.
v. Test action: You should get a message that shows the Status of the record has been changed to “Completed”.
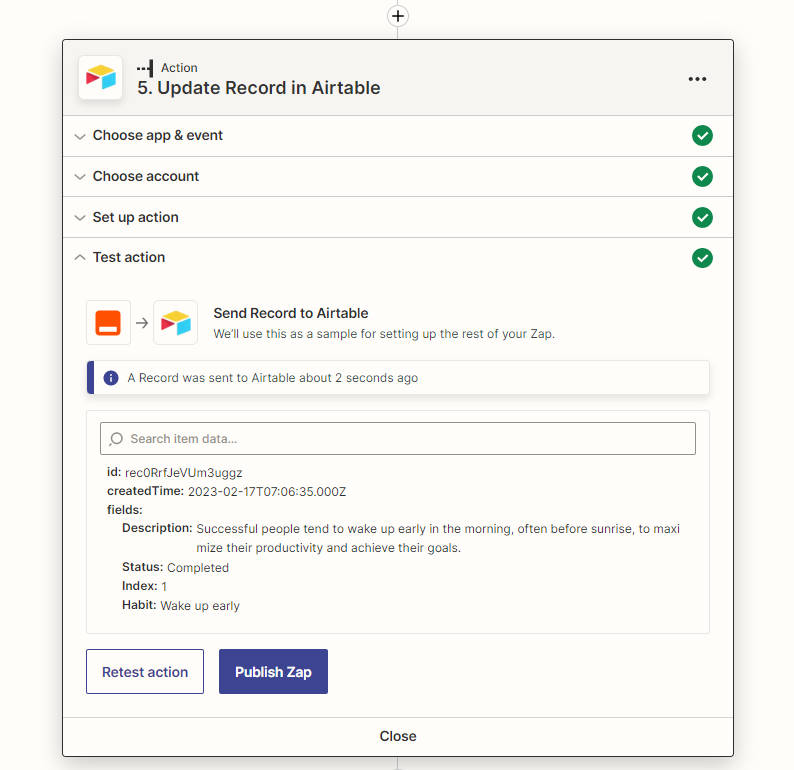
You can check your Airtable base to confirm that the record’s status changed to completed.
Conclusion
ChatGPT can be applied in cases beyond the ones listed in this article which we focused solely on generating social media content. You probably had no idea we could do that using ChatGPT.