In the ever-evolving world of digital magic, where pixels meet productivity, two wondrous tools have taken the stage: CraftMyPDF and UIBakery. Whether you’re a seasoned tech wizard or a curious newcomer to the digital realm, these two powerhouses are here to sprinkle a touch of magic on your PDFs, internal tools, and apps, making the once-daunting tasks feel like a breeze, saving hours of development time.
These low-code dynamic duos are here to rescue you from the clutches of mundane tasks and elevate your digital game to a whole new level of awesomeness!
Now, let’s delve into how you can harness these tools for your projects. In this article, we will guide you through the process of creating PDF documents in UIBakery using CraftMyPDF.
Why use CraftMyPDF?
If you’re looking for a secret weapon to create stunning, customized documents quickly, CraftMyPDF is the ultimate PDF generator. CraftMyPDF offers:
- Simple integration with no-code or low-code platforms: CraftMyPDF integrates seamlessly with platforms like Zapier, Make.com, Bubble, Coda.io, Airtable and REST API.
- Drag-and-drop template editor: With a user-friendly interface, you can easily customize and create PDF reports with just a few clicks.
- Support for formats and expressions: The service supports expressions with built-in functions, allowing for customizations of DateTime, currency, and various other formats.
- Regional API endpoints: CraftMyPDF allows you to generate PDF documents in a region close to you, with supported regions including the EU (Germany), Australia, Asia (Singapore), and the US. Discover more about our regional API endpoints.
- Support for JavaScript expressions: This feature offers powerful customization options using JavaScript for complex expressions.
- Cloud-based PDF generation API and Image generation API: In addition to PDF generation, CraftMyPDF also supports an image generation API.
If you’re seeking a hassle-free solution to swiftly create polished PDFs for your admin dashboard, internal applications, and more, without prior coding experiences, look no further!
Guidelines for Generating Dynamic PDFs using UIBakery
The first three steps require you to perform simple actions on CraftMyPDF, and the remaining steps will be on UIBakery.
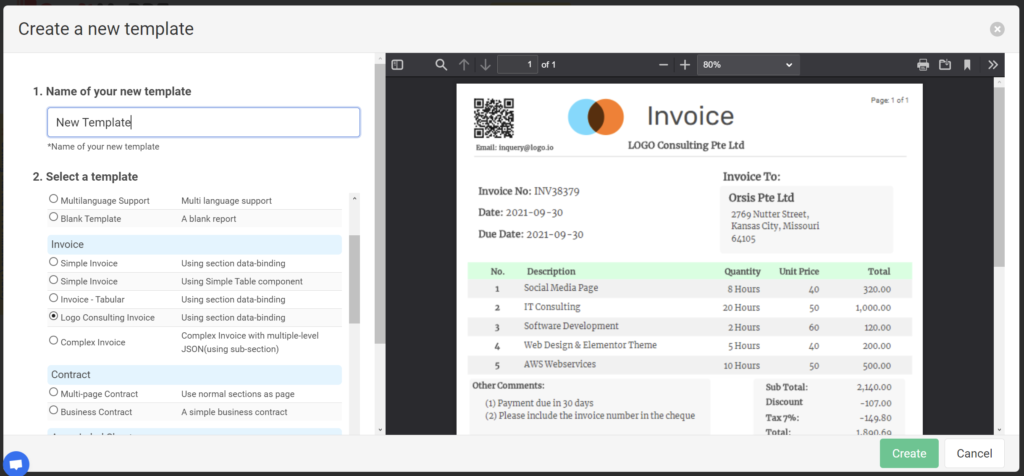
1. Login and create a new PDF template
To kickstart the process, login to CraftMyPDF (or sign up here if you haven’t, it’s free!). When that is done, you will have access to your personalized dashboard, where you can see all your workspaces. Navigate to the ‘Manage Templates’ option on your toolbar and select ‘New PDF Template’ to initiate the creation of a fresh PDF template. In this walkthrough, we’ll craft a logo consulting invoice. Follow these simple steps:
- Name: Assign a name to your template. In this case, the default name ”New Template” suffices
- Template Selection: Choose a preferred template from the available options (I opted for the logo consulting invoice)
- Create: Click the ‘Create’ button to generate your PDF. Upon successful creation, you will be redirected back to your dashboard
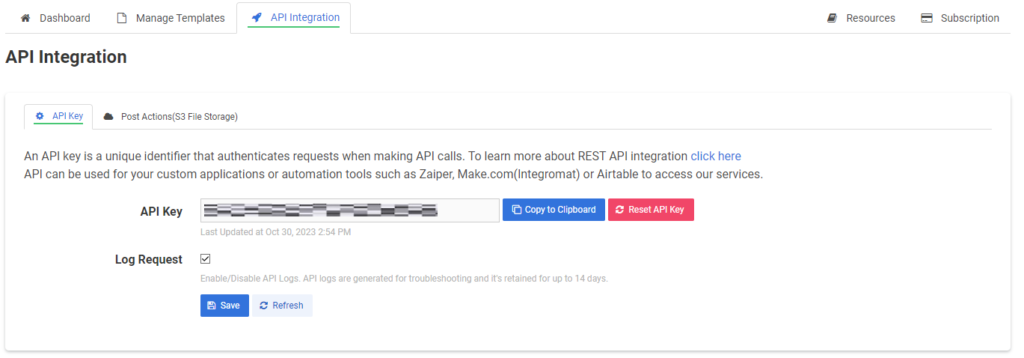
2. Get API Key
Now, back to your dashboard, click on the ‘API Integration’ option on the toolbar, and copy the default API key that has been generated for you by clicking on ‘Copy to Clipboard’. We will need this later on
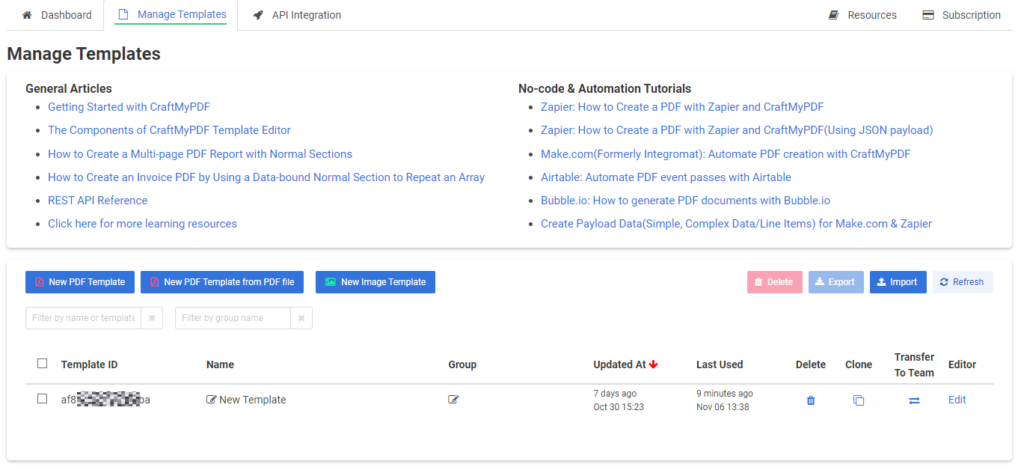
3. Get PDF template ID
Now, back to your dashboard, click on the ‘Manage Templates’ option on the toolbar, and copy the template ID that has been generated for you. We will need this later when we send an API request
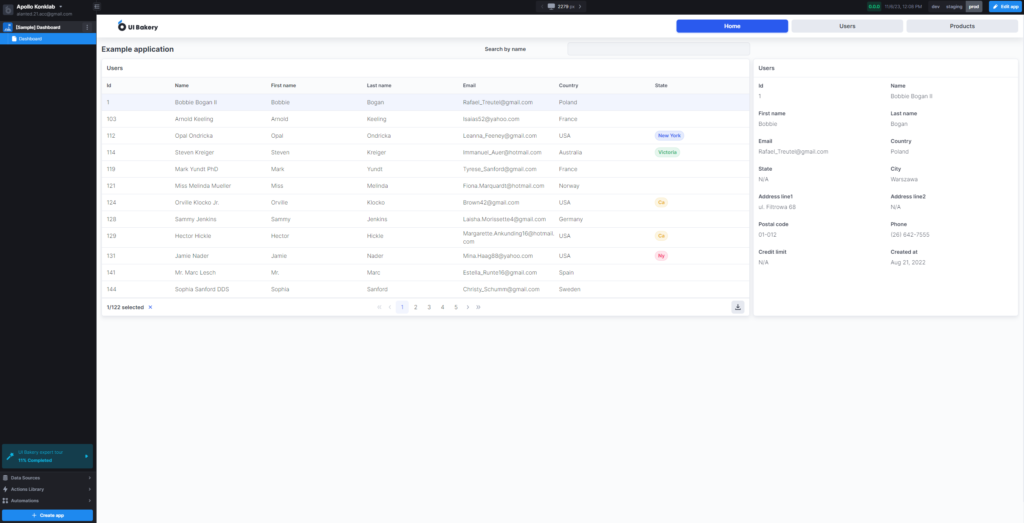
4. Log in to UIBakery and create a new app
Go to uibakery.io, and create an account if you haven’t, if you have already, sign in to your UIBakery account and click on ‘Create App’. If it is your first time and you have just signed up, fill in the relevant details such as Workspace Name, and a URL for your app, and then click on ‘Access Workspace’.
This will create a new app for you and you will be redirected to it immediately. This is what you’ll see:
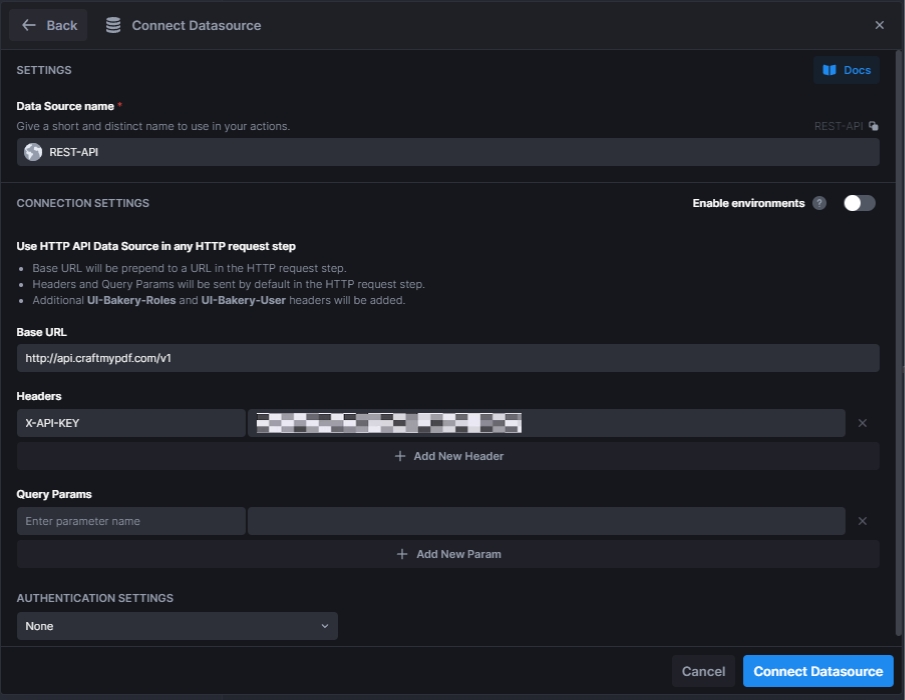
5. Edit App and create a REST API
On the top right of your screen, click on the blue button, ‘Edit App’. Various action trays will expand and you can now add, move, or delete your components however you want. Navigate to the toolbar located on the left side of your page and click on ‘Data Sources’. Then, click on the green ‘Connect’ button. A list of data source type should pop-out. To create a REST API, click on ‘HTTP API’, then fill in these details and follow these steps:
- Data Source Name: Choose a name for the data source (I named mine “REST-API”)
- Base URL: Add a base URL for the API, mine is http://api.craftmypdf.com/v1
- Headers: Add a header name and the API key copied from your CraftMyPDF dashboard in Step 2, in my case the header name shall be X-API-KEY
- Create: Click on the ‘Connect Datasource’ button at the bottom right of the pop-up to finish
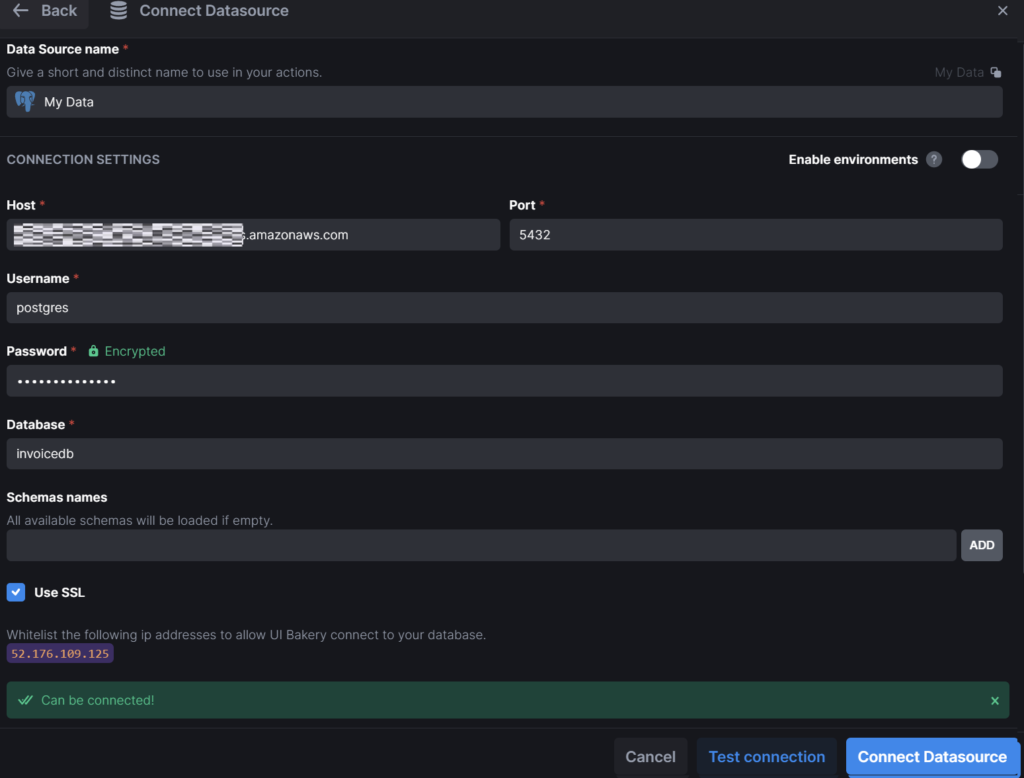
6. Connect to a database
After creating your REST API, you will be redirected back to the Data Sources page. To create a connection to your database, click on the green ‘Connect’ button, and select ‘PostgreSQL’ (in my case). Then follow these steps:
- Data Source Name: Choose a name for the data source (I left mine as the default “My Data”)
- Host: Use your desired existing hostname
- Port: Use your existing port number
- Username & Password: Fill in your database login credentials
- Database name: Use an existing database that has already been created (Mine is “invoicedb”)
- SSL: Enable SSL (Secure Socket Layer)
- Test connection: Click on ‘Test Connection’ to make sure that the connection will be successful
- Create: Click on the ‘Connect Datasource’ button at the bottom right of the pop-up to finish
7. Design your desired app
When you are done setting up connections to all your data sources, navigate to the toolbar located on the left side of your page and click on ‘Pages’. You will be directed to your app’s dashboard and you now have the freedom to drag-and-drop, add as many pages as you need, and edit it however you may like. To find the various components that you will need, click on the ‘Components’ button from the same toolbar. This is my simple design:
- Buttons: I have two buttons, labeled “Generate” and “Download” for the PDF
- Tables: I have two tables, named “Invoices” and “Items”, which will be filled with data queried from the database that we have connected earlier (there will be a default initial set of data displayed)
- PDF Viewer: To view the generated PDF from CraftMyPDF

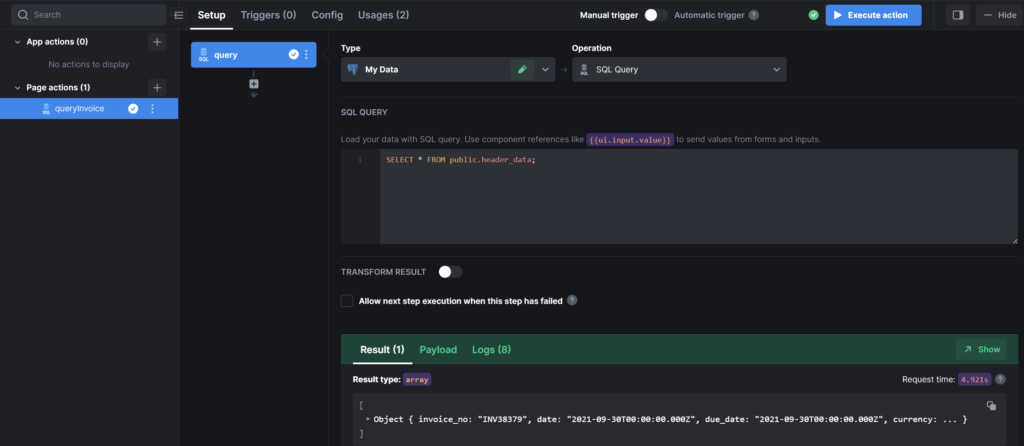
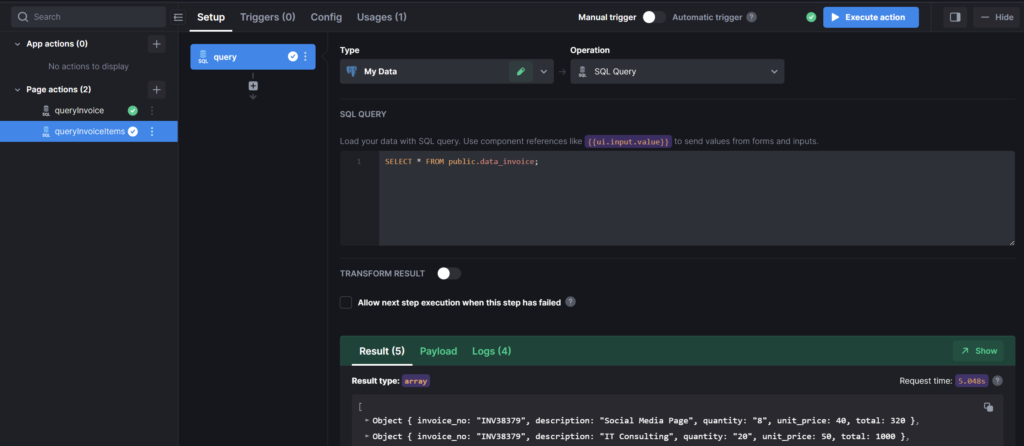
8. Setting up queries to obtain data for tables
To fill our tables with data, we will need to set up database queries for them. I will list down the steps on how to query data for a table, and we can use the same steps and change specific variables depending on what we want to achieve.
- Select table: Click on the desired table, and make sure that it is highlighted (in my case, the “Invoice” table and “Items” table)
- Connect my data: On the right toolbar, click on the green button ‘Connect my data’. This will create a new action at the bottom toolbar
- Rename query: Click on the three vertical dots ‘⋮’ to rename your query (I used “queryInvoice” and “queryInvoiceItems” respectively)
- Type: Select the type of data (the data sources that were created in Step 6)
- Operation: Select ‘SQL Query’
- SQL Query: Write the SQL query statement to obtain the desired data
- Execute action: Click on ‘Execute action’ to make sure that the query works. You will see the data in the “Results” section
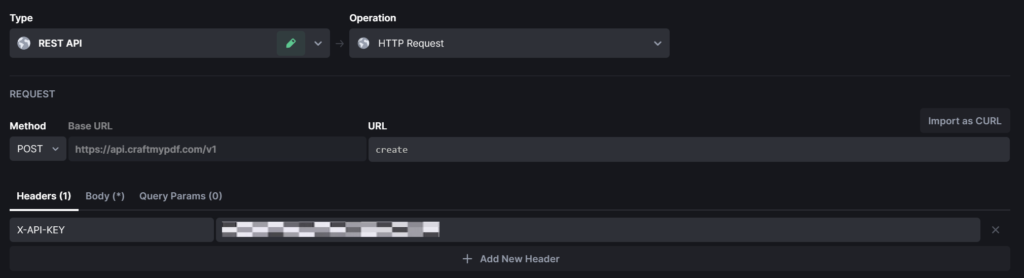
9. Send JSON and API Request to CraftMyPDF
Now, we need to send the data via an API Request to CraftMyPDF so that we can generate the PDF. Follow these steps:
- Select button: Click on the “Generate” button, and make sure that it is highlighted
- Triggers: On the right toolbar, scroll down to the “TRIGGERS” section. Then click on the ‘Select Action’ dropdown
- Create Action: Click on ‘Create Action’
- Type: Select the type of data (the REST API that was created in Step 5)
- Operation: Select ‘HTTP Request’
- Method: Select Method ‘POST’
- Base URL: Should be generated as it was created earlier, so you just have to fill in “create” for the URL (you can find all the CraftMyPDF API references here)
- Headers: Add a header name and the API key copied from your CraftMyPDF dashboard in Step 2, in this case, the header name will be X-API-KEY
- Body: The body should be in the form of JSON. You should replace the template_id in this step with the one that you obtained earlier (refer to Step 3), here’s my sample:
{
    "data": {
        "invoice_number": ui.queryinvoiceTable.selectedRow.data.invoice_no,
        "date": ui.queryinvoiceTable.selectedRow.data.date,
        "due_date": ui.queryinvoiceTable.selectedRow.data.due_date,
        "currency": ui.queryinvoiceTable.selectedRow.data.currency,
        "discount": 5,
        "tax": 7, "company_name": "LOGO Consulting Pte Ltd",
        "email": "[inquery@logo.io](mailto:inquery@logo.io)",
        "client": ui.queryinvoiceTable.selectedRow.data.client, "client_address": ui.queryinvoiceTable.selectedRow.data.client_address,
        "client_address2": ui.queryinvoiceTable.selectedRow.data.client_address2, "client_address3": ui.queryinvoiceTable.selectedRow.data.client_address3, "items": ui.queryinvoiceitemsTable.value
    },
    "template_id": "xxxyyy-xxxyyy-xxxyyy",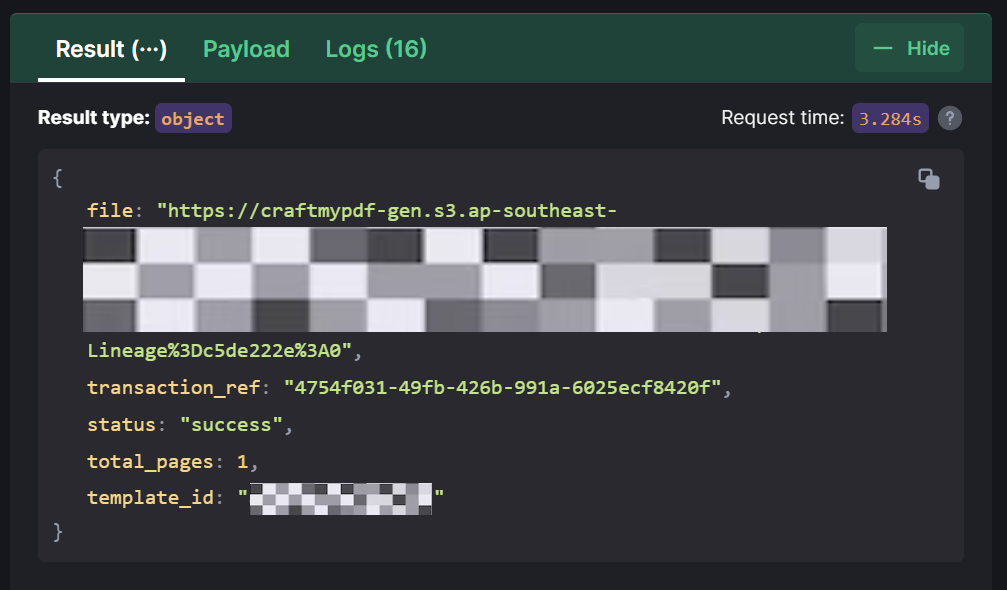
}- Execute action: Click on ‘Execute action’ to send the API request. You will see the response data in the “Results” section like this:
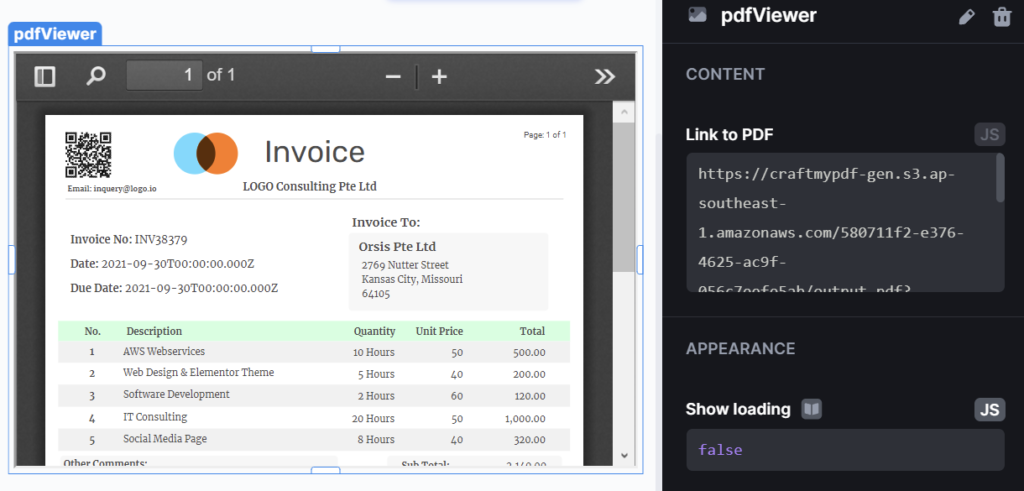
10. Display the generated PDF
It is time to display the generated PDF onto the PDF component that we created earlier. Copy the file link from the API request response in the previous step and paste it into the component’s content section as such:
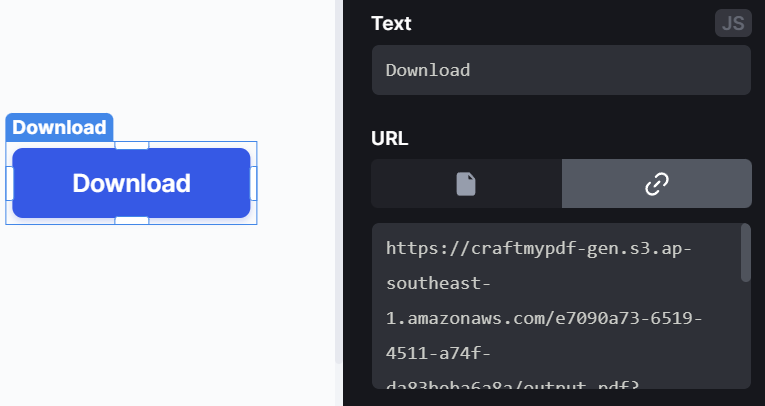
11. Download the generated PDF
If you wish to download the generated PDF, you would need to add an action to a button component that will redirect you to the PDF file that is stored on the cloud. You can follow these steps to achieve that:
- Select button: Click on the “Download” button, and make sure that it is highlighted
- URL: On the right toolbar, you will see the “URL” section. Then click on the ‘Link to URL’ button and paste the same file link from the previous step
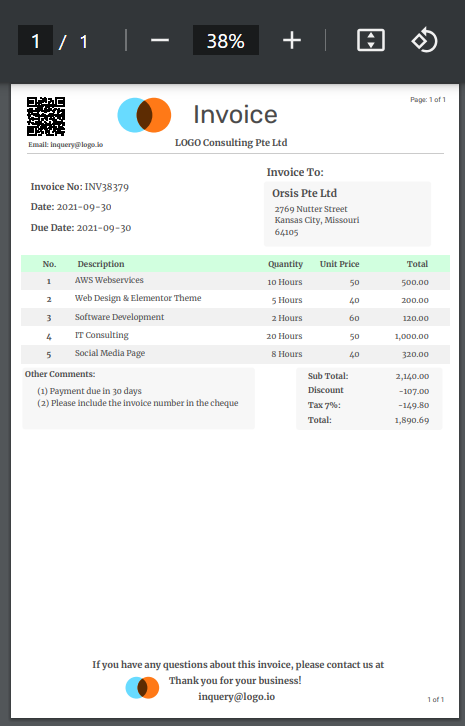
The generated PDF from CraftMyPDF should be available for download upon clicking the button.
Conclusion
This comprehensive guide offers a step-by-step walkthrough to simplify crafting, automating, and customizing PDF templates using CraftMyPDF and UIBakery.
Take your time to understand each step — mastering this process can greatly streamline your workflow and enhance your productivity. Thank you for exploring!
Sign up at https://app.craftmypdf.com/accounts/signup/ to learn more.