Please visit our latest Getting Started section in our support page
1. Introduction and the steps to design PDF
CraftMyPDF offers a web-based drag & drop PDF template editor that lets you design templates and generate pixel-perfect PDF documents from reusable templates. The PDF template editor includes a rich set of layout and components to develop beautiful PDFs with powerful expressions, formatting, page breaks, and data-binding.
Our PDF Generation API allows you to generate PDF documents via REST API. In addition, CraftMyPDF integrates with no-code platforms such as Zapier and Make.com(Formerly Integromat), and Bubble.io for you to automate the creation of PDF documents in your workflows.
To learn about the visual components such as Text, Image, Chart, and other visual elements, head over to our Guide to Components.
In this article, we will cover the basics of PDF template editor, page breaks, data-binding, preview, and other features.
The steps of design and PDF generation
The followings are the 4 simple steps to design PDF templates and generate PDF documents:
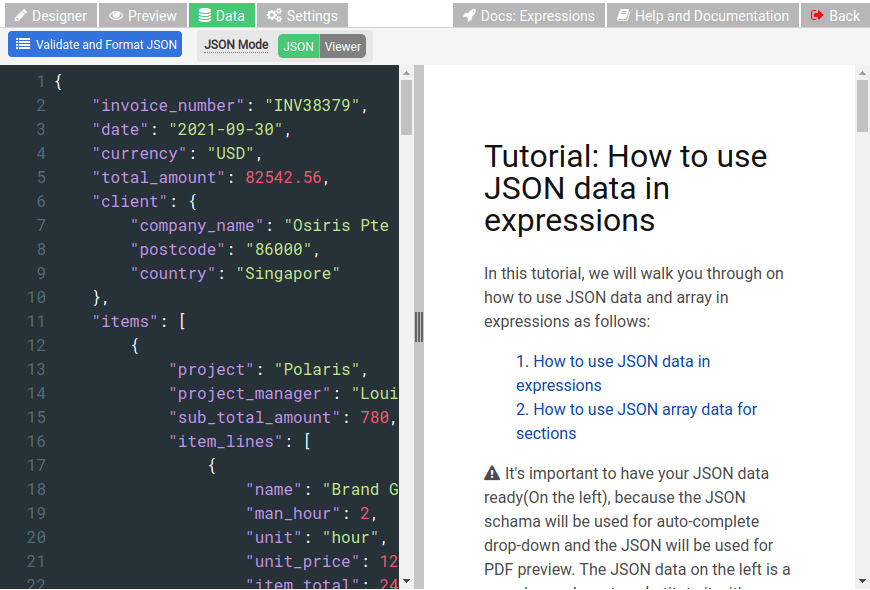
Step 1 – Import, manipulate, or view the JSON data available in the Data tab.
It’s important to have your JSON data ready(On the left) before designing the template. It’s because the JSON schema will be used for auto-complete drop-down and the JSON will be used for PDF preview.
The JSON data on the left is a sample, you have to substitute it with your JSON data for the actual PDF generation.
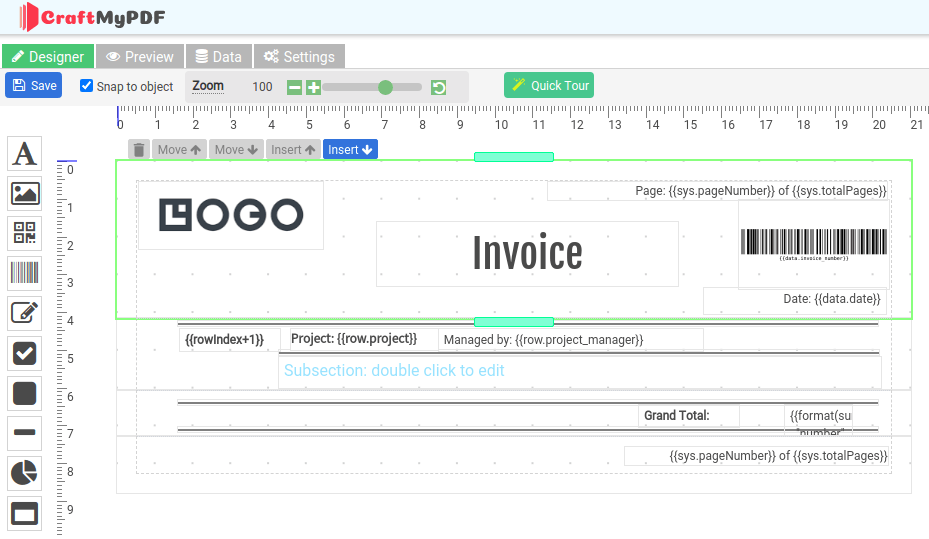
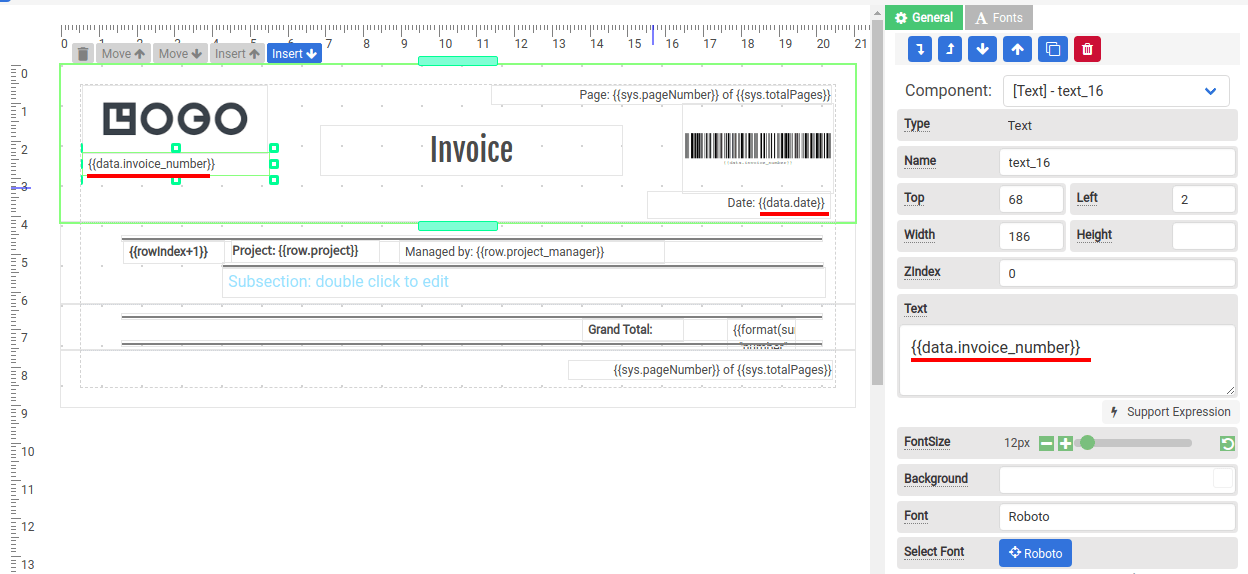
Step 2 – Modify the PDF template in the Designer tab. You may use expressions with the components to create dynamic PDF documents.
An expression is enclosed in {{ syntax }} .To use JSON data in the expressions, {{ data.[field] }}. Replace [field] with the JSON field you want to display
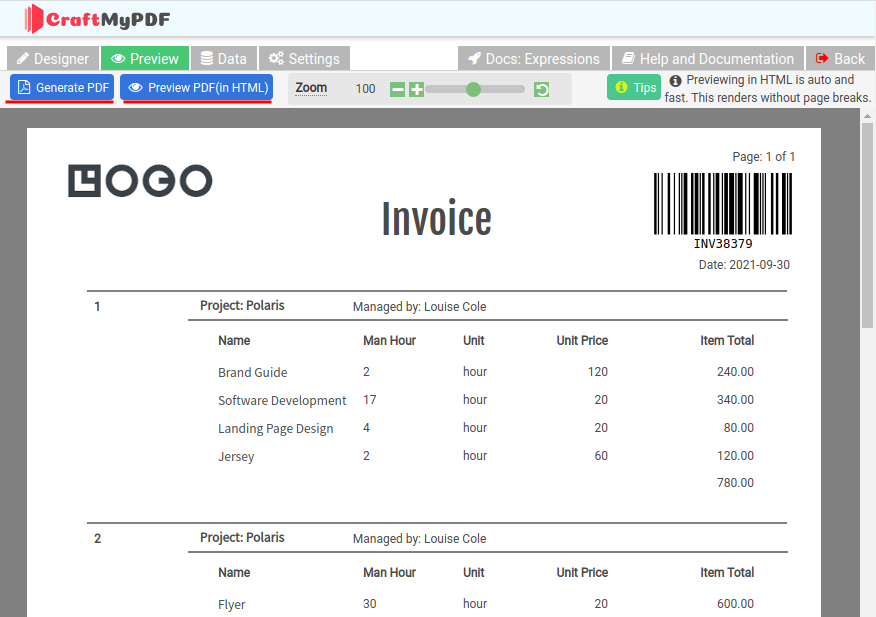
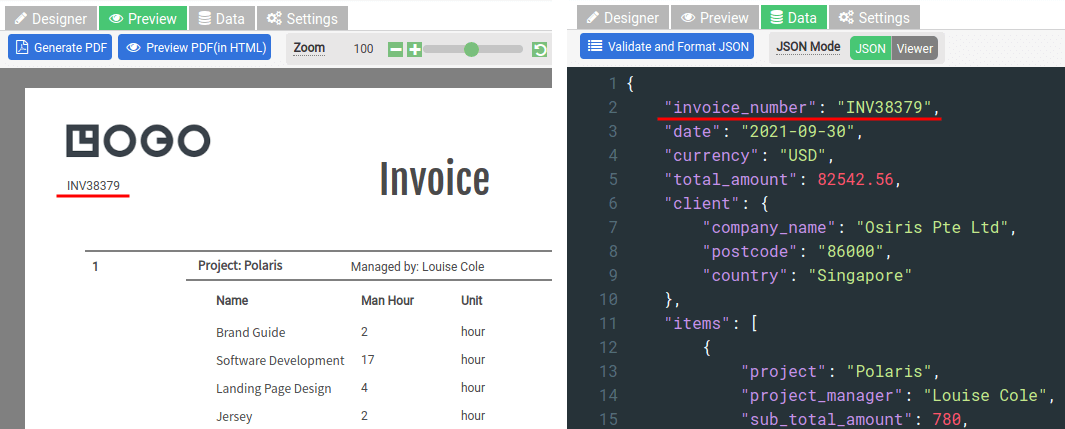
Step 3 – Use the Preview tab to preview PDF or debug the expressions, you may also generate PDF documents here. See the section Preview of PDF for details
Step 4 – The final step is to automate PDF generation with Zapier, Integromat, or REST API. See the Integrations section below.
2. Designer
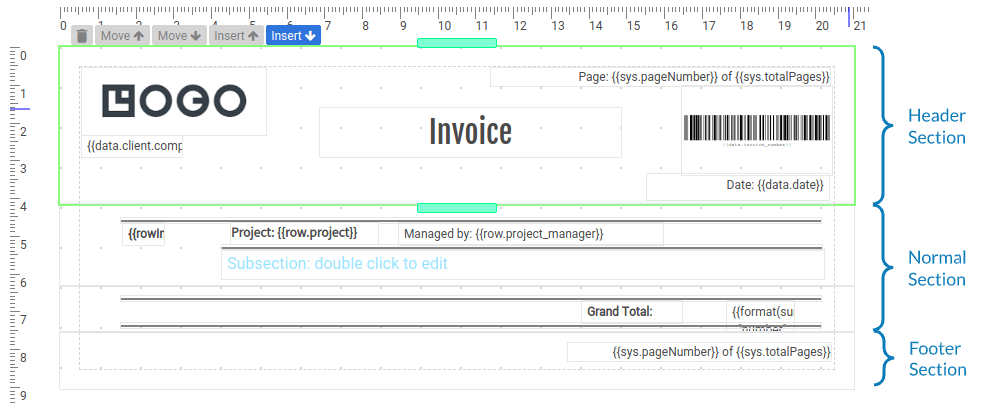
The Designer tab is a drag-and-drop environment for designing a PDF template. There are three (3) different sections in the PDF designer:
(a) Header Section
(b) Normal Section
(c) Footer Section
2.1 Sections – Header, Footer & Normal
A template is divided into multiple sections, and a section is where you can drag-and-drop components, such as Label, Image, Chart component, etc. There are three types of sections: Header, Normal, and Footer.
i. Header section
The header section appears at the top of each page. This includes things such as page number, document title, and other information.
ii. Normal section
The normal section is the body of the report where the report data appears. If data binding is enabled, a normal section will be repeated once per record; see below for data binding.
* if you are displaying tabular data, you may consider using the Simple Table component
iii. Footer section
The footer section appears on the bottom of each page, and it usually contains the page number, document title, or other information.
2.2 Data binding
Data binding is the technique that binds the data sources to the UI components in the template and displays the data.
2.2.1 All sections – The JSON data
A special variable data is to access the JSON data. You can use it with expressions.
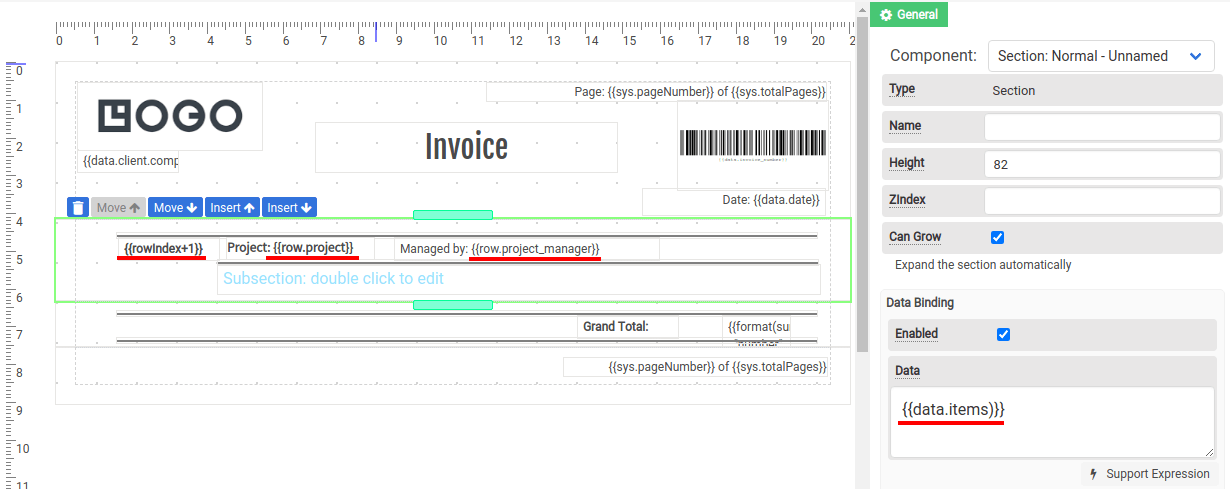
2.2.2 Data binding for normal sections
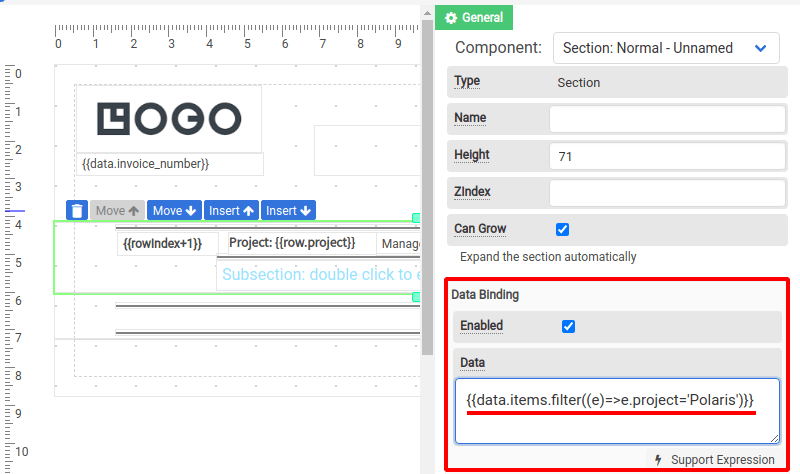
(i) If data binding is enabled, the section will be repeated once per record. the Data/Data Source section in the property panel is mandatory and it only accepts an array. You can use an expression to bind it to an array. Additional filtering and ordering can be done for data with an expression, see the section below for filtering and ordering of the rows.
(ii) A special variable row is available for sections that data binding is enabled. To access a field in the row in an expression, use the expression row.field.
(iii) The variable rowIndex is a running index of the current row, it starts from zero.
2.2.3 Variables for header & footer
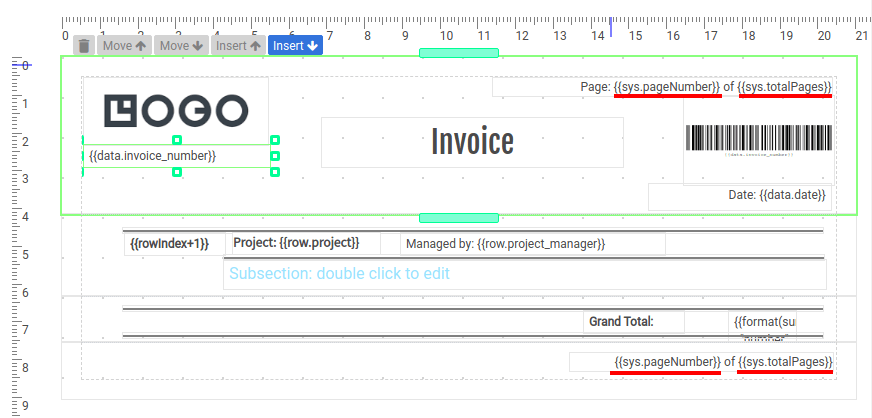
The expression {{sys.pageNumber}} or {{sys.totalPages}} displays the current page number and total pages.
2.2.4 Nested data with subsection/area
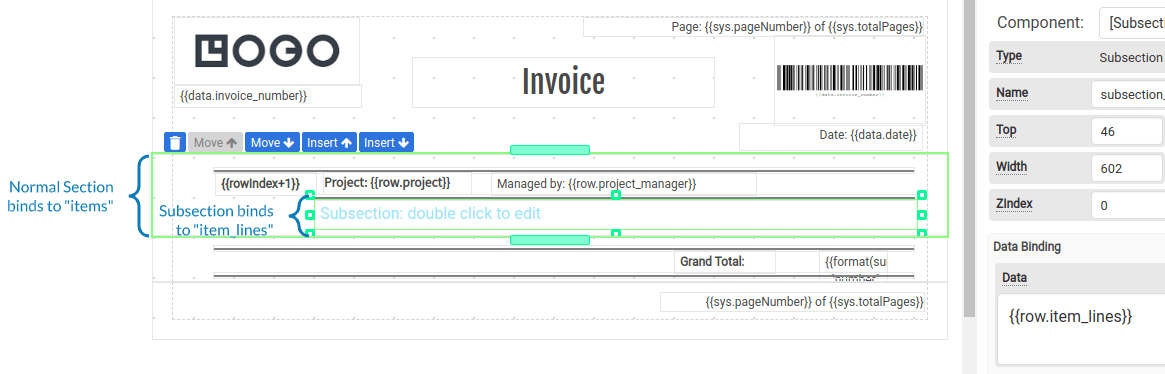
A subsection component is a component that contains sub-header, sub-footer and sub-normal section. It can be used to iterate the rows in an array. combined with a section, you can iterate a complex hierarchical structured JSON.
To access row data, use row variable.
With nested subsection(or area), a special variable parent let you access the parent data(To access all the nested parents use the variable parents). The following is an example of a data-bound section and a subsection component within it.
parent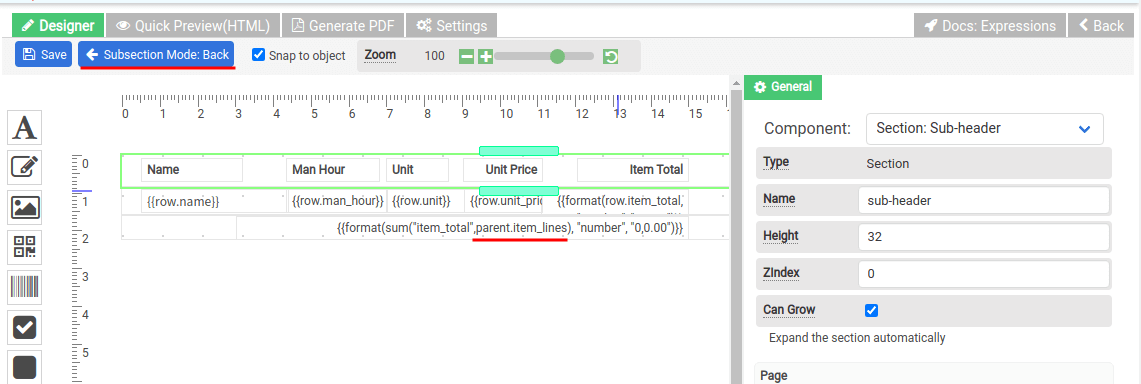
parent allows you to access the parent data.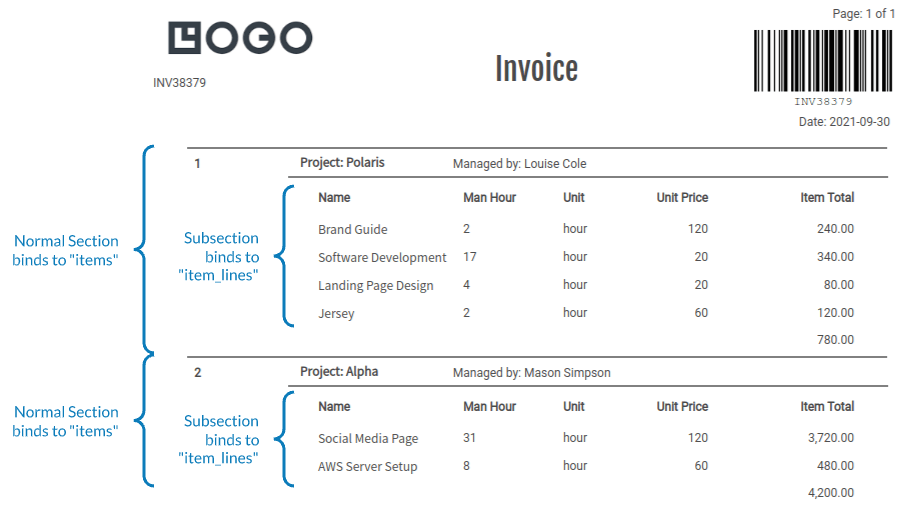
2.2.5 Data manipulation(Filtering & Sorting)
Filtering array data
Expression:
{{array.filter((var)=> condition)}}
The method filter filters an array according to provided criteria, and it returns a new array containing the items that meet the criteria. Read more at Mozilla
e.g: To filter an array based on the project name Polaris
{{data.items.filter((e)=>e.project=='Polaris')}}
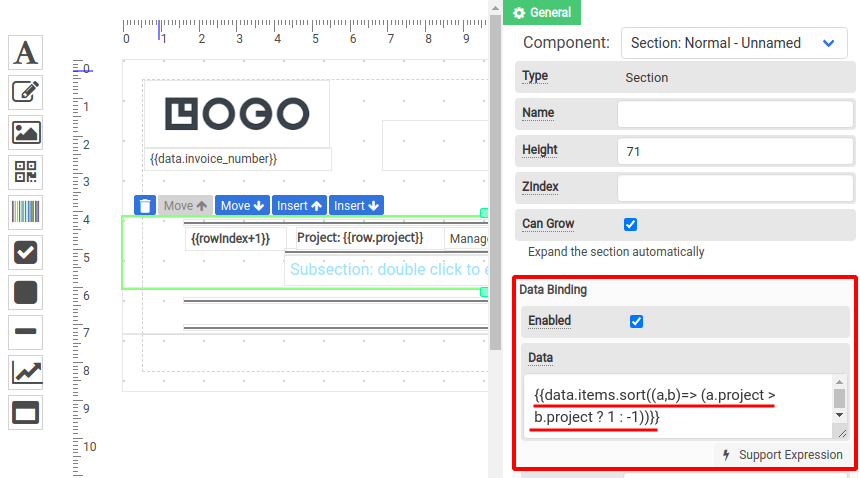
Sorting array data
Expression:
{{array.sort((comp1, comp2)=> condition)}}
The method sort reorders an array according to provided criteria, and it returns a new array containing the sorted items. Read more at Mozilla
e.g: To sort an array based on the project names
{{data.items.sort((a,b)=>a.project>b.project?1:-1)}}
Tips:
You can also use our built-in method sort(field,array, direction), find out more on docs: Expressions
2.3 Common issues for data-binding
2.3.1 “Undefined” in generated PDFs
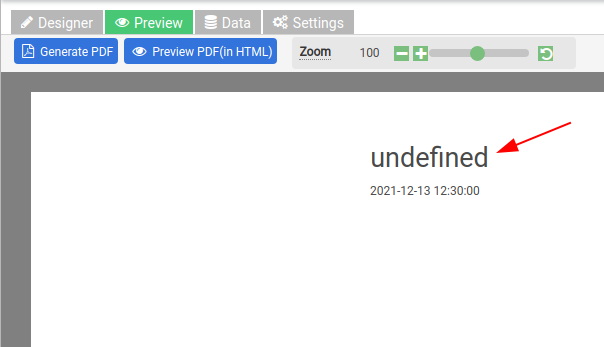
The possible root cause you may encounter are:
(i) Incorrect use of syntax {{data.[field]}} to access JSON data
In most cases, the keyword data is missing. Make sure you use the correct syntax as follows:
{{data.[field]}}
Remember to replace [field] with the JSON field that you want to display
for example, if you want to display a JSON field position, use the following expression
{{ data.position }}
(ii) The field doesn’t exist in the JSON data
Make sure the field you are using is present in the JSON data.
Optionally, you can use our built-in expression isNullOrEmpty, and Javascript’s conditional (ternary) operator to check for a null or empty value, then substitute with a new text. The following is an example to check for the field company_name, if it’s empty then it will display “THIS IS EMPTY”.
{{ isNullOrEmpty(data.company_name) ? “THIS IS EMPTY”: data.company_name }}
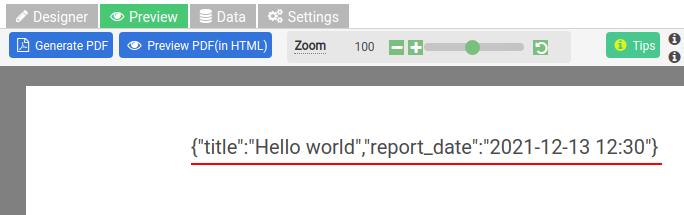
2.3.2 Debug for data-binding
To display available JSON data, you can use the following expression:
{{ JSON.stringify(data) }}
It displays the data in JSON
2.4 Expressions
An expression is essentially a javascript syntax enclosed in {{ and }}. The expression is any valid set of variables, operators, and expressions that evaluates to a single value. The value may be a number, a string, an array or a logical value.
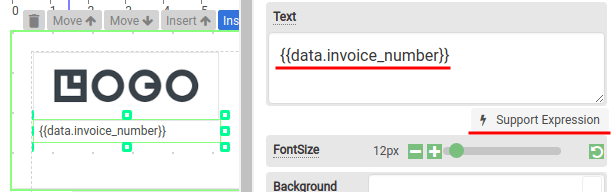
The following is a text component that supports expression.
Type of functions
(i) Standard JavaScript libraries – JavaScript standard built-in functions and objects such as Math, String, Array or any standard Javascript methods.
(ii) External libraries – We support Numeral.js and Moment.js out of the box
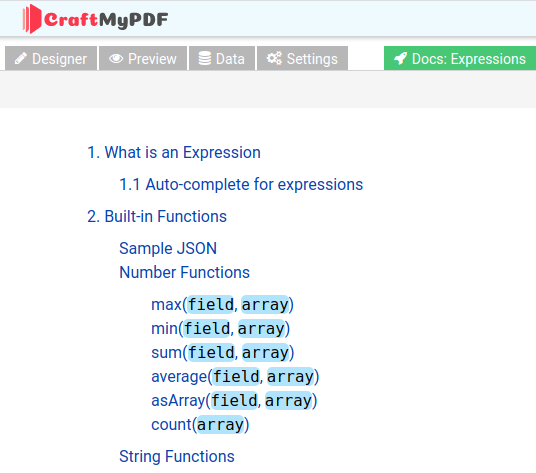
(iii) CraftMyPDF’s built-in functions – functions for formatting, number and string. You may find them in the designer Docs: Expressions
2.5 Overridable properties
Overridable properties are the changes you want to make to the element. Unlike Data binding or Expressions, an Overridable Property allows you to directly make changes to the properties(or styles) of an element such as font size, color, background color, rotation and etc during PDF or image generation.
Select an element in the editor, the Overridable Properties section is located at the bottom of the General tab of the property panel (on the right-side of the editor).
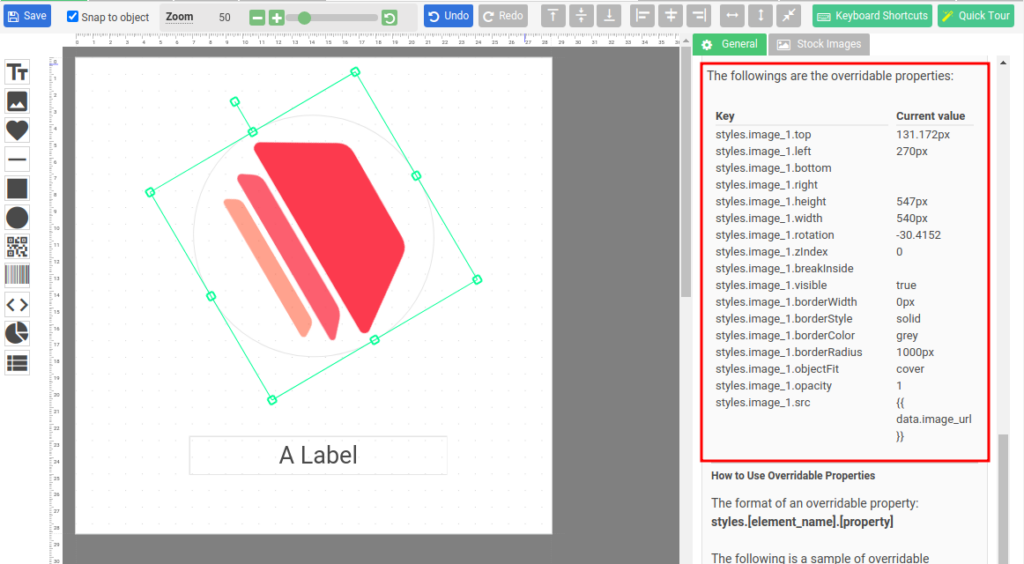
How to use overridable properties
The following is the format of an overridable property, it starts with “styles.” followed by the name of the element and the property name
styles.[element_name].[property]The following is a sample to change the font size and visibility of text_1 using overridable properties(font size and visibility) along with the data in the request body
{
  "invoice_no": "INV727462",
  "title": "This is a sample title",
  "styles.text_1.fontSize": "30px",
  "styles.text_1.visible": true
}
2.6 Data Binding & Expressions vs Overridable Properties
Data binding, expressions, and overridable properties are used to display the data during PDF/image generation.
The followings are the differences:
- Data binding is useful to display list data or array data. It’s used in the section component to bind list/array data.
- Some of the properties of an element allow the use of Expressions, you can use expressions to format and display the data.
- Overridable properties allow you to change the properties of an element such as color, font, or text, please look at Overridable Properties for a detailed explanation. It’s normally used for image templates to modify the text, color, and font size of an element.
In short, use data binding & expressions to bind list/array data to section components and use overridable properties to modify the styles of a UI element.
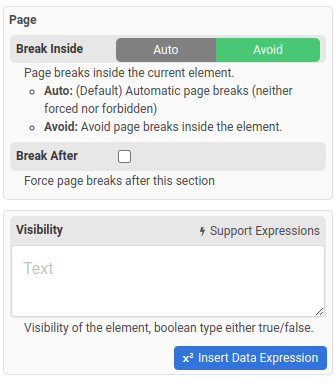
2.7 Page breaks for sections
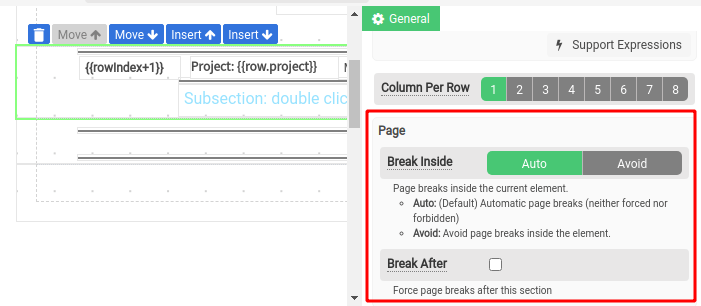
Break inside indicates whether or not a page break should occur inside the specified element.
There are 2 types of break inside:
- Auto – (Default) Automatic page breaks (neither forced nor forbidden)
- Avoid – Avoid page breaks inside the element.
Break after – Force page breaks after this section if this is enabled
2.8 Layout modes(Vertical Flow & Relative)
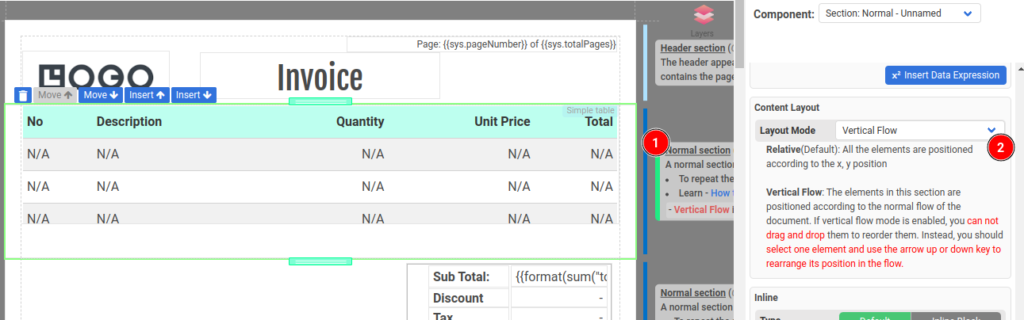
The layout mode controls how the elements in a section should be arranged. They are 2 types of layout modes: Relative(Default) and Vertical Flow
The following is where to configure the Layout Mode for a Section component in the property panel.
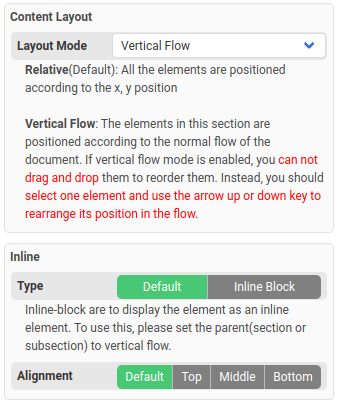
i. Relative(Default): All the elements are positioned according to their x and y coordinates.
If the layout mode is set to relative, you can drag and drop components and move them freely with your mouse.

ii. Vertical Flow: The elements in this section are positioned according to the normal flow of the document. If vertical flow mode is enabled, you can not drag and drop them to reorder them. Instead, you should select one element and use the arrow up or down key to rearrange its position in the flow.
The following is a demo in which a section is in Vertical Flow mode. To reorder, you must first select an element and then use the arrow key (up or down) to reorder.
Arrange elements horizontally in a Vertical Flow section
All the elements in a Vertical Flow section are by default arrange(or flow) vertically. To arrange the elements horizontally, we have to set the Inline Type of the elements to Inline Block.
The following is a demo in which you set the Inline Type of the elements to Inline Block in a Vertical Flow section.

2.9 Common Issues for page-break
2.9.2 Text being split across pages
If you have lines of text that are being split across pages, and you want to prevent it from happening, you need to enable Break Inside to Avoid
The following is where you enable it in the property panel, and you can set it to the section level.
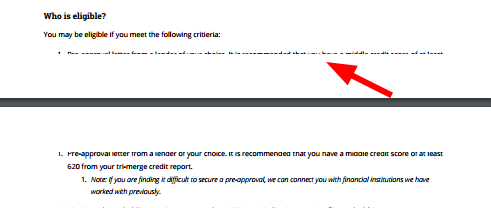
2.9.1 Incomplete rendering of PDF
If a PDF does not display a section completely, it is likely due to the Break Inside property of some elements being set to true for Relative layout mode (it causes parts of these elements to become stuck between pages. As a result, the layout engine is unable to accurately calculate the section height)
The following is a sample PDF and parts of it (1) are “stuck” between page 1 and page 2, causing the section not able to render the section completely(2).
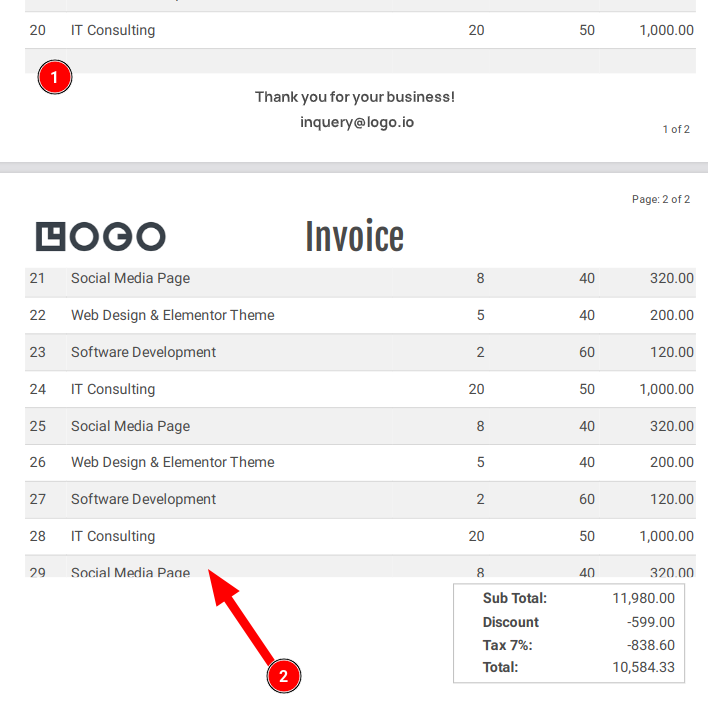
To fix this problem, the Layout Mode needs to be changed to Vertical Flow.
Vertical Layout Mode makes the elements in a section flow naturally. It is useful for components such as data-bound sections, simple tables, etc, especially if you have components or records that span across multiple pages.
3. Preview of PDF
Preview tab is used to preview the PDF. It’s important to have your JSON data ready(in Data Tab), the sample JSON data will be used for PDF preview.
There are 2 modes of PDF preview:
Generate PDF
- Use this to generate the actual PDF. It typically takes a few seconds.
- This renders a full PDF and accurately the same PDF that you generate with REST API.
- Generating PDFs with web console costs 0.5 credit.
Preview PDF(in HTML) – Default mode
- Previewing in HTML is auto and fast.
- However, this renders everything in one page without page breaks.
- Use this for debugging expressions or preview the data/layout.
4. Data Tab
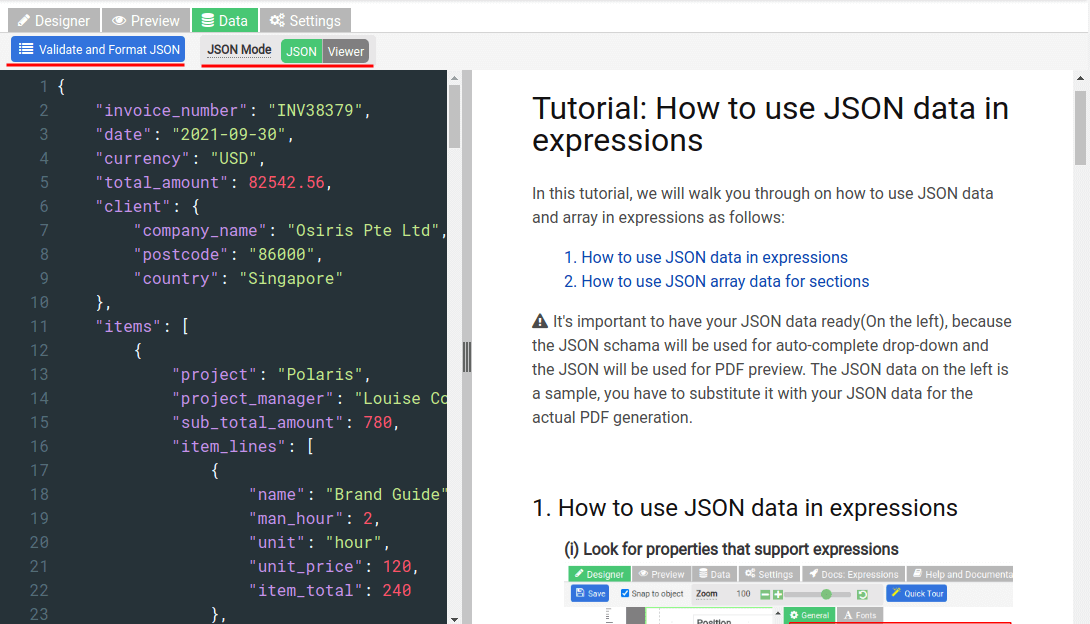
Manipulate your JSON data in the Data tab. It’s important to have your JSON data ready(On the left) because the JSON schema will be used for auto-complete drop-down and the JSON will be used for PDF preview. The JSON data on the left is a sample, you have to substitute it with your JSON data for the actual PDF generation.
Click on the “Validate and Format JSON” button to format your JSON data.
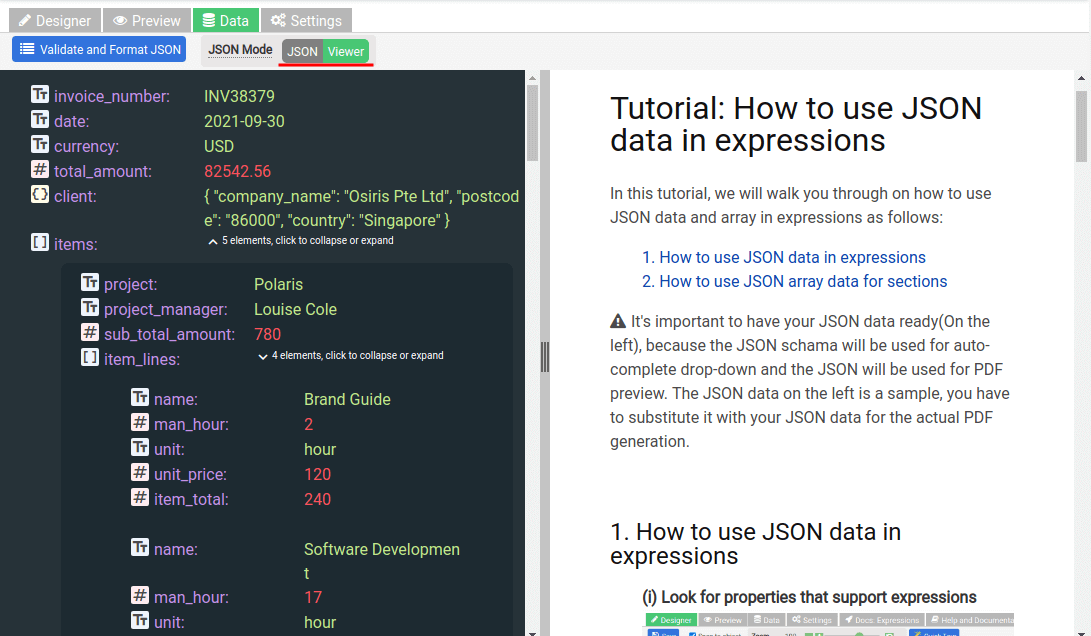
There are 2 modes of JSON:
- JSON mode – editable
- Viewer mode – non-editable
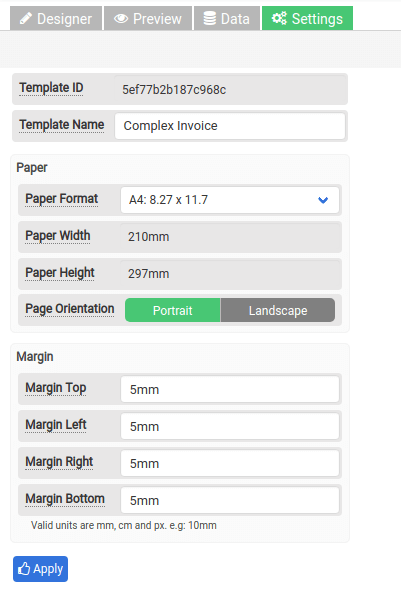
5. Settings Tab
This is where you configure the paper format, page margin, etc.
6. Integrations(REST API, Zapier & Make.com)
CraftMyPDF supports integration with Zapier, Integromat, and REST API
i. REST API
ii. No-code – Zapier and Make.com
We integrate with Zapier and Make.com. Both of the no-code platforms are powerful tools for automation without writing a single line of code.
Payload Types
When it comes to sending data to generate PDFs/Images, there are 2 types of payload:
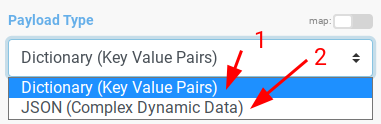
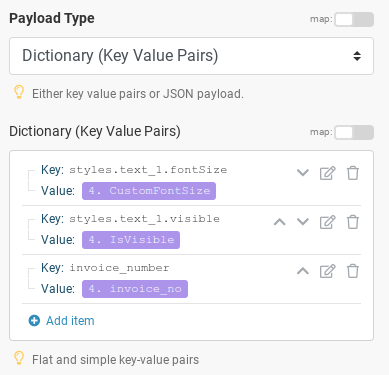
1. Dictionary: Simple key-value pairs data, it’s essentially a flat hierarchical JSON data with just key-value pairs. The following is an example of Dictionary payload:
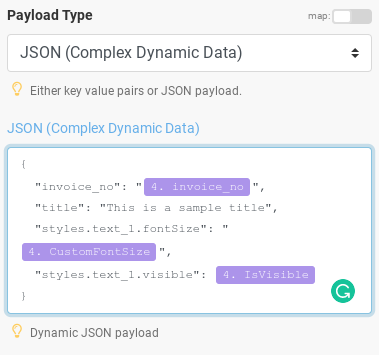
2. JSON payload: It’s used for complex JSON data that consists of nested objects, and key-value pairs. An example is an invoice that comprises item lines, invoice no, due date and etc. The following is an example of JSON payload:
Tutorial for Zapier integration
Tutorial for Make.com(Formerly Integromat)