
How To Add eSignatures To HubSpot Deals (Without Leaving Your CRM)
Send HubSpot deal documents for eSignature straight from the Deal record: install the CraftMyPDF app, build a signature-ready template, and track signed PDFs.
TL;DR
Install the native CraftMyPDF app from your HubSpot account, connect it with your API key once, and build a signature-ready document template. From then on, open any Deal, click Generate PDF on the app card, and the buyer gets a signing email automatically. No Zapier, no separate eSignature tool, no exporting and re-uploading. Track status and download signed PDFs from the Signed Documents dashboard.
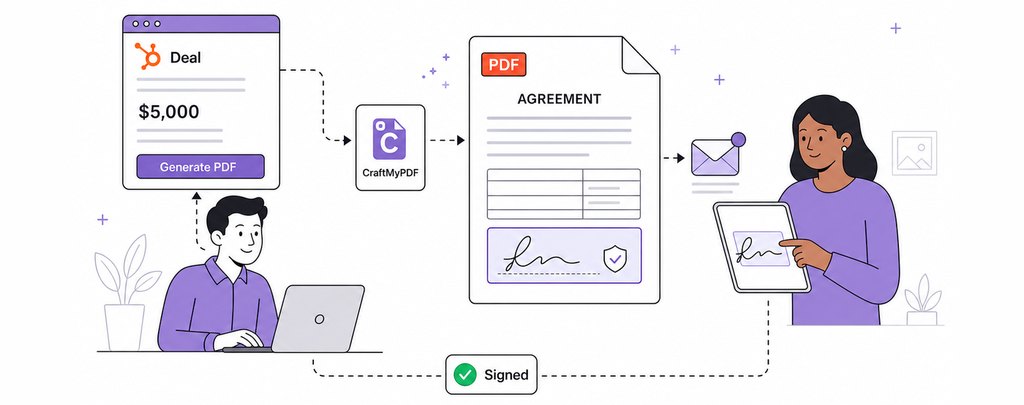
A deal reaches the contract stage and, in theory, the rest should be mechanical: generate the agreement, send it, track it, file it. In practice this is exactly where deals stall. The salesperson builds the document in a doc tool, exports it, uploads it to a separate eSignature platform, waits, then comes back to HubSpot to paste the signed copy in as an attachment. Four tools and two logins for one document.
The problem isn’t only speed. It’s reliability. When signing lives outside the CRM, no two deals follow quite the same path, and nobody can answer “which deals are waiting on a signature?” without opening three tabs.
Where HubSpot Signing Workflows Break
A manual signing process usually fails in the same places:
- Sales documents and contracts are built outside HubSpot, so CRM data gets copied across by hand and typos ship with the document
- Follow-ups depend on a salesperson remembering, so requests go unanswered for days
- Signed agreements end up in an inbox instead of on the Deal record
- There’s no shared view of signing status, so forecasting is guesswork
- Handling varies deal to deal, which gets worse as volume grows
What an In-CRM Signing Workflow Should Do
A workflow worth building should already know which template to use, who signs, and which CRM fields belong in the document, without a salesperson re-entering anything. It should generate and route the document in a single action from the record itself, expose a status anyone can check, and keep the finished document attached to the deal.
That’s what this guide sets up.
How CraftMyPDF Fits
CraftMyPDF has a native HubSpot connected app that puts an app card directly on your Deal (and Contact, Company, Ticket, Order, Cart, or custom object) records, so you generate documents from your own CRM data without leaving the record. One CraftMyPDF account serves your whole team. Its eSignature API is backed by Documenso and supports the ESIGN Act, UETA, and eIDAS (SES). Recipients sign by drawing, typing, or uploading their signature.
The mechanic that makes this work: E-Signature is a property of the PDF template, not a separate call or a separate app. Once it’s enabled, CraftMyPDF creates a Documenso envelope after every PDF generation and emails the signing request automatically, whether that generation comes from the API, the dashboard, or, as in this guide, the app card sitting on your Deal record. There is no extra “send for signature” step.
The app card generates from Deals, Contacts, Companies, Tickets, Orders, and Carts, from custom objects on a HubSpot Enterprise subscription, and from objects activated in HubSpot’s data model builder such as Appointments, Courses, Listings, Services, and Projects. This guide builds the signable document from the Deal record, because a Deal already carries everything the document needs (your line items, buyer contact, and company) through its associations.
Step 1: Connect CraftMyPDF to Your HubSpot Account
For the full reference walkthrough of every screen in this step, see CraftMyPDF’s HubSpot Integration documentation.
Create a CraftMyPDF account. The Free plan includes 50 PDFs or images per month, forever, with no credit card required, across up to 3 templates. Since an eSignature request costs 10 credits, that’s 5 signed documents a month at no cost, enough to build and test this workflow end to end.
- Log in to HubSpot and go to the CraftMyPDF app installation page.
- Select the HubSpot account to connect and click Choose Account.
- Review the requested permissions and click Connect app.
- Because the app is not yet HubSpot-verified, type I accept the risk into the text box and click Connect.
- HubSpot redirects you back to CraftMyPDF’s documentation, confirming the app is connected.
Now configure it. There are two required steps: setting the API key and setting the app card location.
Set the API key
In CraftMyPDF, open the API Integration tab and copy your API key. In HubSpot, click the settings icon, go to Integrations > Connected Apps, click Actions on the CraftMyPDF app, then Go to settings. On the Settings tab, paste the API key, optionally choose the region closest to you for lower latency, and click Save settings.
Set the app card location
Still in the app’s settings, open the App cards tab and click Manage locations. On the side panel, choose which CRM records the app card should appear on (for this workflow, Deals, and optionally Contacts and Companies too), then click Save.
Before Step 2: Create a Test Deal (If You Don’t Have One)
The rest of this guide needs a Deal that has at least one associated Contact with an email address and at least one Line Item. If your portal is empty, create one now. Use your own email as the contact so the test signing request lands in your inbox.
Create the contact
- In HubSpot, go to Contacts.
- In the upper right, click Create contact.
- Enter an Email (yours), First name, and Last name.
- Click Create.
Create the deal and associate the contact
- Go to Deals.
- In the upper right, click Add Deals, then Create new.
- Enter a Deal name (for example “Acme Website Redesign”), pick the Pipeline and Deal stage, and set an Amount and Close date. The close date is what the document will show as “Valid until.”
- In the Associate Deal with section, search for the contact you just created and select it.
- Click Create.
Add line items
- Open the new deal. In the right sidebar, find the Line items card and click Add (or Edit if the deal already has line items). This opens the line item editor.
- Click Add line item, then choose one of:
- Select from product library: tick one or more products and click Add. (Products live under Commerce > Products; if the library is empty, use the next option.)
- Create custom line item: in the right panel, enter a Name, Unit price, and Quantity. Optionally tick Save line item to the product library so it’s reusable. Click Save, or Save and add another for a second line.
- Click Save in the line item editor. HubSpot updates the deal’s Amount from the line items.
Creating custom line items requires the Create custom line items permission; Super Admins have it by default.
You now have a Deal with a contact and line items, which is everything the CraftMyPDF app card needs for the Preview Data step below.
Step 2: Build a Signature-Ready Document Template
We’ll start from CraftMyPDF’s Simple Invoice 2 - Minimalist starter template. It’s an A4 layout with a company block, a “Bill To” block, an invoice number and dates, a line-items table built with section data-binding, and a totals block. That’s structurally the document we need already; we just need to re-label it, point it at HubSpot’s Deal data, and add a signature block.
Two constraints to know up front, both from CraftMyPDF’s E-Signature docs: E-Signature works only on PDF templates (this starter is one), and it does not fire in Preview mode. You’ll test it by generating from HubSpot in Step 3.
2a. Copy your real Deal data from HubSpot
- Open a Deal in HubSpot that has at least one associated Contact (with an email address) and one or more Line Items. Use a test deal with your own email as the contact.
- In the CraftMyPDF app card, under Step 2: Prepare your data, tick Contacts, Companies, and Line Items. All three are used by this template: the contact becomes the signer, the company names the buyer, and the line items fill the pricing table. Tick the same three again in Step 3, or the elements that reference them render blank.
- Click Preview Data. The JSON Data tab shows the record exactly as CraftMyPDF will receive it.
- Copy that whole JSON.
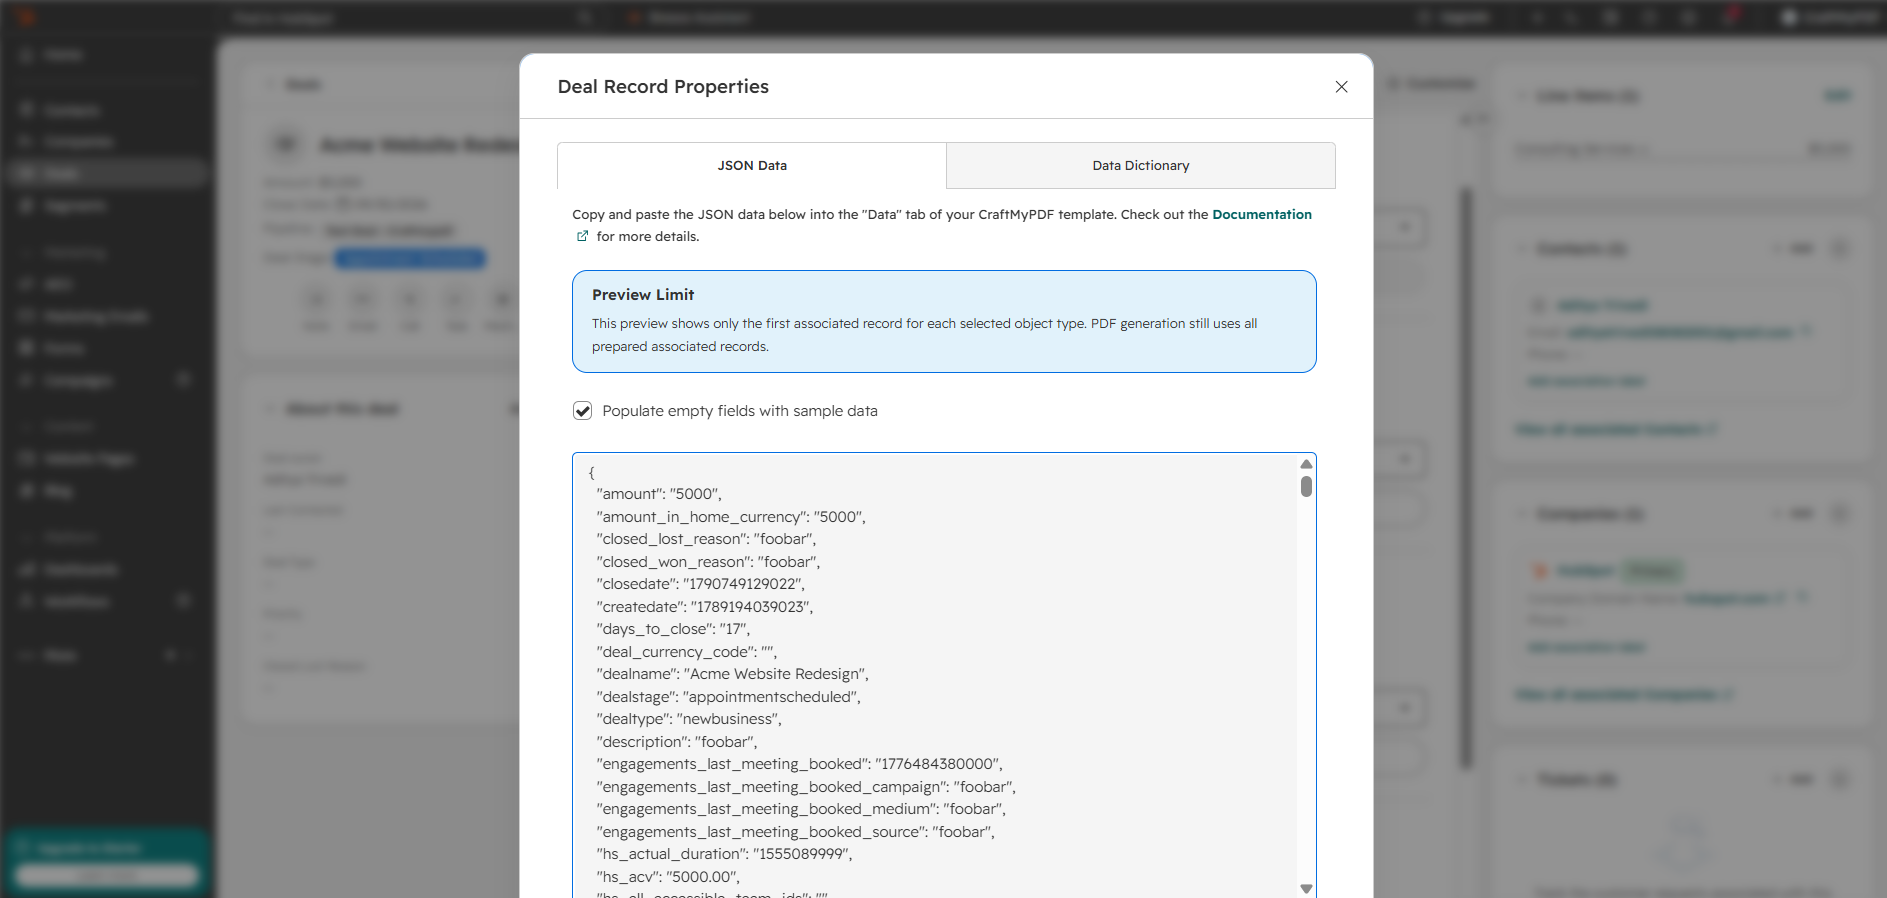
Keep this tab open; you’ll come back to it in Step 3.
2b. Create the template and load the Deal data
- In CraftMyPDF, open Manage Templates and click New Template.
- Pick Simple Invoice 2 - Minimalist (the card says “Using section data-binding”) and click Edit to open the template editor.
- Open the Data tab. You’ll see the starter’s own sample JSON already in there. Don’t copy or edit it, just glance at its keys, because every element on the page is currently bound to one of them and you’ll be swapping each for a HubSpot key in 2c. The starter keys are:
items(an array withdescription,qty,unitprice),company_name,company_address,company_email,bill_to,bill_to_address,invoice_no,invoice_date,invoice_due_date,footer,balance,logo, andcurrency. - Now replace it: click inside the text area, select all (Ctrl+A / Cmd+A), delete, and paste the JSON you copied from HubSpot’s Preview Data in 2a. Check the result: the first line should be a Deal property such as
"amount": "5000",and near the bottom you should see"_associations": {. If you instead still see"items": [at the top, the paste didn’t take. The Designer preview will show blanks for a moment; that’s expected until you re-point the expressions. - Take a moment to read what you just pasted. It will look overwhelming: HubSpot sends every property on the Deal, so expect roughly 180 keys, alphabetically ordered, most of them internal
hs_*fields likehs_v2_cumulative_time_in_appointmentscheduledthat you’ll never reference. That’s normal. Paste all of it anyway, and simply ignore what you don’t need.
Scroll to the very bottom of the pasted JSON and look for "_associations". If it isn’t there, the associated records weren’t included. The dialog only adds them when the object types are ticked before you click Preview Data, so go back to the app card, tick Contacts, Companies, and Line Items, click Preview Data, Copy, and replace the Data tab contents again. Without _associations there is no buyer, no company, and no line items to build the document from.
Out of those ~180 keys, this guide uses exactly four Deal properties and three association arrays. Here they are as an excerpt, so you can recognise them in the wall of JSON. This is not a block to paste anywhere:
{
  "amount": "5000",
  "closedate": "1790749129022",
  "dealname": "Acme Website Redesign",
  "hs_object_id": "347997710049",

  "_associations": {
    "companies": [
      { "name": "HubSpot", "domain": "hubspot.com" }
    ],
    "contacts": [
      { "firstname": "Aditya", "lastname": "Trivedi", "email": "aditya@example.com" }
    ],
    "line_items": [
      { "name": "Consulting Services", "quantity": "1", "price": "5000", "amount": "5000.00" }
    ]
  }
}
In your own payload these keys won’t sit together like that. They’re scattered alphabetically among the rest, and _associations is last. Use your editor’s find (Ctrl+F) to confirm each one is present before moving on.
2c. Re-point the template’s fields to Deal data
Switch to the Designer tab. The method is the same for every element: click it on the canvas, look at its expression in the property panel on the right (it will reference one of the starter keys from the list above), and replace it with the HubSpot expression from the tables below. Work top to bottom.
Header block
The top-left block on the starter holds the sender’s identity: a logo, company name, address, and email. None of it can come from HubSpot, because a Deal payload carries the buyer’s data, not yours. Rather than hardcode four values that would then be wrong for anyone else using the template, delete the block entirely and let the document lead with the DOCUMENT heading and the deal reference. Your branding still comes through in the colours, fonts, and layout, and the sender is unambiguous from the email the document is sent from.
| Starter element | Do this |
|---|---|
Logo image ({{ data.logo }}) | Select it on the canvas and delete it |
{{ data.company_name }} | Delete the element |
{{ data.company_address }} | Delete the element |
{{ data.company_email }} | Delete the element |
| “INVOICE” heading (static text) | Change the text to DOCUMENT |
If you’d rather keep a logo, add an Image component and paste your logo’s URL into its URL property directly. That’s a design choice, not a data binding, so it belongs in the Designer and never in the Data tab.
Everything from here down comes from HubSpot.
Reference and dates block
| Starter label | Starter expression | New label | Replace with |
|---|---|---|---|
| Invoice #: | {{ data.invoice_no }} | Document #: | {{ data.hs_object_id }} |
| Date: | {{ data.invoice_date }} | Date: | {{ moment().format("MMM D, YYYY") }} |
| Due Date: | {{ data.invoice_due_date }} | Valid until: | {{ moment(Number(data.closedate)).format("MMM D, YYYY") }} |
Add one more label under Document # that reads Re: with the expression {{ data.dealname }} so the document carries the deal name.
Watch these three closely, they’re the easiest to skip. invoice_no, invoice_date, and invoice_due_date don’t exist in the HubSpot payload, so an element left on any of them renders as nothing at all, and you’re left staring at a bare Document # label with no number after it. Note also that the sent date has no HubSpot equivalent and doesn’t need one: moment() with no argument is the moment of generation, which is exactly when the document went out.
“Bill To” block
| Starter label | Starter expression | New label | Replace with |
|---|---|---|---|
| BILL TO: | (static) | PREPARED FOR: | (static, just edit the text) |
| (client name) | {{ data.bill_to }} | {{ data._associations.companies?.[0]?.name }} | |
| (client address) | {{ data.bill_to_address }} | {{ data._associations.contacts?.[0]?.firstname }} {{ data._associations.contacts?.[0]?.lastname }} |
Then add one more Label beneath those with {{ data._associations.contacts?.[0]?.email }}, so the block reads company, then contact name, then contact email. All three come straight from the Deal’s associations.
If you’d like the buyer’s logo on the document, HubSpot supplies it too: add an Image component and set its URL to {{ data._associations.companies?.[0]?.hs_logo_url }}. This is populated for companies HubSpot has enriched; if it’s empty for a given deal the image simply doesn’t render.
Line-items table (the data-bound section)
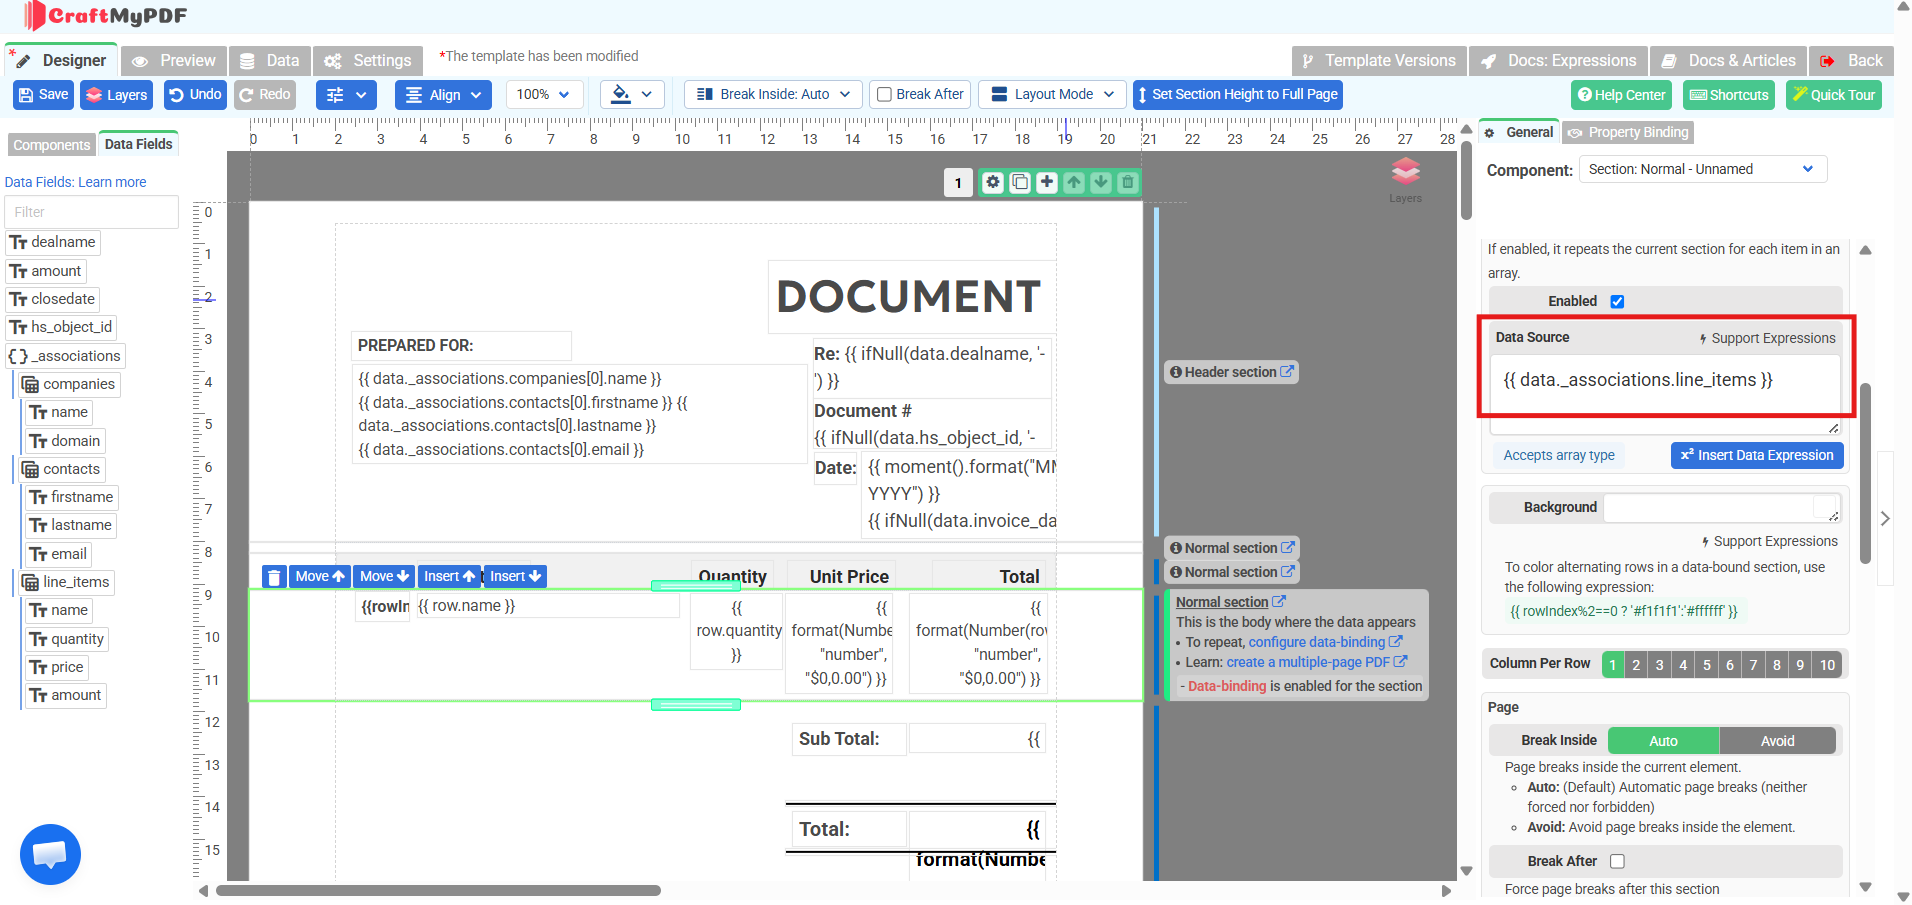
This is the part that turns a sample invoice into the real document. The rows “Item 1” and “Item 2” in the starter are not separate rows; they’re a single normal section with Data Binding turned on, repeated once per element of the items array.
- Click directly on the “Item 1” row. In the property panel, find the Data Binding section. The Data Source reads
{{ data.items }}. - Replace it with
{{ data._associations.line_items }}. - Inside that row, click each cell and swap its
row.expression:
| Column | Starter expression | Replace with |
|---|---|---|
| # | {{ rowIndex + 1 }} | leave as is |
| Description | {{ row.description }} | {{ row.name }} |
| Quantity | {{ row.qty }} | {{ row.quantity }} |
| Unit Price | {{ row.unitprice }} (may be wrapped with data.currency) | {{ format(Number(row.price), "number", "$0,0.00") }} |
| Total | {{ row.qty * row.unitprice }} (or similar) | {{ format(Number(row.amount), "number", "$0,0.00") }} |
Totals
| Starter label | Starter expression | Replace with |
|---|---|---|
| Sub Total: | a sum over data.items | {{ format(Number(data.amount), "number", "$0,0.00") }} |
| Total: | subtotal minus balance | {{ format(Number(data.amount), "number", "$0,0.00") }} |
Then delete two elements the document doesn’t need: the Balance row ({{ data.balance }}), which belongs to an invoice rather than a document being signed, and the footer text ({{ data.footer }}) at the bottom of the page. Removing both frees the vertical space you’ll need for the signature block ahead.
Click Preview and use Quick Preview (HTML) to check that every field renders with your Deal data. Then click Save in the top-left.
2d. Enable E-Signature and add the buyer as the signer
- Open Settings and click the E-Signature tab.
- Check Enable E-Signature. Four sections appear:
| Section | Controls |
|---|---|
| Signing order | Parallel (default) or sequential; leave Parallel for a single signer |
| Envelope details | Optional custom email subject and message |
| Envelope expiration | Optional deadline, disabled by default, 30 days once enabled |
| Recipients | Who signs, and in what role |
- In Recipients, add one recipient. It receives the Recipient ID
recipient_1, which you’ll use when assigning fields. - Set its Role to Signer.
- In the Name field, enter
{{ data._associations.contacts[0].firstname }} {{ data._associations.contacts[0].lastname }}. - In the Email field, enter
{{ data._associations.contacts[0].email }}.
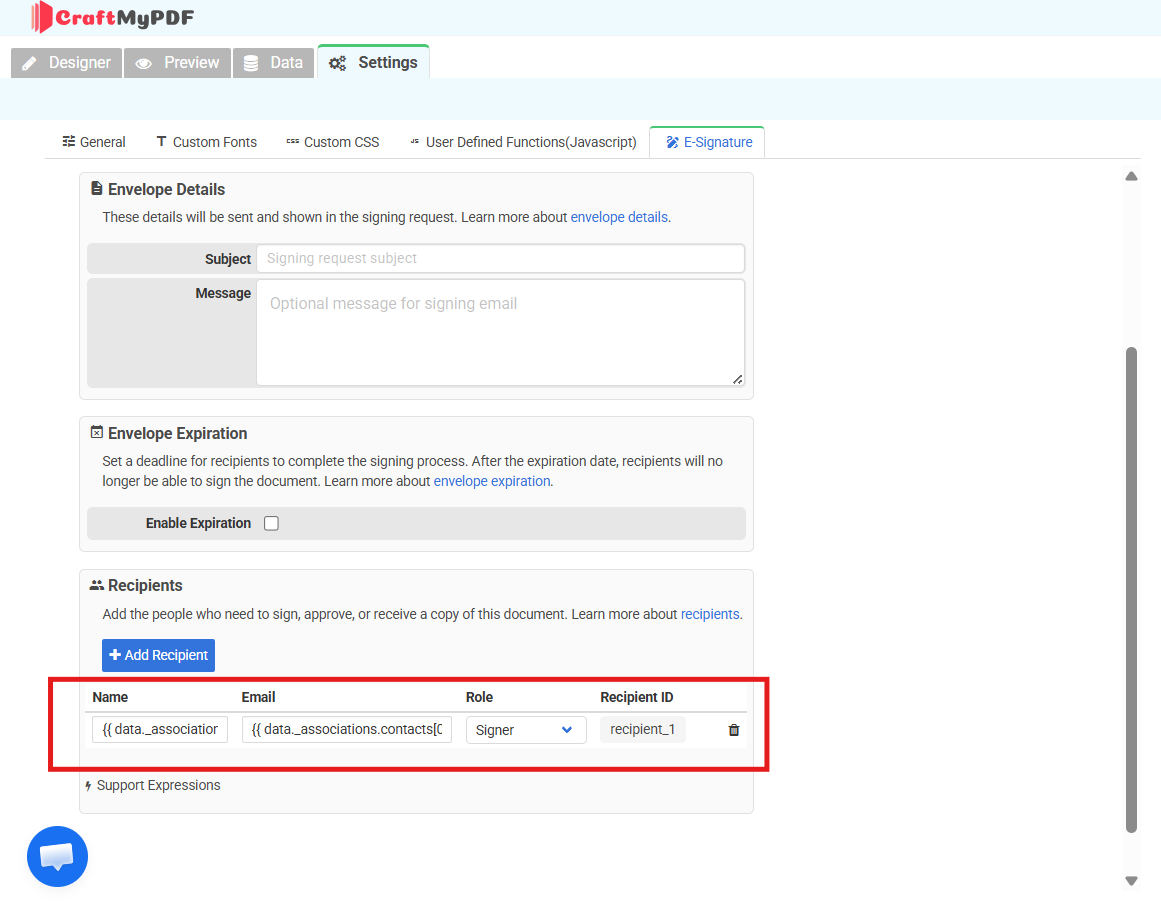
Because both are expressions rather than typed values, every Deal this template runs against resolves to its own buyer automatically.
Signer is one of five roles available:
| Role | Action required | Can sign | Typical use |
|---|---|---|---|
| Signer | Yes | Yes | The buyer signing the document |
| Approver | Yes | Optional | Internal sign-off before it reaches the buyer |
| Viewer | Yes | No | Acknowledges the document, no fields assignable |
| CC | No | No | Receives a copy after completion |
| Assistant | Yes | No | Pre-fills fields for a later signer; requires sequential signing |
2e. Add the signature block to the document
The Minimalist starter leaves open space below the totals block, which is where the signature goes.
- Back in the Designer tab, click in the empty area below the Total row to make sure you’re in the normal section beneath the totals, not inside the line-items section.
- Add a Label component there and set its text to Accepted by: (a normal static label, not an E-Signature field). Add a second Label to its right that reads Date:.
- Open the Components panel on the left and scroll to the E-Signature Fields section. Ten field types are listed: Signature, Initials, Email, Name, Date, Text, Number, Radio, Checkbox, and Dropdown.
- Drag a Signature field onto the page directly beneath “Accepted by:”. Resize it to a comfortable signing area, roughly the width of the totals block and about 15 to 20 mm tall.
- Drag a Name field beneath the Signature field, so the buyer’s printed name appears under their signature.
- Drag a Date field beneath the “Date:” label. Name and Date auto-fill from the recipient at signing time, so the buyer doesn’t have to type them.
- Click the Signature field. In the property panel on the right, open the Recipient dropdown and select
recipient_1. - Repeat step 7 for the Name field and the Date field. Every E-Signature field must be assigned to a recipient, and every Signer needs at least one Signature field.
- Optional, if your terms require it: drag a Checkbox field next to a Label reading “I accept the terms above”, assign it to
recipient_1, and set Required in its properties so the buyer can’t complete without ticking it. - Click Save.
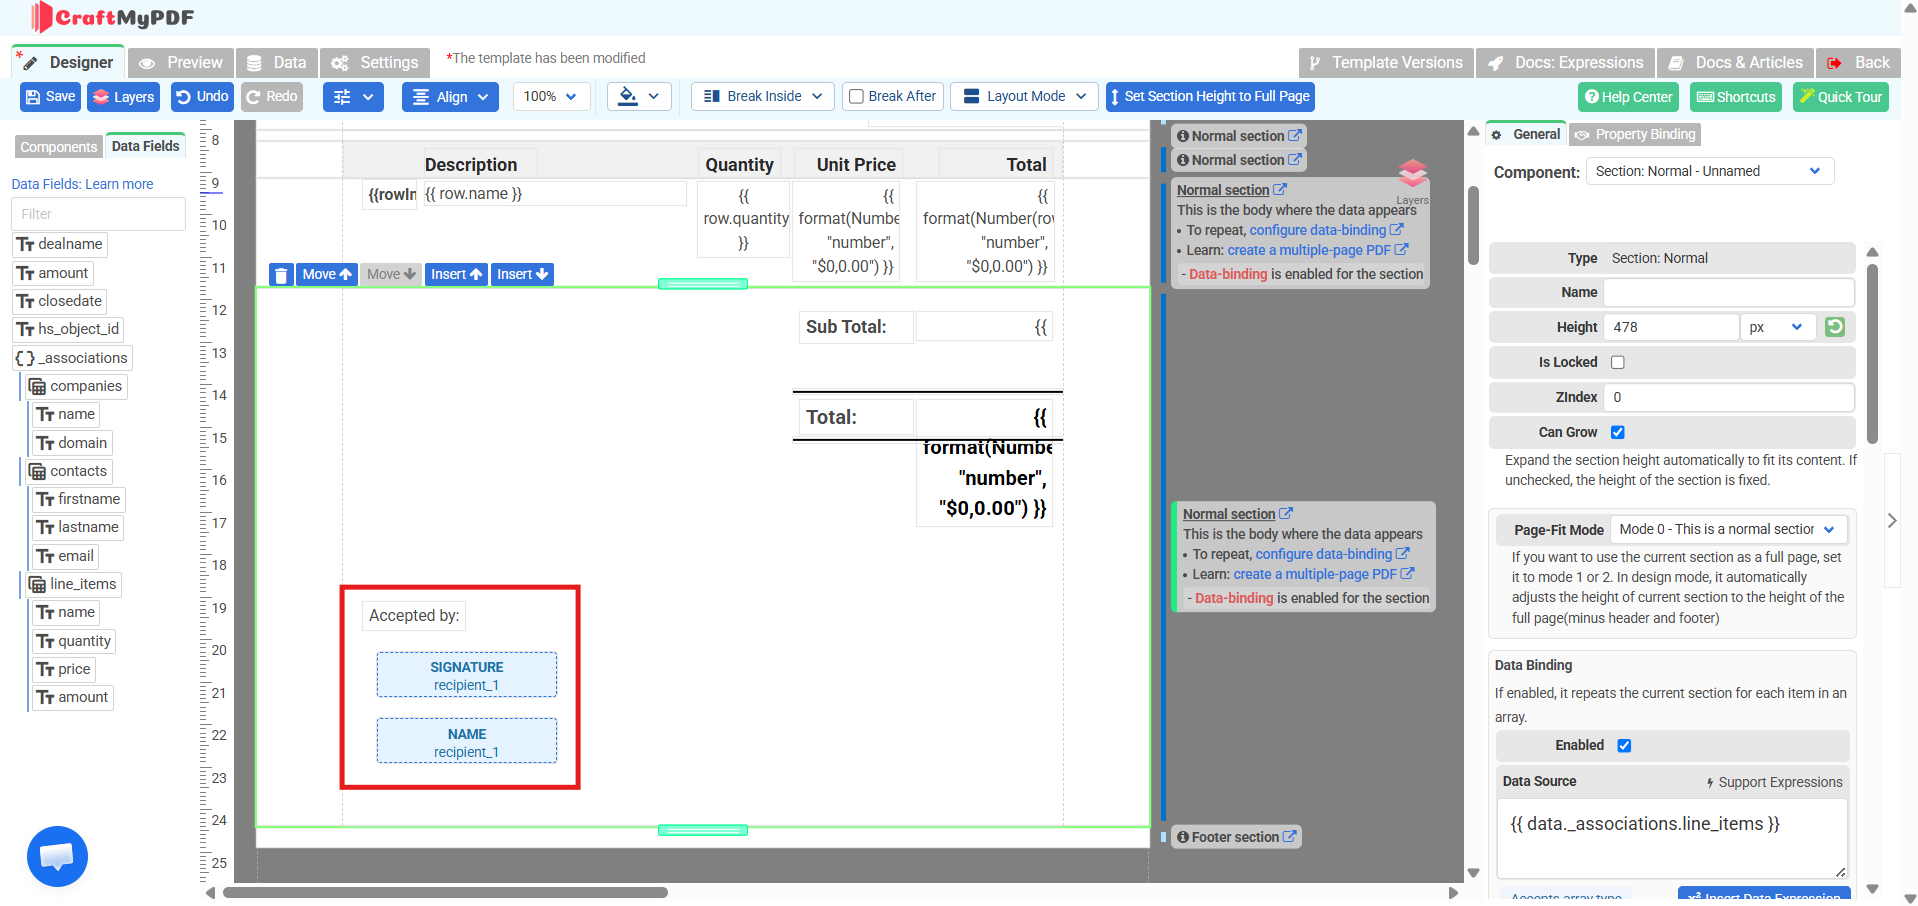
Note the template’s name and Template ID from Manage Templates; you’ll select it by name on the HubSpot app card.
Step 3: Generate and Send the Document From the Deal Record
Open a Deal and find the CraftMyPDF app card. Generating a PDF is a three-step process on the card itself:
- Select your signature-enabled document template from the dropdown.
- Select the associated object types to include. Tick exactly the same ones you ticked in Preview Data in Step 2a, for this template Contacts, Companies, and Line Items. An object type you leave unticked here is simply absent from
_associationsat generation time, even though it was present in your sample data, so any element referencing it renders blank or throws. - Click Generate PDF. You can also check the option to have the app create a Note on the Deal with the generated PDF attached, so the outgoing document is logged on the timeline the moment it’s sent.
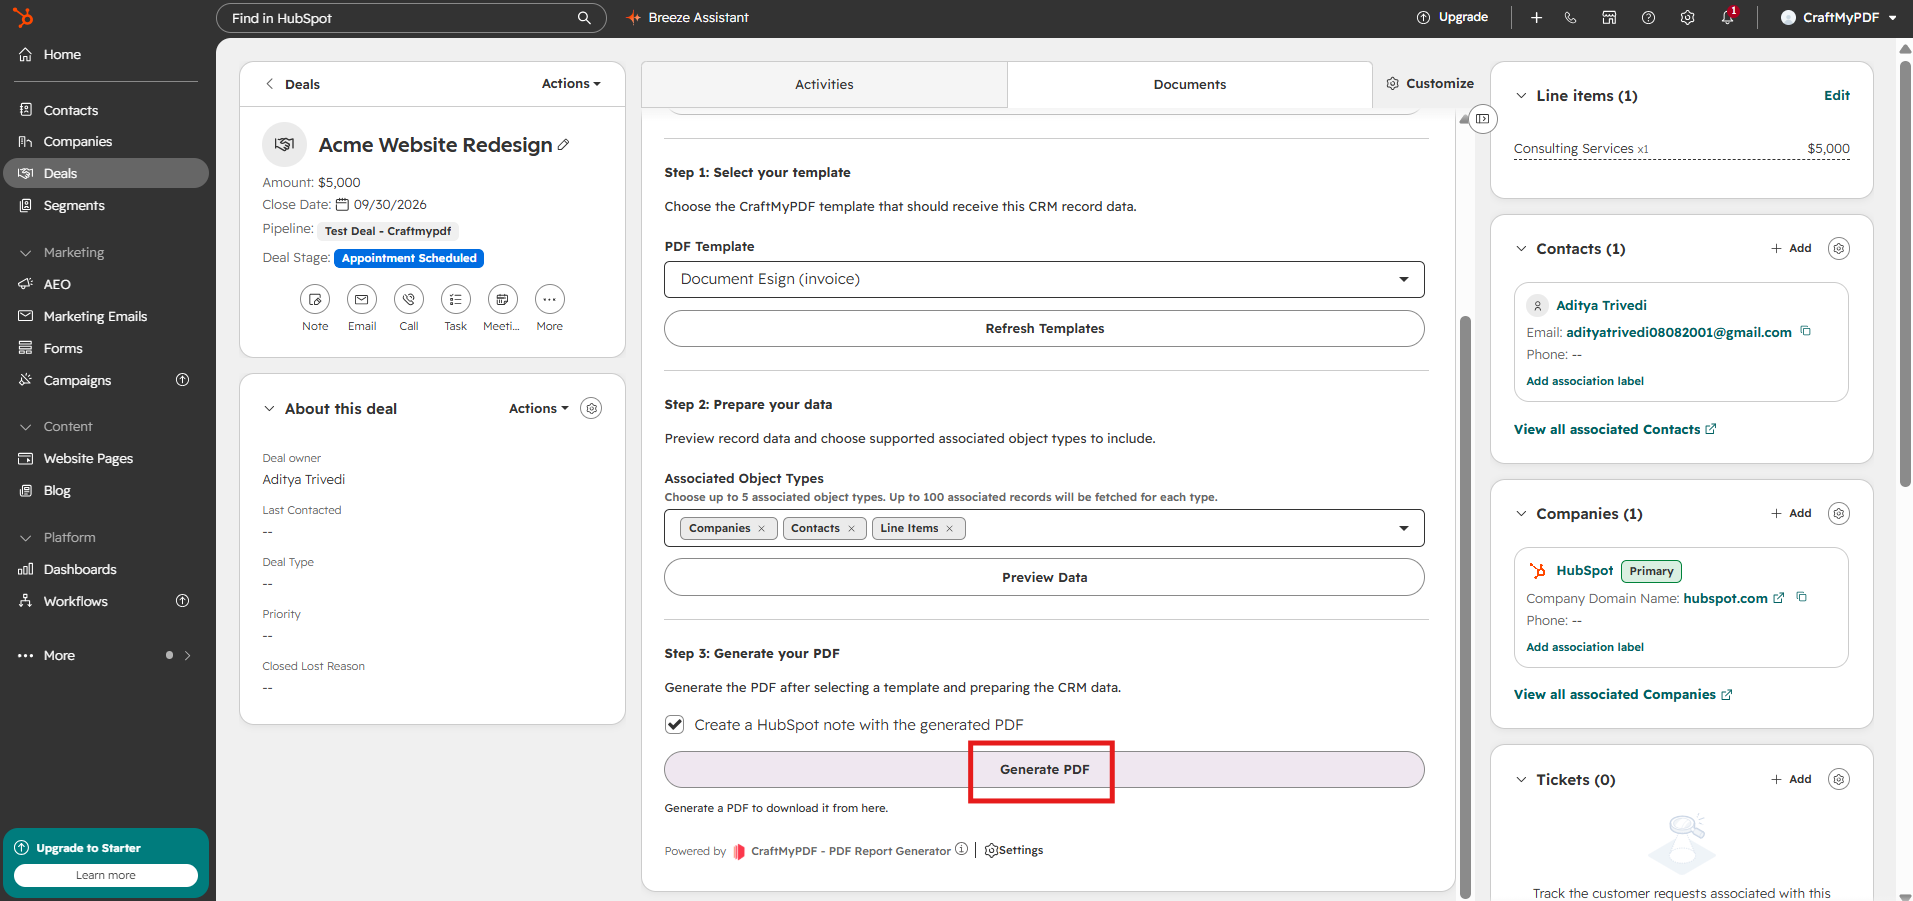
Generating the PDF renders the document and creates the Documenso envelope in the same action, so the signing email goes out to the buyer immediately. There’s no separate “send” step to run.
For your first run, use the test deal from Step 2a with your own email as the contact. This sends a real email and uses real credits (10 per signed document), so you want to be the recipient. Then:
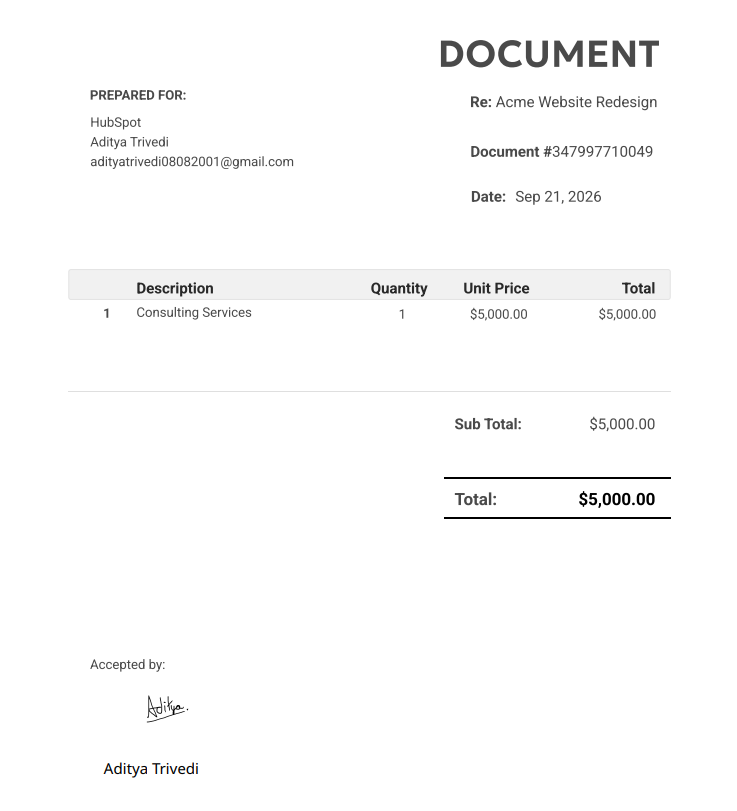
- Open the generated PDF (from the Note on the Deal, if you enabled it) and check the line items, totals, and “Prepared for” block match the Deal.
- Check your inbox for the signing email. The default subject is “CraftMyPDF invited you to sign a document” unless you customised it.
- Click through, and confirm the Signature, Name, and Date fields sit where you placed them under “Accepted by:”, and that Name and Date are pre-filled.
- Sign by drawing, typing, or uploading, and complete.
Step 4: Track Signing Status
Signing is asynchronous. Generating the PDF only gets a document to “sent,” well before anyone has actually signed it.
Open Signed Documents in your CraftMyPDF dashboard, next to Manage Templates, to see every document generated from your templates, along with its template, transaction reference, recipient count, status, and timestamps.
Depending on status, three actions are available: Retry Send for a document that was created but failed to distribute, Signing Links to view and copy each recipient’s individual signing URL (useful when a buyer says they never got the email), and Download for sent and completed documents.
Once a document reaches the Completed stage, download the signed PDF.
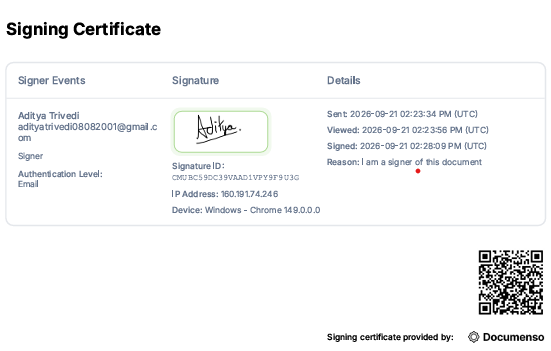
A Signing Certificate page is appended to every successfully signed document:
Where Teams Use This
- Sales agreements and order forms, generated the moment a deal reaches your contract stage
- Client onboarding and service agreements, sent from the Deal right after close
- NDAs, generated from a Company or Contact record before a deal even exists
- HR offer letters, built from a Contact record with the candidate as the signer
- Partner, sponsorship, and co-marketing agreements, kept on the Company record where the relationship lives
Only the object and the template change; the workflow is identical.
Conclusion
Once this is wired up, a salesperson never leaves the Deal record to get a document signed. The template is built once, the signing request goes out the moment the PDF is generated, and status lives on a dashboard instead of in someone’s inbox.
The same pattern extends to other teams: sales for sales agreements and order forms, legal for contracts and NDAs tied to a Deal or Company, HR for offer letters linked to a Contact. Only the object and template change.
Create a free CraftMyPDF account and connect it to your HubSpot portal.
Additional Resources
- eSignature API
- HubSpot Integration documentation
- How to Add E-Signatures to PDFs and Automate Signing with CraftMyPDF
- How To Automate eSignatures Using Zapier (with CraftMyPDF)
- 10 Best eSignature API Features for Developers in 2026
- E-Signature component reference
- Pricing
FAQ
How do I add eSignatures to a HubSpot Deal without using Zapier?
Install CraftMyPDF’s native HubSpot app, connect your API key, and build a template with E-Signature enabled and recipients bound to the Deal’s associated Contact. Generating the PDF from the app card on the Deal creates the signing envelope and emails the buyer automatically.
Which HubSpot records can I generate signable documents from?
Deals, Contacts, Companies, Tickets, Orders, and Carts, plus custom objects on HubSpot Enterprise and objects activated in the data model builder. This guide uses the Deal, since its Line Items, Contact, and Company associations already hold everything the document needs.
Which HubSpot data can I pull into the document automatically?
Deal properties plus any associated object types you choose in the app card’s Preview Data step, typically Contacts for the buyer and Line Items for pricing, plus Company if needed.
Is the signature collected this way legally binding?
CraftMyPDF’s E-Signature runs entirely on Documenso, so the signatures inherit Documenso’s compliance: the US ESIGN Act, UETA, eIDAS SES (Simple Electronic Signature), 21 CFR Part 11, SOC 2, and HIPAA.
How many credits does a signed document use?
10 credits from your existing plan balance, the same balance used for plain PDF generation, which costs 1 credit per PDF. On the Free plan’s 50 monthly credits that works out to 5 signed documents a month. Credits reset monthly and don’t roll over.
How do I know when a Deal’s document has been signed?
Check the Signed Documents dashboard in CraftMyPDF; status moves from Sent to Completed.
Start generating PDFs today
Design templates in the browser and generate pixel-perfect PDFs via a simple REST API. 50 free PDFs every month, no credit card required.
Keep reading
CraftMyPDF vs DocuSign vs PandaDoc: Which eSignature API Should Developers Choose in 2026?
DocuSign, PandaDoc or CraftMyPDF? Compare eSignature API pricing, webhooks, embedded signing, eIDAS levels and the steps from data to a signed PDF.
How To Automate eSignatures Using Zapier (with CraftMyPDF)
A step-by-step guide to sending contracts for eSignature automatically: build the template once, trigger it from Zapier, track signing status in CraftMyPDF.
10 Best eSignature API Features for Developers in 2026
The 10 eSignature API features developers should compare, from single-call generation to recipient roles, signing order, field validation, and legal standards.