How to Add E-Signatures to PDFs and Automate Signing with CraftMyPDF
 By Jacky Tan Updated July 17, 2026
Learn how to add e-signature fields to PDFs and automate your signing workflow with CraftMyPDF. This guide shows you how to import a PDF, place signature fields, assign signers, and generate signable documents using simple JSON data and API automation.
TL;DR
This guide shows you how to use the eSignature API to add e-signature fields to an existing PDF contract in CraftMyPDF. You will import a service agreement, connect JSON data, configure two signers, place signature fields, and send signing requests automatically.
- What you will build: A reusable PDF contract template with two signers, dynamic contract details, and e-signature fields.
- Cost: A CraftMyPDF account is required. CraftMyPDF offers a free tier for PDF generation; check your current plan for e-signature availability.
- Technical skill needed: Minimal. You will use the CraftMyPDF template editor and a simple API request in Postman.
- Time to set up: Around 20 to 30 minutes.
- Best for: Service agreements, onboarding documents, approval forms, sales contracts, and any PDF that needs signatures.

PDF contract signing is often manual: prepare the contract, add signer details, email each party, wait for replies, and store the final copy. That works for one-off documents, but it becomes slow when your team handles contracts every week.
With CraftMyPDF, you can turn an existing PDF contract into a reusable template that generates personalized documents, creates signing envelopes, emails signers, and tracks signing status from the dashboard.
Watch the Video Tutorial
Follow along with the full video walkthrough on YouTube:
If the video does not load, open it directly on YouTube.
How CraftMyPDF E-Signature Works
An e-signature, or electronic signature, lets someone review, approve, and sign a PDF contract or business document online without printing, scanning, or mailing paper copies. For contracts, approvals, onboarding forms, and document signing workflows, e-signatures help teams move faster while keeping a clear record of who signed and when.
CraftMyPDF integrates with Documenso to add electronic signatures to PDF templates, making it easier to automate online PDF signing for contracts and forms with support for ESIGN Act, UETA, and eIDAS (SES) compliance.
When e-signature is enabled, CraftMyPDF creates am e-signature envelope after each PDF generation, assigns the configured signing fields to the right recipients, and sends secure signing requests by email.
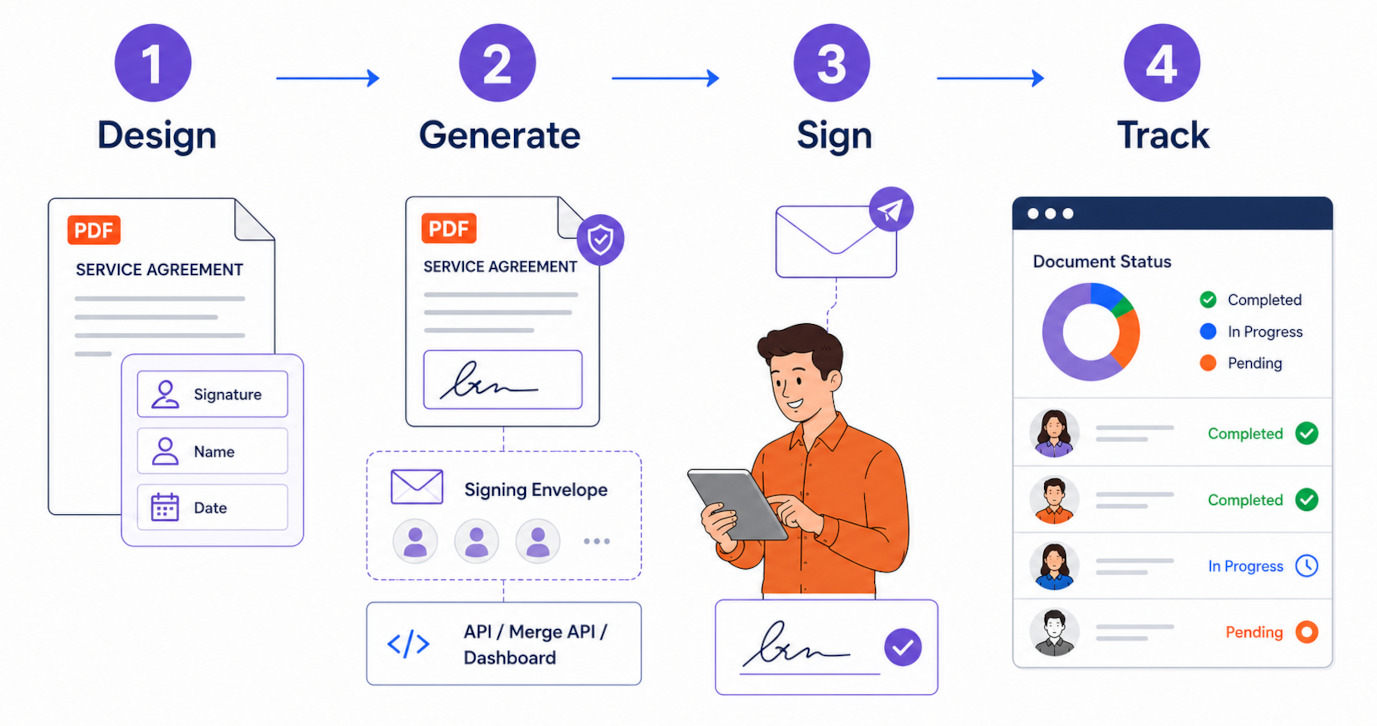
The workflow has four parts:
- Design – Enable E-Signature on a PDF template, configure the signing order, envelope details, expiration, and recipients, then place e-signature fields on the PDF.
- Generate – Generate a PDF through the API, Merge API, or dashboard. CraftMyPDF renders the PDF and queues the signing envelope for processing.
- Sign – Recipients receive an email with a unique signing link and complete their assigned actions.
- Track – Monitor the document status and download signed PDFs from the Signed Documents page.
One important note: E-Signature is available only for PDF templates. It is not available in Preview mode, so you need to generate the document to start the signing workflow.
Signing Order, Recipient Roles, and Document Lifecycle
Before building the template, it helps to understand how signing order and document states work in CraftMyPDF. You can find more information at our support page.
Signing Order
CraftMyPDF supports parallel and sequential signing. Parallel signing sends the document to all recipients at the same time, while sequential signing sends it one order level at a time.
In this tutorial, we use parallel signing because the client and service provider can sign the agreement in any order. Use sequential signing for approval chains, review steps, or workflows that require the Assistant role. For more details, see the CraftMyPDF signing order documentation.
Recipient Roles
CraftMyPDF supports several recipient roles:
- Signer: Must sign the document. Each signer must have at least one Signature field assigned.
- Approver: Must approve or reject the document. Signing is optional if fields are assigned.
- Viewer: Must view and acknowledge the document but cannot sign or fill fields.
- CC: Receives a copy after completion and does not need to take action.
- Assistant: Can pre-fill fields for later recipients. This role requires sequential signing.
For a simple service agreement, both the client and provider are set as Signer.
Document Lifecycle
After the PDF is generated, the signing document moves through lifecycle states. The following diagram shows the document lifecycle states and how a signing document moves from one status to another.
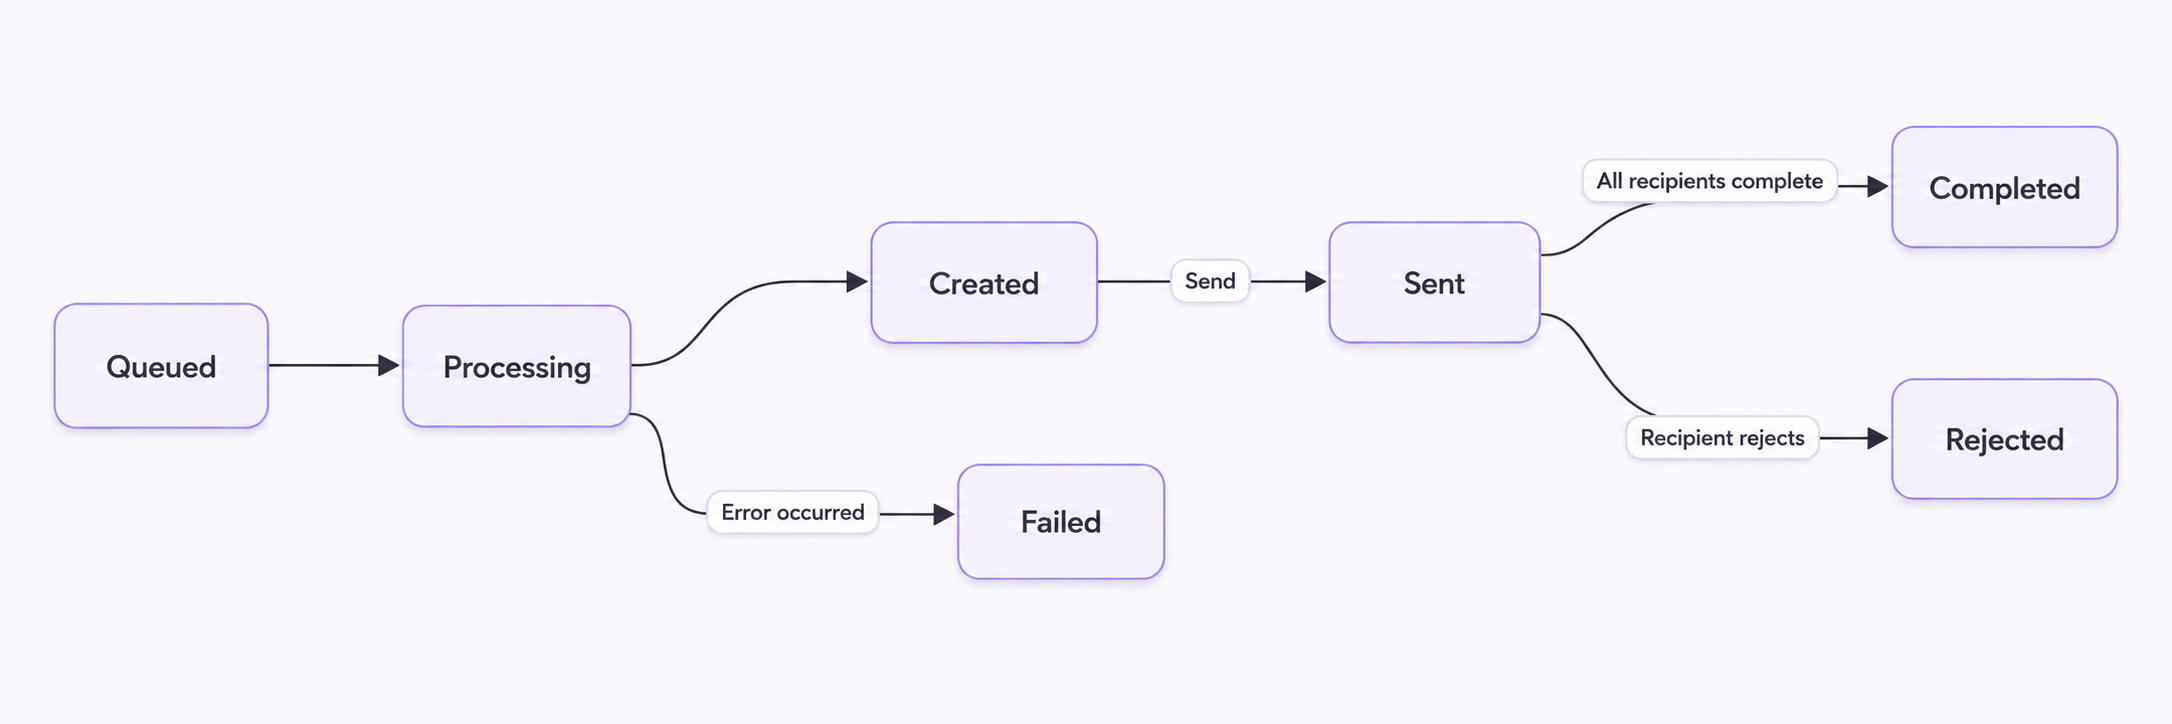
You can check these from the Signed Documents page in CraftMyPDF.
- Queued: The document is waiting to be processed.
- Processing: The document is being sent to Documenso.
- Created: The envelope was created but has not yet been sent to recipients.
- Sent: The document has been sent and is waiting for recipient actions.
- Completed: All recipients have completed their required actions.
- Rejected: A recipient rejected the document.
- Failed: Processing failed, often because of invalid template configuration or validation errors.
- Cancelled: The document was permanently deleted from Documenso.
The Signed Documents page also shows the template, transaction reference, recipient count, status, timestamps, and available actions. Depending on the document status, you can retry sending, view signing links, or download the signed PDF.
For more details, see the CraftMyPDF document lifecycle documentation.
Things to Take Note Before You Start
There are a few rules that will save you time when setting up e-signature templates:
- Every E-Signature field must be assigned to a recipient.
- Each signer must have at least one Signature field assigned.
- Recipient names and emails can be static values or dynamic expressions.
- Dynamic expressions must match the JSON payload you send when generating the PDF.
- The signing email subject and message are optional. If left blank, Documenso generates default email text based on the recipient role.
- Envelope expiration is optional. When enabled, the default expiration is 30 days.
- Each recipient gets a unique signing link. The link stops working when the document is completed, rejected, cancelled, or expired.
Prerequisites
Before you begin, you need:
- A CraftMyPDF account. If you are new to the platform, start with the CraftMyPDF Getting Started guide.
- An existing PDF contract. In this tutorial, we use a one-page Simple Service Agreement.
- Sample JSON data with the contract and signer details.
- A CraftMyPDF API key if you want to generate the PDF from Postman or your own application.
Here is the sample data used in this tutorial:
{
  "client_name": "Alex Tan",
  "client_email": "alex@example.com",
  "provider_name": "Jamie Lee",
  "provider_email": "jamie@example.com",
  "contract_amount": "USD 1,200",
  "effective_date": "2026-07-08"
}
How to Add E-Signature Fields to a PDF Contract
This section walks through the full setup in CraftMyPDF, from importing the existing PDF contract to sending it for signing.
Step 1: Import the Existing PDF Contract
Log in to CraftMyPDF and open the Manage Templates tab. Click Create Template from PDF, then import your existing service agreement PDF.
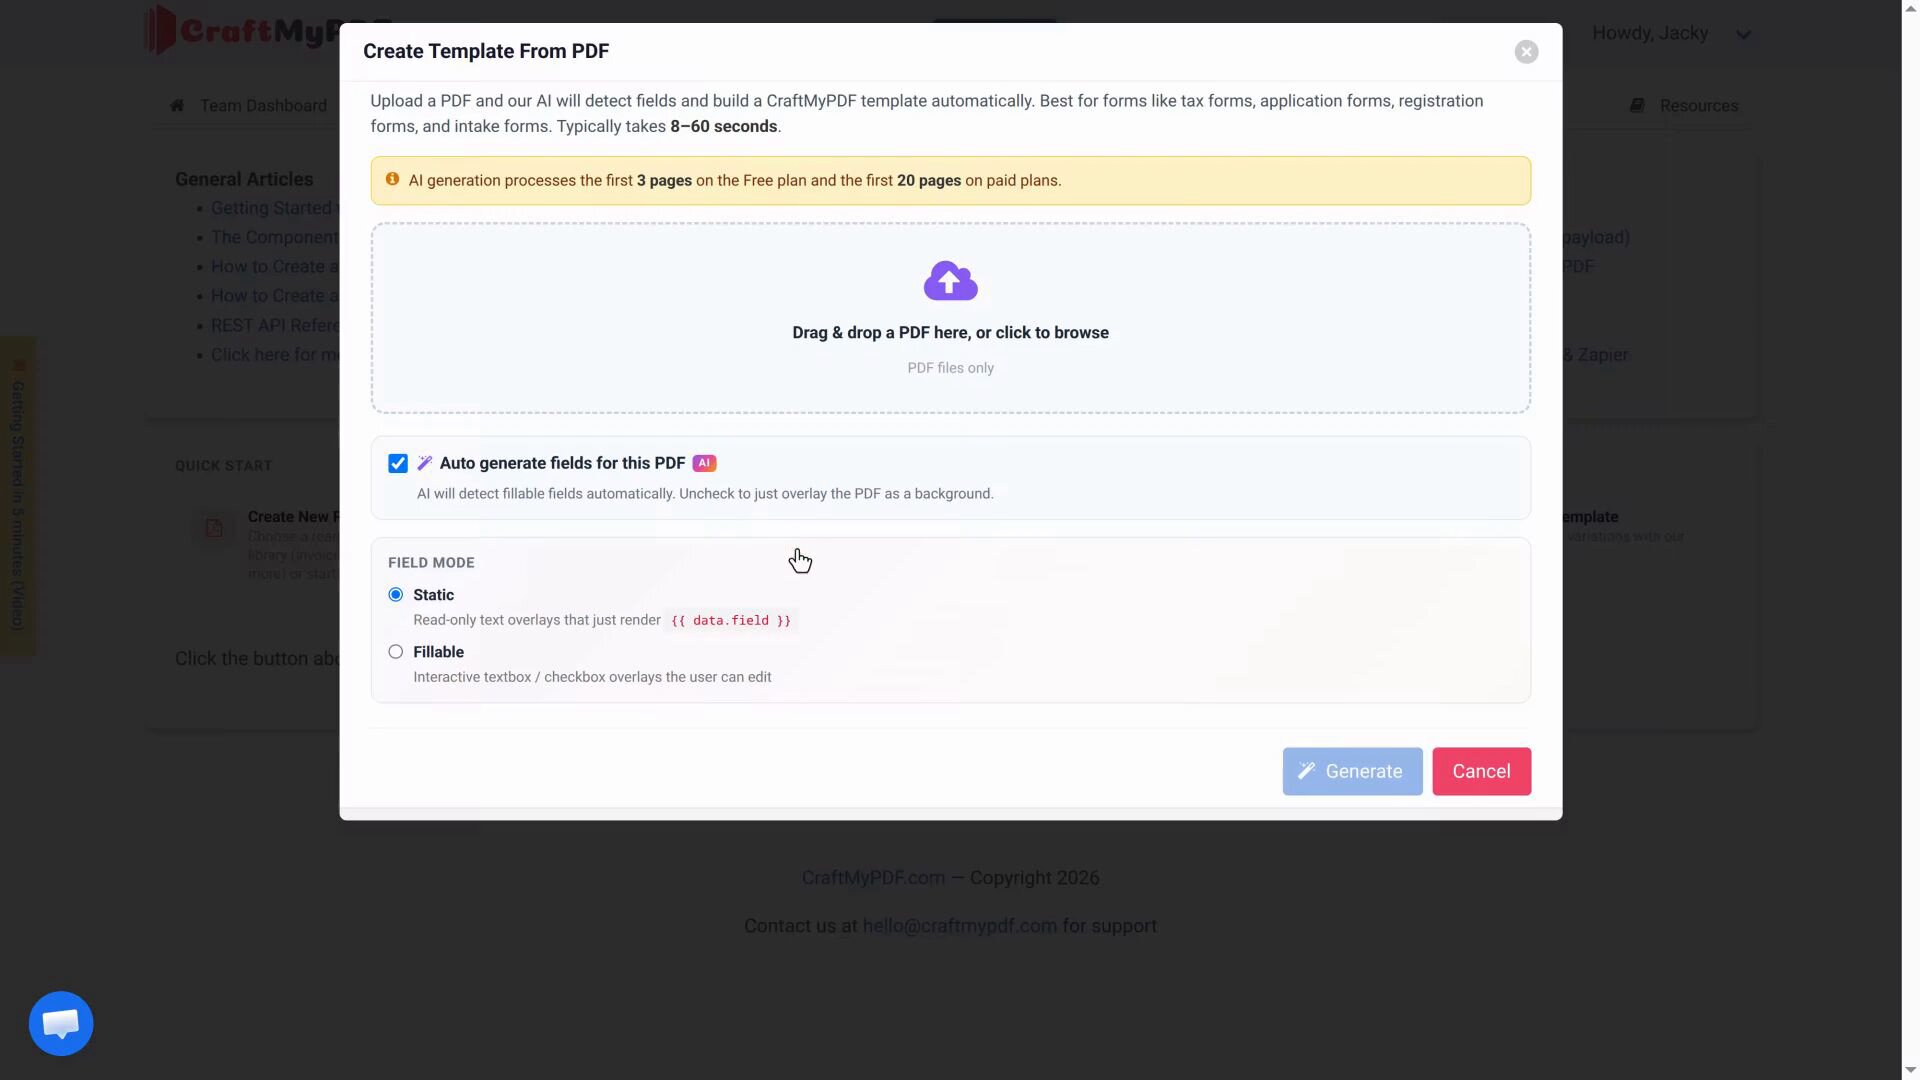
After the PDF is imported, click Edit to open it in the template editor.
Step 2: Add Sample JSON Data
Open the Data tab in the editor and paste in the sample JSON. This data includes the client name, provider name, email addresses, contract amount, and effective date.
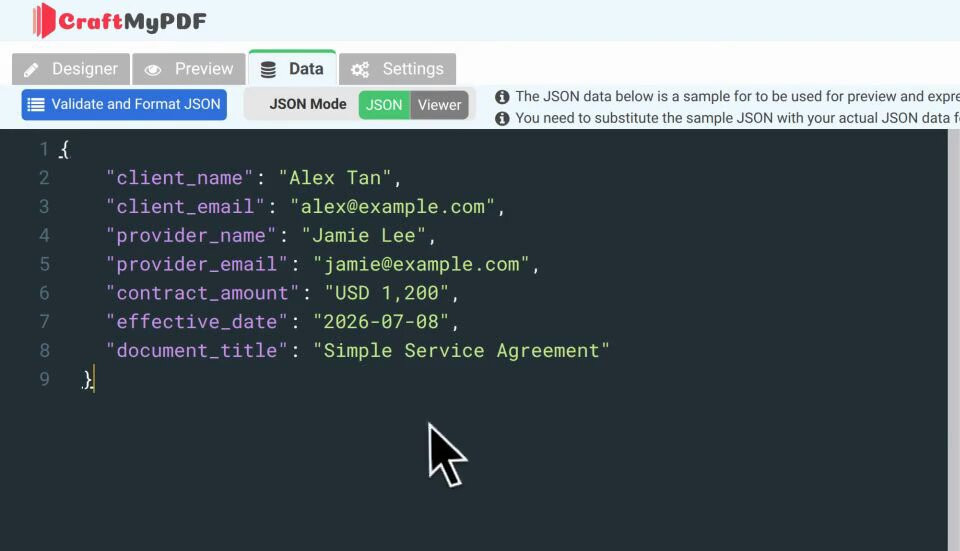
Using JSON data makes the template reusable. Instead of hardcoding names and emails into the PDF, you can pass new data each time you generate a document.
Step 3: Enable E-Signature and Configure the Envelope
Next, open Settings and go to the E-Signature panel. Check Enable E-Signature for this template.
For this example, choose Parallel signing. This sends the signing request to both signers at the same time, so the client and provider can sign in any order.
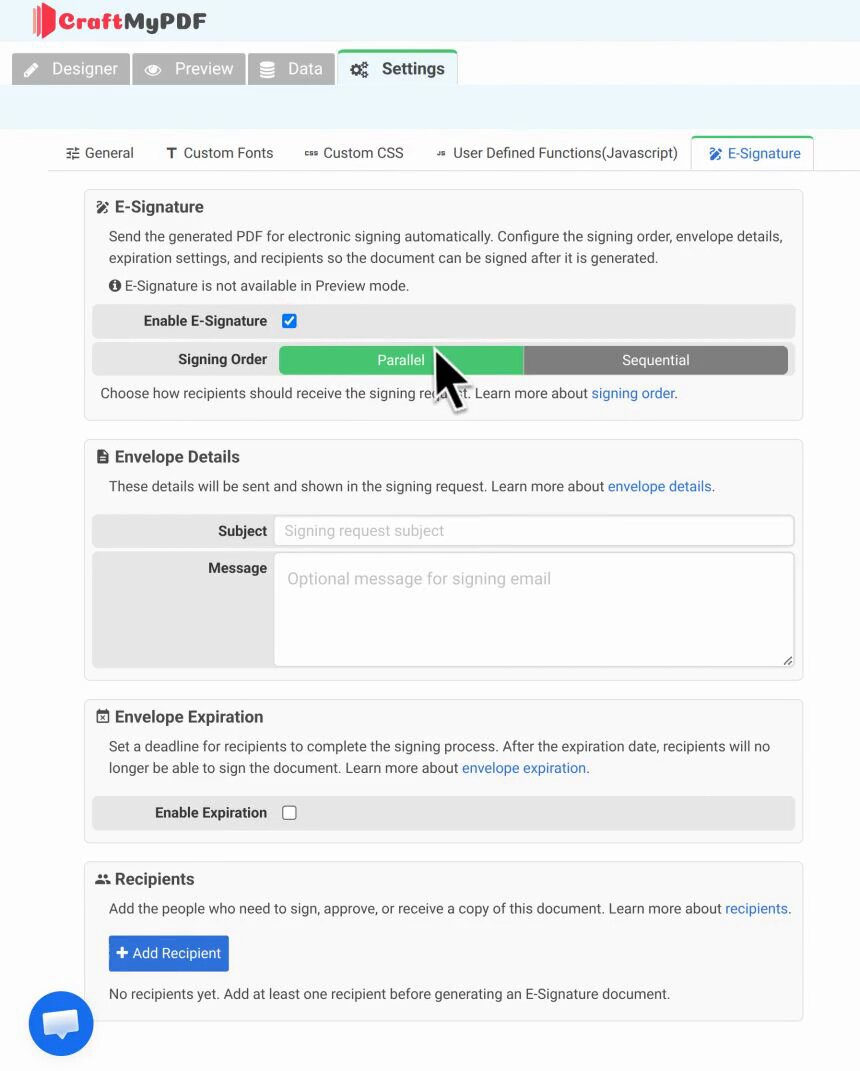
Then add the signing email details:
- Subject:
Please sign the service agreement. - Message:
Hi {signer.name}, please review and sign the document. Thank you.
The {signer.name} variable is replaced with each recipient’s name in the signing email. You can also use {signer.email} for the recipient’s email address and {document.name} for the document title.
Step 4: Add Recipients with Dynamic Expressions
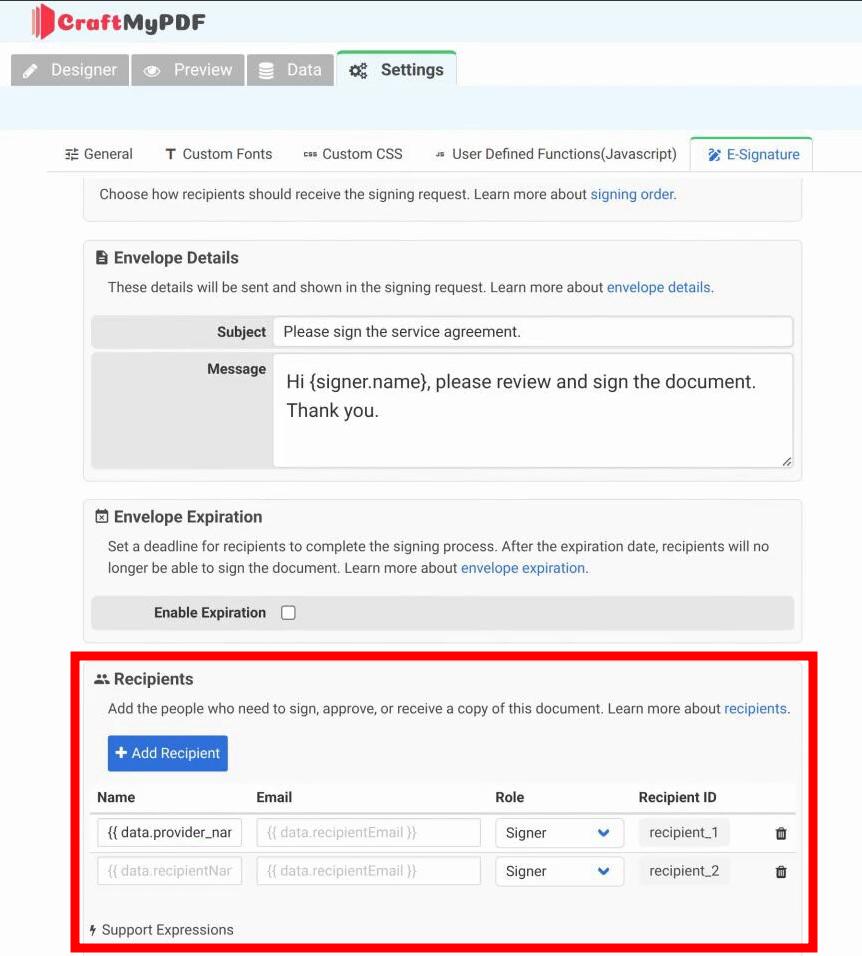
Now add the two recipients. In this tutorial, both recipients use the Signer role:
- Provider
- Client
Instead of entering static names and emails, use expressions from the JSON data. This keeps the template reusable for future contracts.
For the provider:
{{ data.provider_name }}
{{ data.provider_email }}
For the client:
{{ data.client_name }}
{{ data.client_email }}
When the PDF is generated, CraftMyPDF evaluates these expressions and sends the signing request to the email addresses from your JSON payload.
Step 5: Place Dynamic Contract Fields
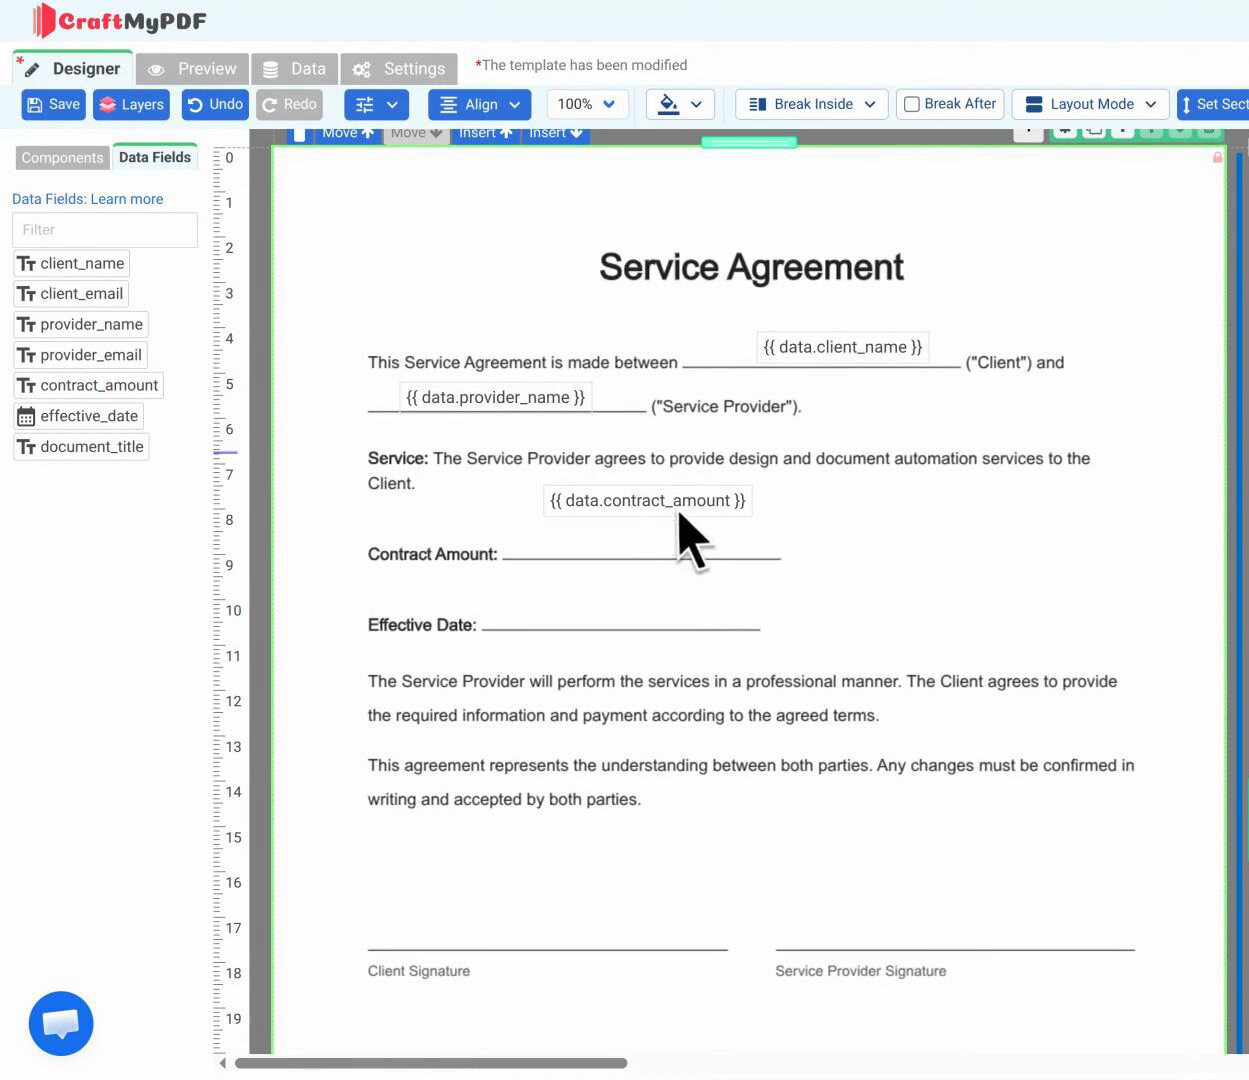
Switch to the Designer tab. You can use the data fields from the JSON to personalize the contract text.
For example, drag fields such as client name, provider name, contract amount, and effective date onto the contract. These values are populated automatically when the PDF is generated.
This step is optional if your imported PDF already contains all contract details. It is useful when you want one contract template to work for many clients or agreements.
Step 6: Add and Assign E-Signature Fields
Open the Components tab and find the E-Signature Fields section. For this service agreement, add the following fields:
- A Signature field for the client.
- A Name field below the client’s signature.
- A Date field below the client’s signature.
- A Signature field for the provider.
- A Name field below the provider’s signature.
- A Date field below the provider’s signature.
The Signature field captures the recipient’s legally binding signature. The Name and Date fields help show who signed the agreement and when.
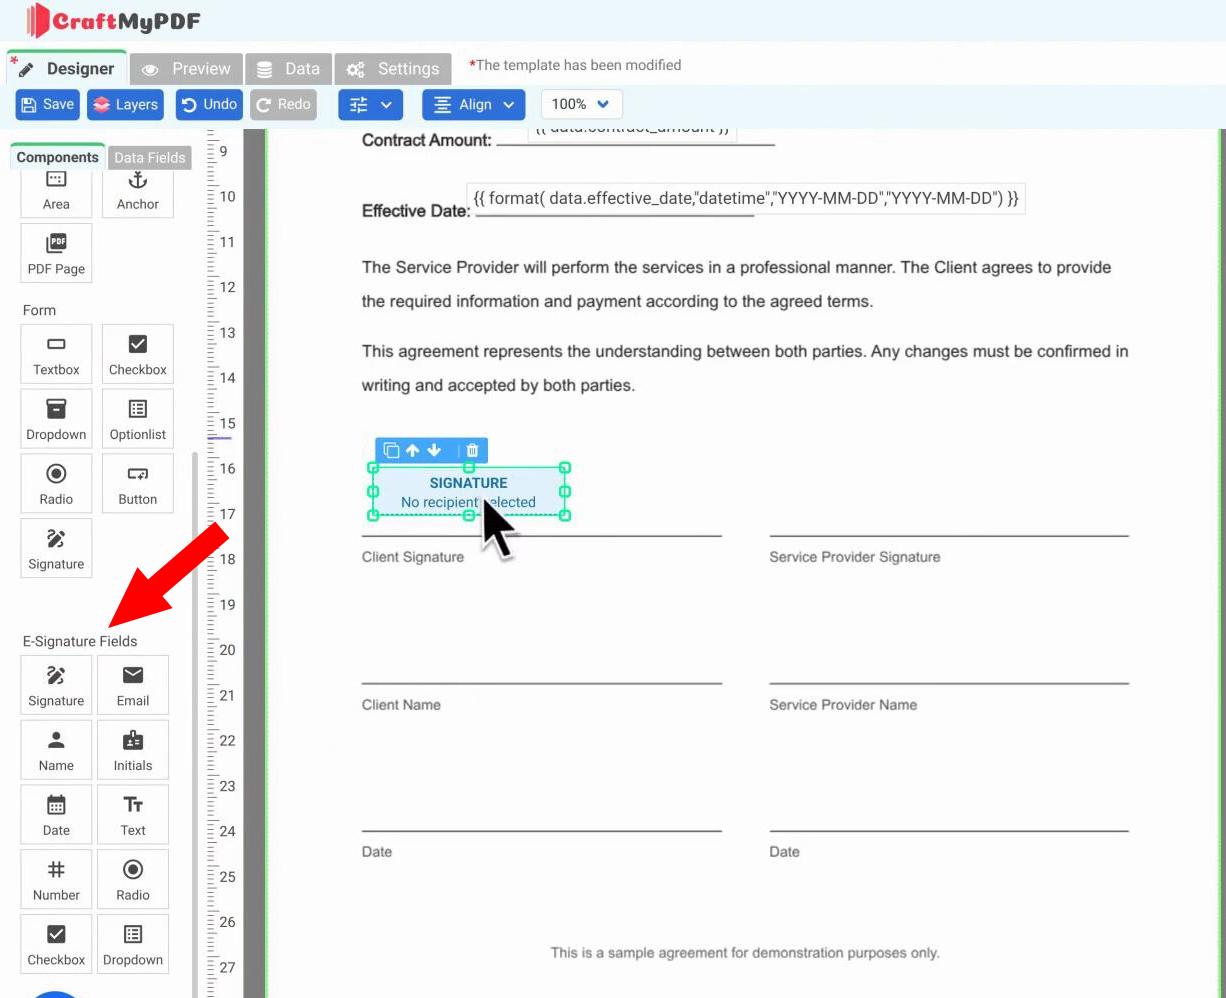
After placing the fields, assign each one to the correct recipient. Select a field on the canvas, then choose the recipient from the Recipient dropdown in the properties panel.
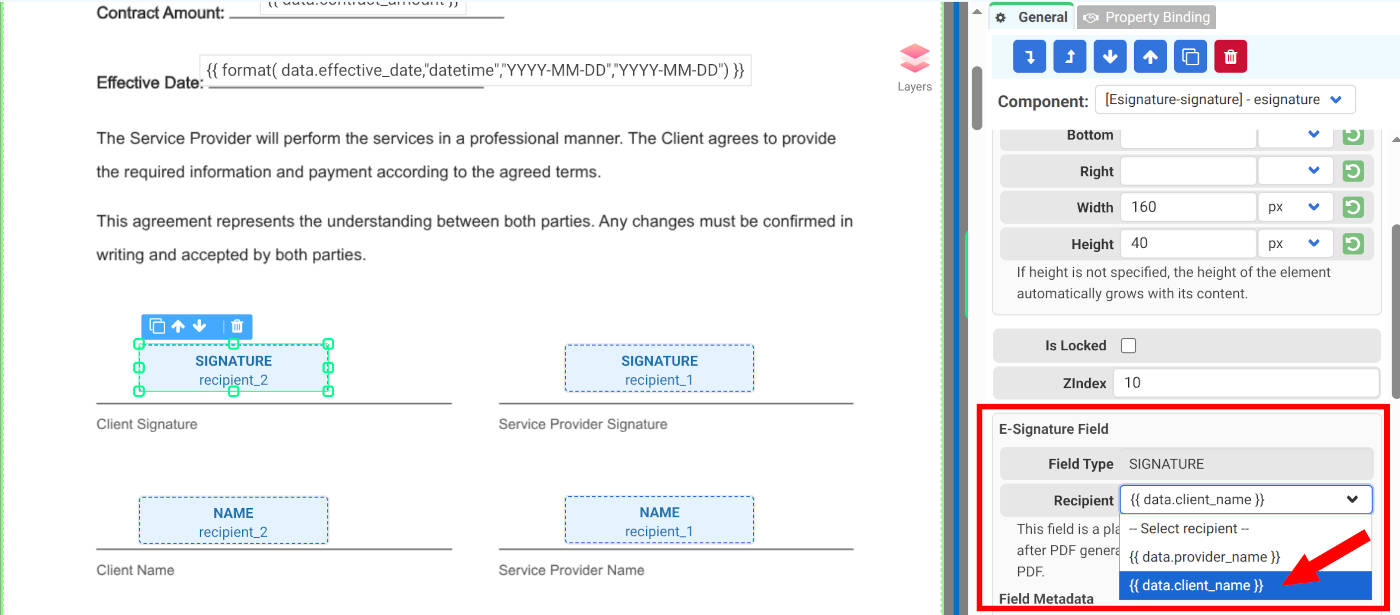
Make sure every e-signature field has a recipient. If a field is not assigned, the signing workflow may fail validation or the signer may not see the expected field.
Once every field is assigned, click Save.
Step 7: Generate the PDF and Send Signing Requests
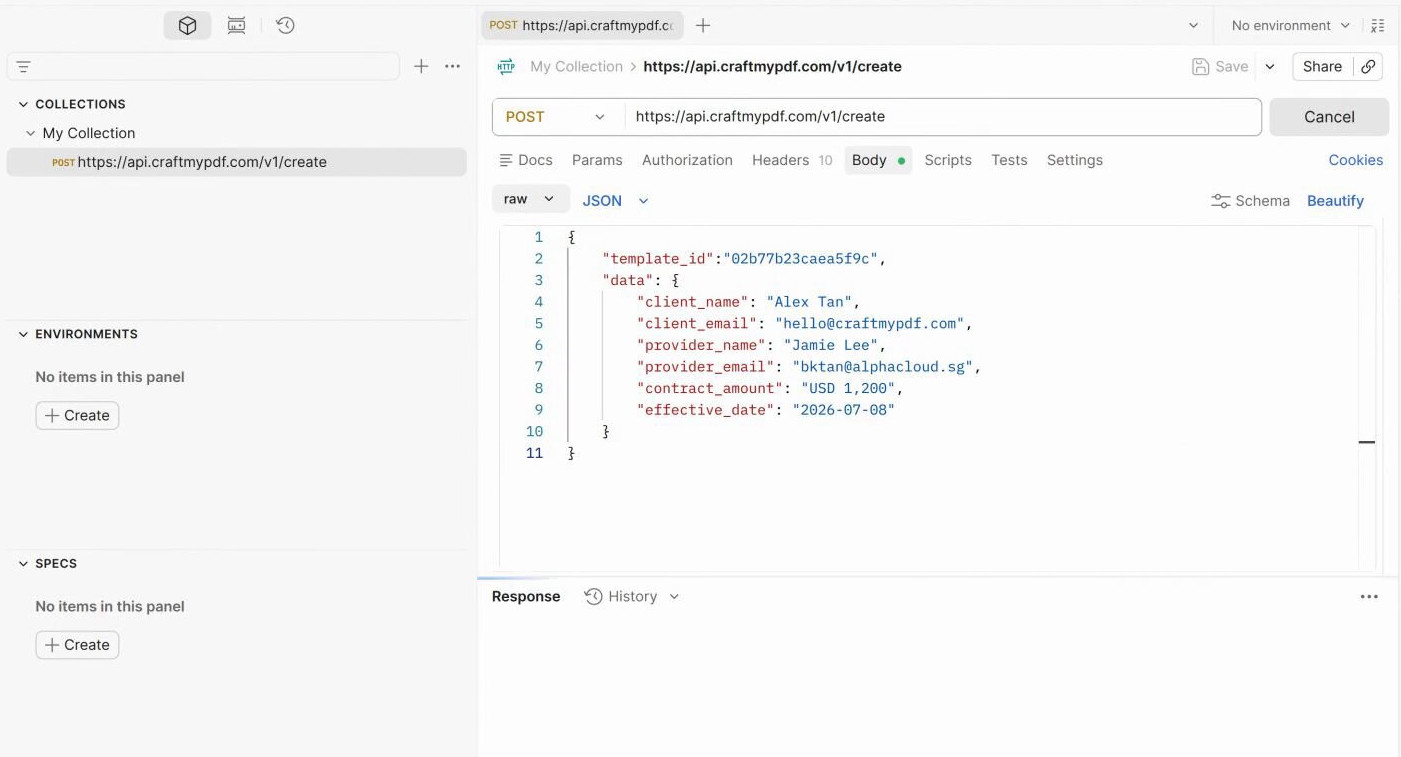
With the template ready, generate the PDF to start the signing process. In the video, this is done with Postman by sending a POST request to the CraftMyPDF API.
You can also generate the PDF from other platforms such as Zapier, Bubble, HubSpot, or your own backend application.
A simplified API request looks like this:
curl -X POST "https://api.craftmypdf.com/v1/create" \
  -H "Content-Type: application/json" \
  -H "X-API-KEY: YOUR_API_KEY" \
  -d '{
    "template_id": "YOUR_TEMPLATE_ID",
    "export_type": "json",
    "data": {
      "client_name": "Alex Tan",
      "client_email": "alex@example.com",
      "provider_name": "Jamie Lee",
      "provider_email": "jamie@example.com",
      "contract_amount": "USD 1,200",
      "effective_date": "2026-07-08"
    }
  }'
When the PDF is generated, CraftMyPDF creates the signing envelope and emails each signer a signing request.
Step 8: Track the Signed Document
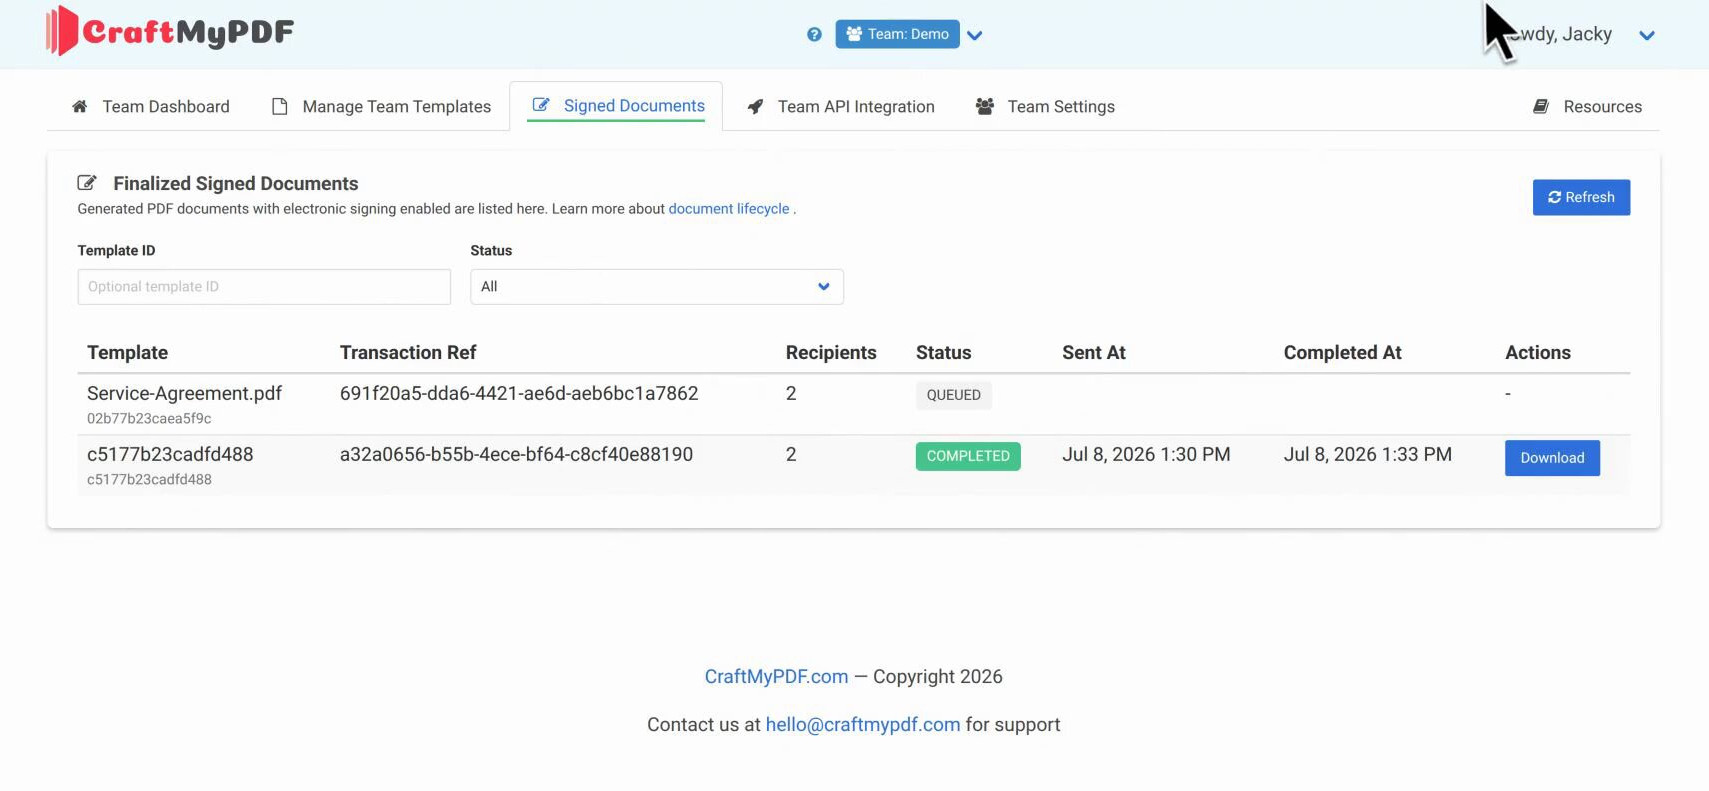
To check the signing status, open Signed Documents in the CraftMyPDF dashboard.
From there, you can see whether the document is queued, processing, created, sent, completed, rejected, failed, or cancelled. Once the document is completed, you can download the signed PDF.
You may also see actions such as Retry Send, Signing Links, or Download, depending on the current document status.
Step 9: Recipient Signing Experience
Each recipient receives a signing request email. The email includes the document title, the signing message, and a View Document to Sign button.
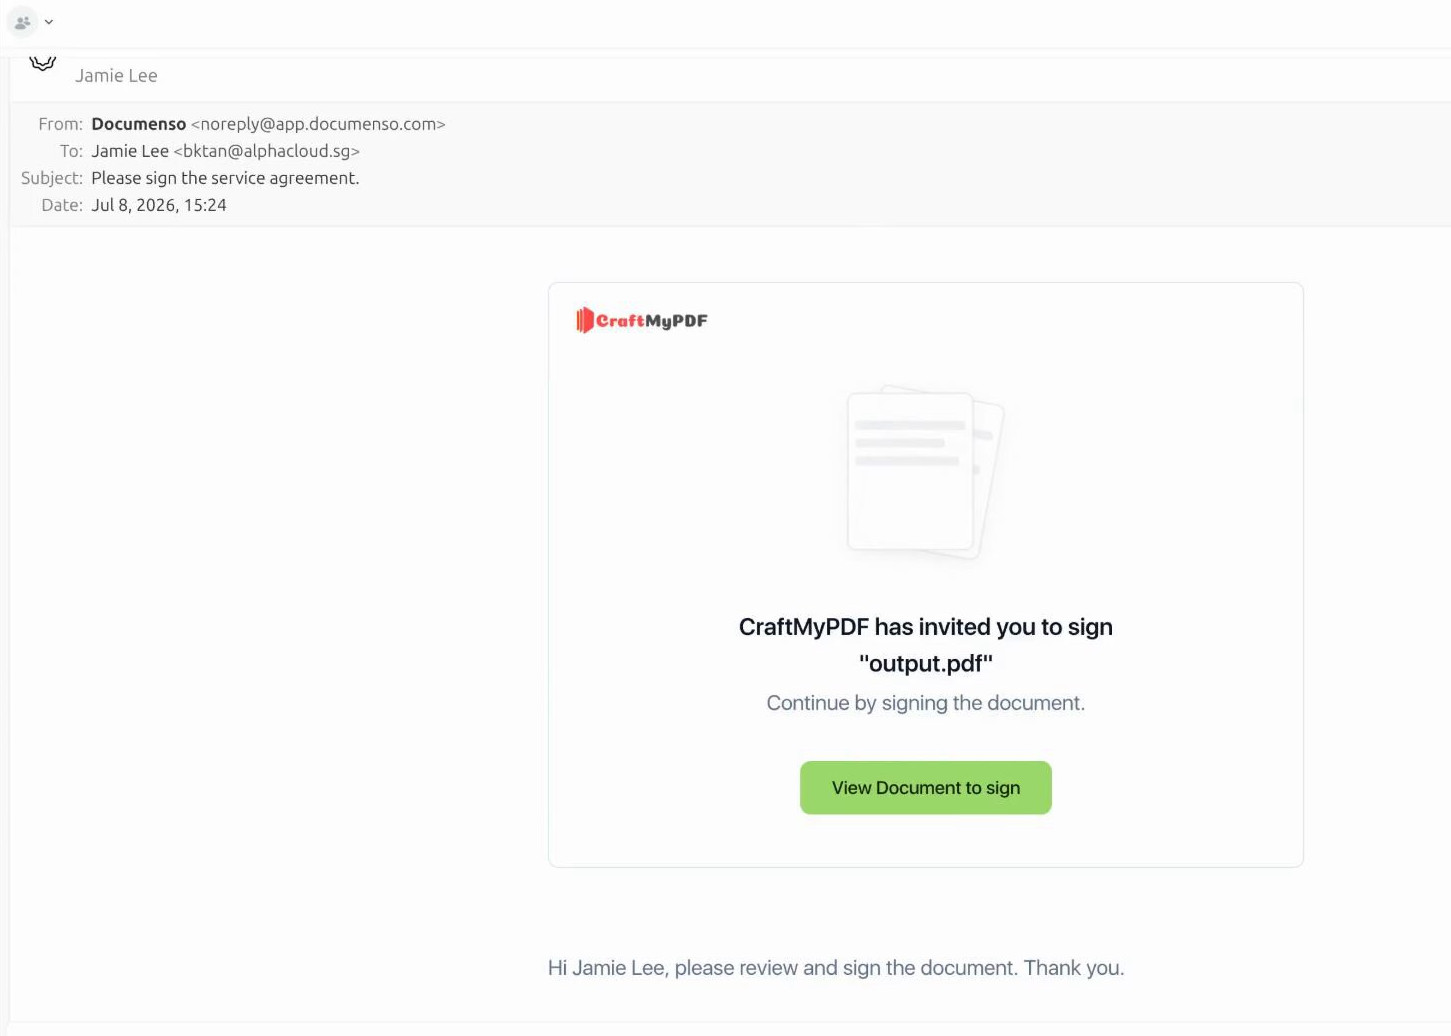
When the recipient clicks the button, they are taken to the signing page. They follow the on-screen instructions, complete the fields assigned to them, and submit the signed document.
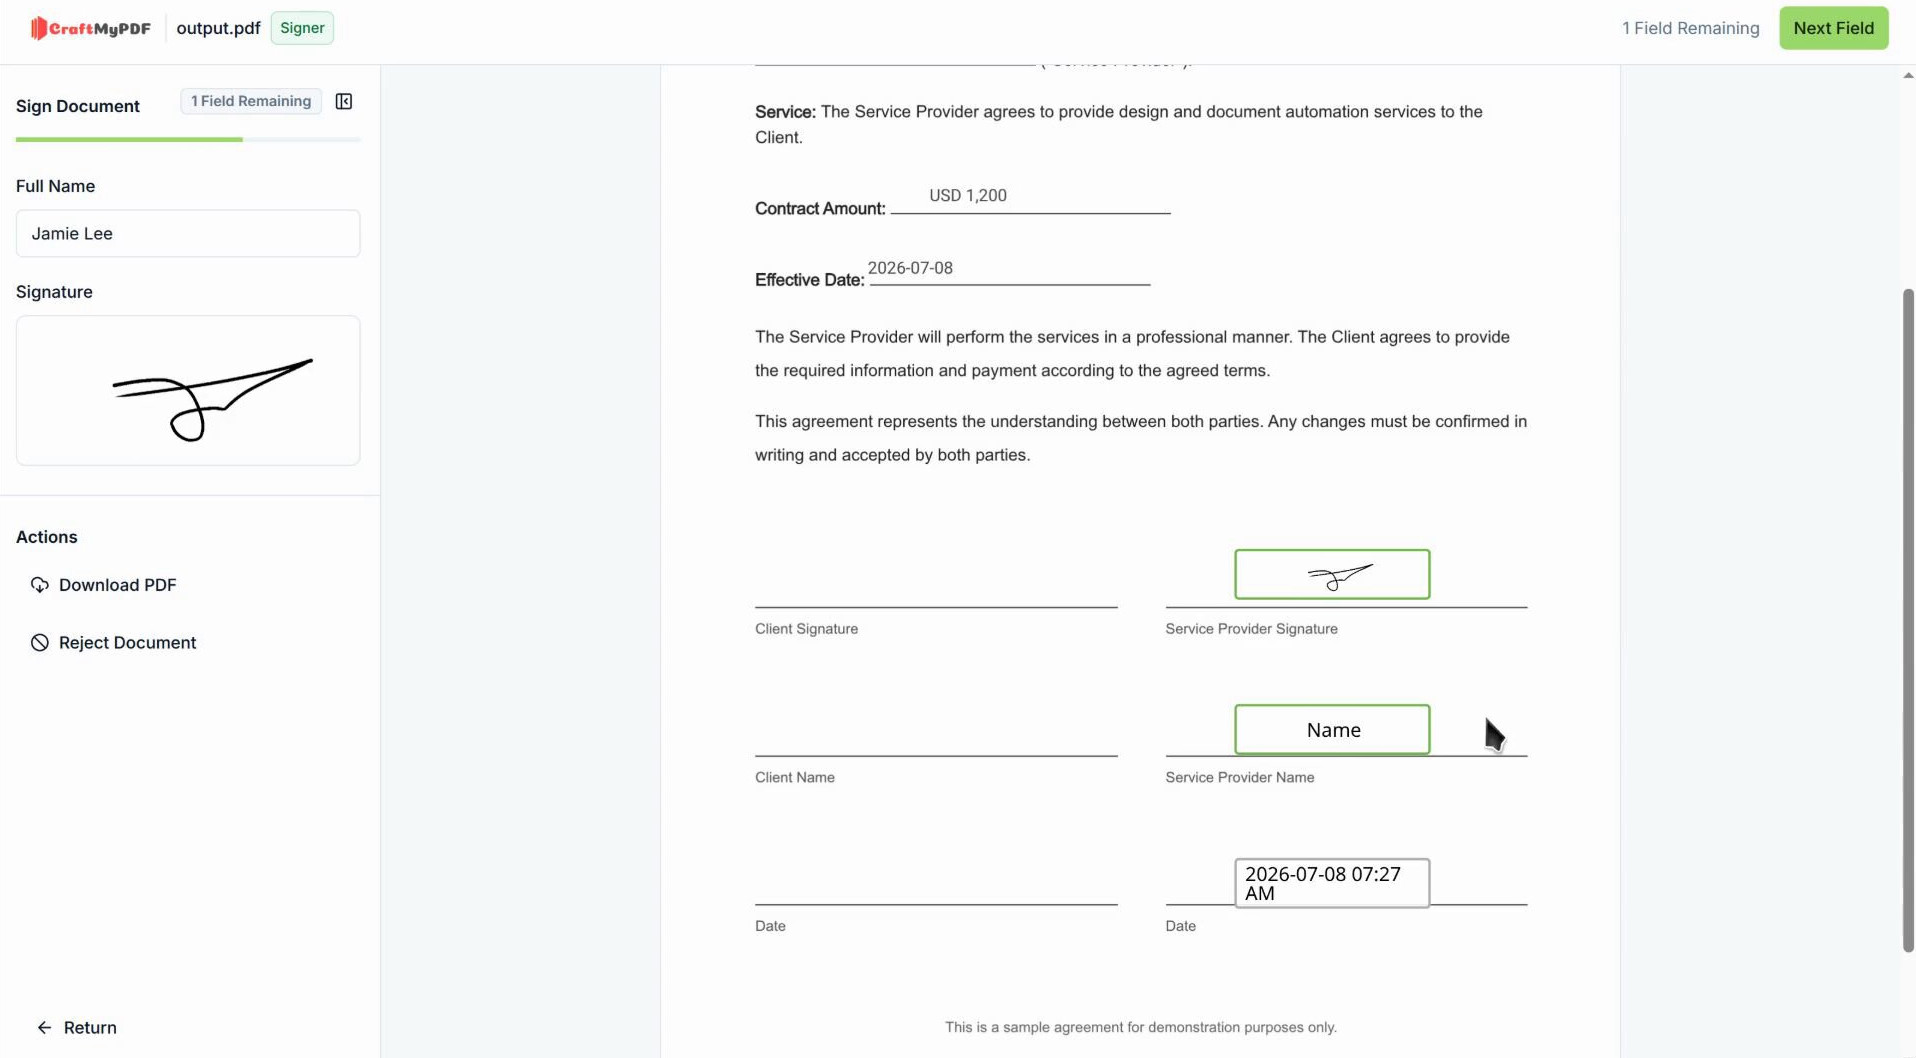
After all required recipients complete their actions, the document status changes to Completed, and the signed PDF can be downloaded from the dashboard.
Troubleshooting
If the signing workflow does not behave as expected, check these common issues first.
The document generated, but no signing email was sent
Open Signed Documents and check the document status. If it is queued or processing, it may still be waiting. If it failed, review the template configuration and field assignments.
A signer did not receive the email
Check the recipient email expression. Dynamic expressions such as {{ data.client_email }} must match the JSON payload exactly. Also check whether the document is still queued, processing, or failed.
The signer cannot complete the document
Make sure each signer has at least one Signature field assigned. Also confirm that all required fields for that signer are visible and assigned to the correct recipient.
A field does not appear for the expected signer
Select the field in the designer and check the Recipient dropdown. Every E-Signature field must be assigned to a recipient.
The wrong signing order was used
Use parallel signing when recipients can sign independently. Use sequential signing when you need a review or approval chain. If you need the Assistant role, switch to sequential signing because Assistant is not available in parallel signing mode.
A signing link has expired
If envelope expiration is enabled, recipients must complete their actions before the deadline. By default, expiration is disabled. When enabled, the default deadline is 30 days unless you configure a different amount and unit.
Conclusion
You now have a reusable PDF contract template with two signers and e-signature fields in CraftMyPDF. The same setup can be used for service agreements, onboarding documents, approval forms, sales contracts, and any PDF that needs signatures.
The main idea is simple: design the template once, use JSON data to personalize it, assign e-signature fields to the right recipients, and generate the PDF to start the signing workflow.
Try it with your own PDF contract, add the fields you need, and automate the signing process with CraftMyPDF. Sign up for CraftMyPDF to get started.
FAQ
What is an e-signature?
An e-signature, or electronic signature, is a way to sign a document online instead of printing, signing by hand, scanning, and emailing it back. It is commonly used for PDF contracts, approval forms, onboarding documents, and business agreements.
Can I add e-signature fields to an existing PDF contract?
Yes. With CraftMyPDF, you can import an existing PDF contract, turn it into a reusable template, place e-signature fields on the document, and assign those fields to the correct recipients.
Does CraftMyPDF send the signing request automatically?
Yes. After you generate a PDF from an e-signature-enabled template, CraftMyPDF creates a Documenso envelope and sends signing requests to the configured recipients by email. This works across CraftMyPDF integrations, including Zapier, Make, Bubble.io, HubSpot, and other supported automation tools.
Can a document have more than one signer?
Yes. CraftMyPDF supports multiple recipients, including signers, approvers, viewers, CC recipients, and assistants. You can also choose parallel signing or sequential signing depending on your workflow.
Can I track whether a PDF contract has been signed?
Yes. You can open the Signed Documents page in CraftMyPDF to check the document status, such as queued, sent, completed, rejected, failed, or cancelled. Once the signing workflow is complete, you can download the signed PDF.
How much does e-signature cost in CraftMyPDF?
Each e-signature document costs 10 credits. Check your CraftMyPDF plan and credit balance before enabling e-signature for automated PDF signing workflows.
Who powers CraftMyPDF e-signatures?
CraftMyPDF e-signatures are powered by Documenso. Documenso’s infrastructure is hosted in Europe and is designed for security-conscious document signing workflows, with support for compliance and trust standards such as SOC 2 Type II and HIPAA.
Additional Resources and Documentation
Start generating PDFs today
Design templates in the browser and generate pixel-perfect PDFs via a simple REST API. 50 free PDFs every month, no credit card required.
Keep reading
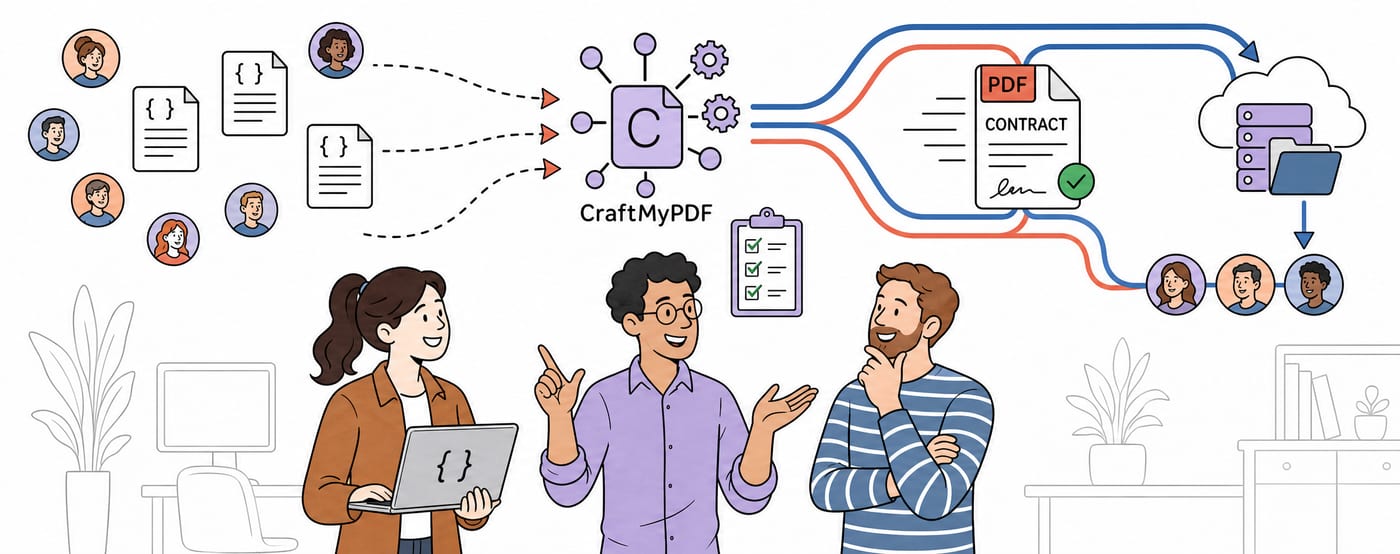
CraftMyPDF vs DocuSign vs PandaDoc: Which eSignature API Should Developers Choose in 2026?
DocuSign, PandaDoc or CraftMyPDF? Compare eSignature API pricing, webhooks, embedded signing, eIDAS levels and the steps from data to a signed PDF.
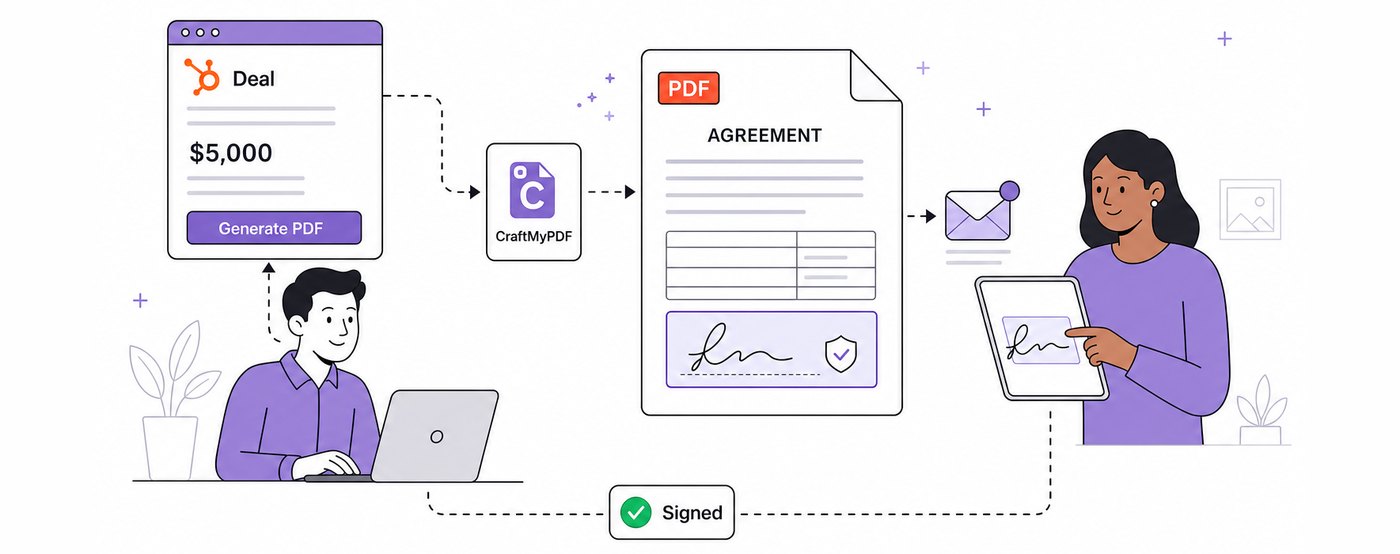
How To Add eSignatures To HubSpot Deals (Without Leaving Your CRM)
Send HubSpot deal documents for eSignature straight from the Deal record: install the CraftMyPDF app, build a signature-ready template, and track signed PDFs.
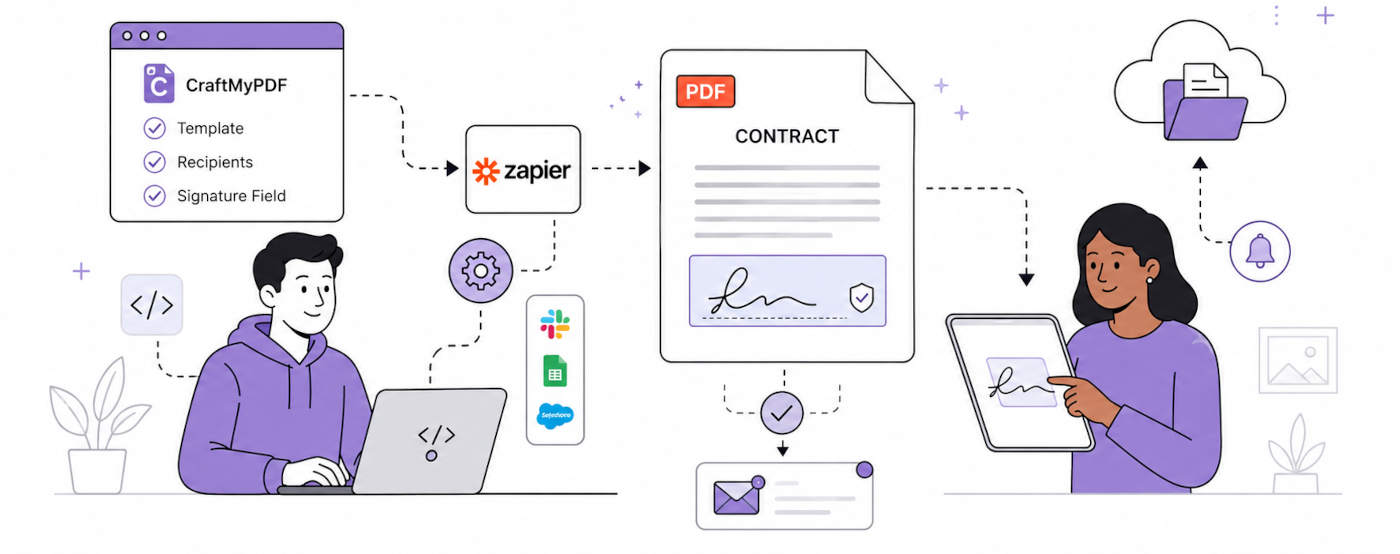
How To Automate eSignatures Using Zapier (with CraftMyPDF)
A step-by-step guide to sending contracts for eSignature automatically: build the template once, trigger it from Zapier, track signing status in CraftMyPDF.