TL;DR
This guide walks you through automating PDF certificate generation using Google Sheets, Apps Script, and CraftMyPDF. You set up a pre-built certificate template, connect it to a Google Sheet with a simple Apps Script, and generate personalized PDF certificates for every row in your spreadsheet, all with one click.
Suppose there are 200 workshop attendees that you need to give a certificate to. The workshop just got completed, and you either spend manual hours creating each certificate one by one, or you automate the entire process using a simple workflow with an API.
This article explains how you can create a simple workflow using CraftMyPDF and Google Apps Script to auto-generate PDF certificates from Google Sheets.

Step 1: Setting Up Your Certificate Template on CraftMyPDF
- Go to CraftMyPDF and SignUp.
- In the dashboard, click Manage Templates on the left menu.
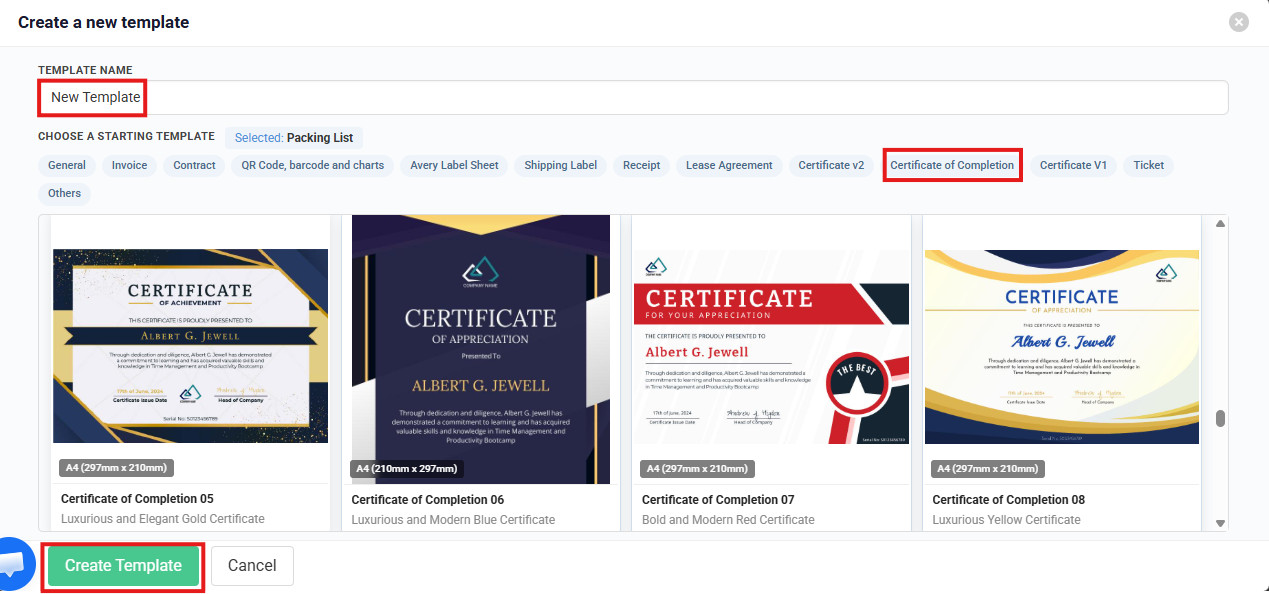
- Click Create New PDF Template. In the “Create a new template” dialog:
- Enter a name for your template in the Template Name field (e.g., “Bootcamp Certificate”).
- Under Choose a Starting Template, select the Certificate of Completion tab.
- Pick any of the available certificate designs that suits your needs. For this tutorial, you can choose any starting template.
- Click Create Template.
Create a new template dialog showing the Template Name field, Certificate of Completion tab selected, and available certificate designs
Click Edit to open the drag-and-drop PDF template editor. On the left you’ll see a Data Fields panel listing the dynamic properties, and on the canvas the text components are bound to these fields using expressions like {{ data.recipient }}. These fields get replaced with real data when the PDF is generated.
The CraftMyPDF drag-and-drop editor showing the certificate template, Data Fields panel on the left, and Layers panel in the center
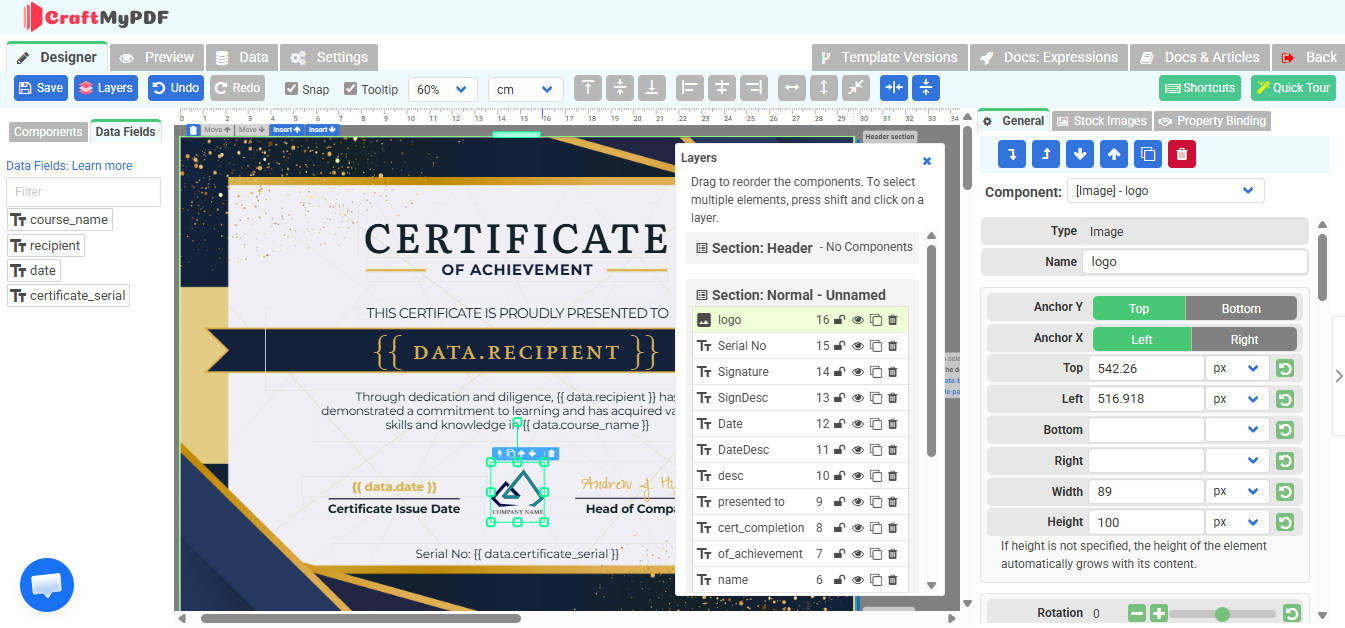
To customize the data fields, click the Data tab at the top of the editor. Here you can remove, add, or rename any data fields according to your needs. Once you’ve made your changes, click Validate and Format JSON to apply them.
For this tutorial, we’ll use these four data fields:
course_name, the course or program titlerecipient, the recipient’s full namedate, the certificate issue datecertificate_serial, a unique serial number for the certificate
We’ll fill all four fields (recipient, course_name, date, and certificate_serial) from each spreadsheet row.
- Go back to the Designer tab. Here you can customize the certificate layout. You can remove or edit any existing text components to match your needs.
- Click Save to save your template, then click the Preview tab to check the final template view and confirm everything renders correctly.
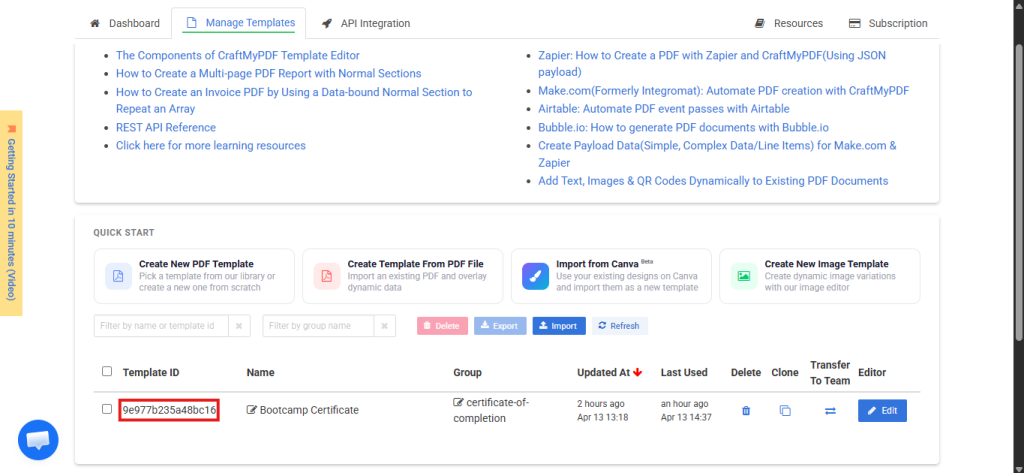
Get Your Template ID and API Key
- Go back to the Manage Templates page. Your Template ID is displayed next to your template name (looks like
9e977b235a48bc16). Copy it.
Manage Templates page showing the Template ID
2. Click on the API Integration tab and copy your API Key. Keep it safe, treat it like a password.
Step 2: Preparing Your Google Sheet to Generate PDF Certificates
- Open Google Sheets and create a new blank spreadsheet.
- Name it something like “Certificate Generator”.
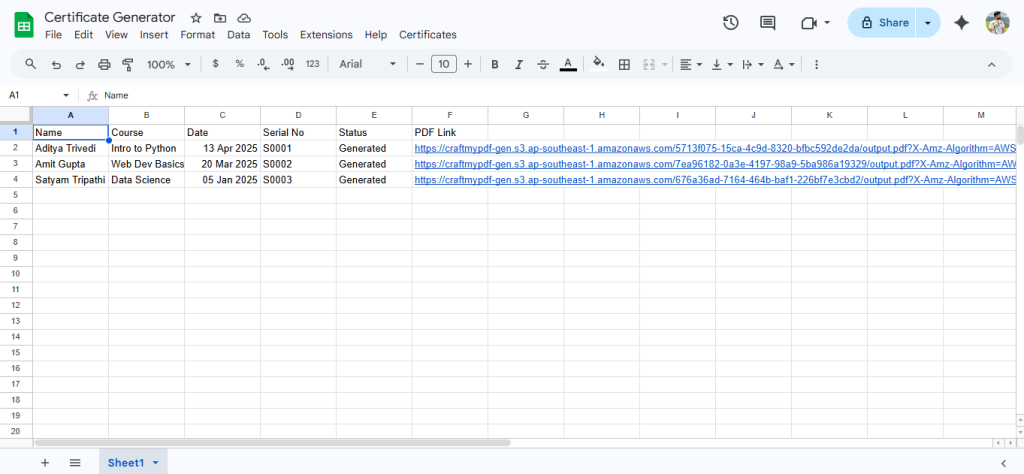
- Set up your sheet like this:
| Name | Course | Date | Serial No | Status | PDF Link |
|---|---|---|---|---|---|
| Aditya Trivedi | Intro to Python | 13 Apr 2025 | CERT-0001 | ||
| Amit Gupta | Web Dev Basics | 20 Mar 2025 | CERT-0002 | ||
| Satyam Tripathi | Data Science | 05 Jan 2025 | CERT-0003 |
Only fill in Name, Course, Date, and Serial No. Leave Status and PDF Link empty, the script fills those automatically.
Step 3: Writing the Apps Script for Google Apps Script PDF Automation
- In your Google Sheet, go to Extensions -> Apps Script.
- Delete everything in the default
Code.gsfile. - Paste the complete script below.
// Configuration
// Replace these with your actual values from CraftMyPDF
var API_KEY = "YOUR_API_KEY_HERE";           // Your CraftMyPDF API key
var TEMPLATE_ID = "YOUR_TEMPLATE_ID_HERE";   // Your certificate template ID

/**
 * Adds a custom menu to the Google Sheet toolbar.
 * This runs automatically every time the spreadsheet is opened.
 */
function onOpen() {
  var ui = SpreadsheetApp.getUi();
  ui.createMenu("Certificates")
    .addItem("Generate Certificates", "generateCertificates")
    .addToUi();
}

/**
 * Main function: reads all rows, skips already-processed ones,
 * and generates a PDF certificate for each new row.
 */
function generateCertificates() {
  // Get the active sheet and all data starting from row 1
  var sheet = SpreadsheetApp.getActiveSpreadsheet().getActiveSheet();
  var data = sheet.getDataRange().getValues();

  // Loop through each row, starting at index 1 to skip the header row
  for (var i = 1; i < data.length; i++) {
    var row = data[i];

    // Column mapping (0-indexed):
    // A=0: Name, B=1: Course, C=2: Date, D=3: Serial No, E=4: Status, F=5: PDF Link
    var name   = row[0];
    var course = row[1];
    var dateRaw = row[2];
    var serial  = row[3];
    var status  = row[4];

    // Google Sheets stores dates as Date objects, so format them to a readable string
    var date = (dateRaw instanceof Date)
      ? Utilities.formatDate(dateRaw, Session.getScriptTimeZone(), "dd MMM yyyy")
      : dateRaw;

    // Skip rows that are already processed or have no name
    if (status === "Generated" || status === "Error" || !name) {
      continue;
    }

    // Build the JSON data object that matches your template's data fields exactly
    // All values come directly from the spreadsheet columns
    // Spreadsheet Column  →  Template Data Field
    // Name                →  recipient
    // Course              →  course_name
    // Date                →  date
    // Serial No           →  certificate_serial
    var templateData = {
      "recipient": name,
      "course_name": course,
      "date": date,
      "certificate_serial": serial
    };

    try {
      // Make the API call to generate the PDF
      var pdfUrl = callCraftMyPDF(templateData);

      // Write results back to the sheet
      // Row in the sheet is i+1 because sheet rows are 1-indexed, array is 0-indexed
      sheet.getRange(i + 1, 5).setValue("Generated");  // Column E = Status
      sheet.getRange(i + 1, 6).setValue(pdfUrl);        // Column F = PDF Link

      Logger.log("Certificate generated for: " + name);

    } catch (error) {
      // If something goes wrong, mark the row as Error and log the details
      sheet.getRange(i + 1, 5).setValue("Error");
      sheet.getRange(i + 1, 6).setValue(error.message);

      Logger.log("Error for " + name + ": " + error.message);
    }

    // Wait 1 second between API calls to avoid hitting rate limits
    Utilities.sleep(1000);
  }

  // Show a confirmation dialog when done
  SpreadsheetApp.getUi().alert("Done! Check the Status and PDF Link columns.");
}

/**
 * Calls the CraftMyPDF REST API to generate a PDF.
 *
 *@param{Object} data - The JSON data to fill the template properties
 *@returns {string} The URL of the generated PDF
 *@throws{Error} If the API call fails
 */
function callCraftMyPDF(data) {
  // CraftMyPDF API endpoint for synchronous PDF generation
  var url = "https://api.craftmypdf.com/v1/create";

  // Build the request payload
  // template_id and data go in the body (not the URL) for CraftMyPDF
  var requestBody = {
    "template_id": TEMPLATE_ID,
    "export_type": "json",        // Returns a JSON response with the PDF URL
    "expiration": 60,             // PDF link expires after 60 minutes
    "data": data
  };

  // Configure the HTTP request
  var options = {
    "method": "post",
    "contentType": "application/json",
    "headers": {
      "X-API-KEY": API_KEY    // Authentication header required by CraftMyPDF
    },
    "payload": JSON.stringify(requestBody),
    "muteHttpExceptions": true  // Don't throw on non-200 responses so we can read the error
  };

  // Make the HTTP POST request
  var response = UrlFetchApp.fetch(url, options);
  var responseCode = response.getResponseCode();
  var responseBody = JSON.parse(response.getContentText());

  // Check if the request was successful (HTTP 200 and status "success")
  if (responseCode === 200 && responseBody.status === "success") {
    // CraftMyPDF returns the PDF URL in the "file" field
    return responseBody.file;
  } else {
    // Throw an error with the API's error message for easy debugging
    throw new Error("API Error " + responseCode + ": " + (responseBody.message || response.getContentText()));
  }
}
The script reads each row, sends the data to CraftMyPDF, and writes the PDF link and status back to the sheet. The inline comments explain every step.
Step 4: Running It
- Press
Ctrl+Sto save the script. - From the function dropdown at the top (next to the ‘Debug’ button), select
generateCertificates. - Click the Run button.
- Google will ask you to authorize the script. Click Review permissions -> select your Google account -> Advanced -> Go to Certificate Generator (unsafe) -> Allow. This is a one-time step.
Apps Script execution log after running the generateCertificates function

Switch back to your Google Sheet. You should see Status filled with “Generated” and PDF Link filled with clickable URLs for each row.
Google Sheet showing “Generated” status and PDF Link URLs for each row
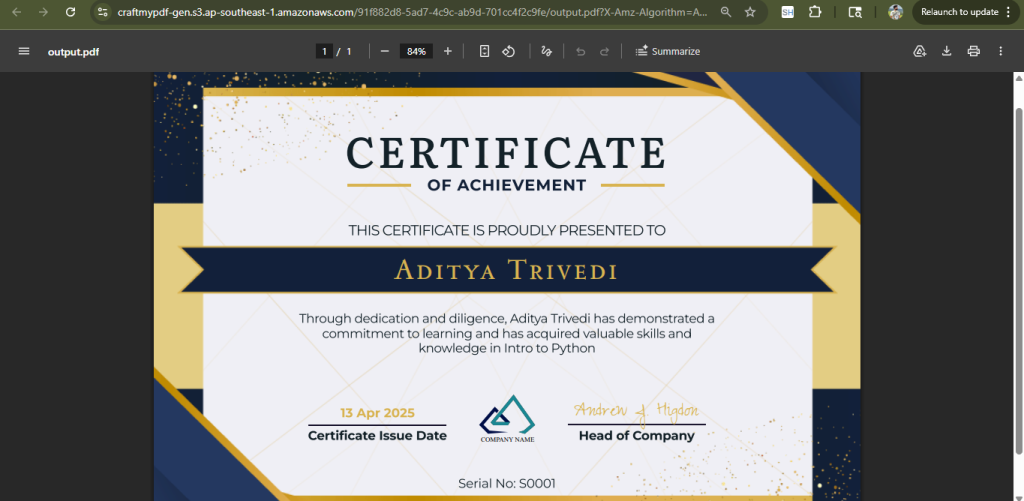
Click any URL in the PDF Link column to open the certificate in your browser.
Opening the generated PDF link for Aditya Trivedi’s certificate in the browser
Tip: After refreshing the page, a Certificates menu appears in the menu bar to the right of Help. You can use Certificates -> Generate Certificates to run the script directly from the sheet.
Step 5: Making It Fully Automatic (Optional)
Want it to run without clicking anything? You can auto generate certificates Google Sheets style with triggers.
Option A: Time-Driven Trigger
- In the Apps Script editor, click the clock icon (Triggers) in the left sidebar.
- Click + Add Trigger.
- Set function to
generateCertificates, event source to Time-driven, type to Hour timer, interval to Every hour. - Click Save.
Option B: onEdit Trigger
Generate a certificate the moment you add a new row. Add this function to your script:
/**
 * Trigger function that runs when any cell in the sheet is edited.
 * Checks if the edit was in a data row and generates a certificate if needed.
 *
 *@param{Object} e - The event object provided by Google Sheets
 */
function onEditTrigger(e) {
  var sheet = e.source.getActiveSheet();
  var row = e.range.getRow();

  // Only process edits below the header row (row 1)
  if (row <= 1) return;

  // Check if this row has a name but no status yet
  var name = sheet.getRange(row, 1).getValue();
  var status = sheet.getRange(row, 3).getValue();

  // Only generate if the row has a name and hasn't been processed
  if (name && !status) {
    generateCertificates();
  }
}
Then set up the trigger: Triggers (clock icon) -> + Add Trigger -> function: onEditTrigger, event source: From spreadsheet, event type: On edit -> Save.
Common Issues & Troubleshooting
- 401 Unauthorized: API key is wrong or missing. Re-copy it from the API Integration tab in the CraftMyPDF dashboard.
- 404 error: Template ID is wrong. Re-copy it from the Manage Templates page.
- Script times out: Apps Script has a 6-minute limit. Process in batches of 50 rows.
- PDF fields are empty: Data property names are case-sensitive. Make sure
"recipient"in the script matches the property name in the template exactly. - Rate limit (HTTP 429): CraftMyPDF allows 100 requests per 10 seconds. Increase
Utilities.sleep(1000)to2000if needed or upgrade your plan. - PDF link expired: By default, generated PDFs expire after the
expirationtime (set to 60 minutes in the script). Download or share them before they expire, or increase the value.
Quick Start Blueprint
Want to skip the manual setup? Use these two links to get started in under a minute:
- Copy the Google Sheet Template: Click the link, hit “Make a copy”, and you’ll have the pre-built spreadsheet with all columns ready in your Google Drive. Just fill in your data.
- Grab the Apps Script Code: Copy the full script, then in your copied sheet go to Extensions – >Apps Script, delete the default code, and paste it in. Replace
YOUR_API_KEY_HEREandYOUR_TEMPLATE_ID_HEREwith your CraftMyPDF credentials.
Conclusion
That’s it. With a Google Sheet, a few lines of Apps Script, and a CraftMyPDF template, you now have a system that generates personalized PDF certificates automatically. No manual work, no extra tools, just one click and your certificates are ready.
Sign up for a free CraftMyPDF account and try it yourself, no credit card required.