Even though we live in a world full of apps and real-time data, PDFs are still one of the most widely used document formats. Businesses rely on them for reports, invoices, summaries, contracts, and documents that need to be shared, printed, or stored.

However, creating these documents manually can quickly become time-consuming. Imagine you have to copy every information from your workspace into a document, format, then export while having to repeat the same process every time a new data appears. The process gradually becomes slow and reduces your productivity.
This is where learning how to automate documents can make a big difference.
Today, many no-code tools allow you to automate tasks without needing deep programming knowledge. You can easily connect tools together and build workflows using simple steps and visual interfaces. This makes automation accessible not just to developers, but also to marketers, operations teams, and anyone who wants to streamline repetitive work.
In this article, you will learn how to automatically generate reports from Notion using CraftMyPDF and Pipedream. With the aforementioned tools, you can easily create a workflow to help you automate PDF reports or any other document of your choice. Let’s get started!
What is Pipedream?
Pipedream is a low-code automation platform that allows you to connect different applications and automate tasks between them. Pipedream lets you create workflows that automatically trigger actions when something happens in your apps.
For example, you can create a workflow where new data added in Airtable automatically generates a PDF report using CraftMyPDF. Once the workflow is set up, the process runs in the background without needing manual input each time.
One of the reasons many developers and teams like Pipedream is that it combines the simplicity of no-code tools with the flexibility of code when needed. You can build workflows using prebuilt integrations, but you can also add small pieces of code if you want more control over your automation.
Key Features of Pipedream
Pipedream has a lot of features that makes it a powerful workflow automation tool. Here’s a list of some of them:
i. Event-Based Workflows: Pipedream workflows are triggered by events which is similar to how Zapier, Make, Knack, and so on works. For example, when a new item is added to Notion, the workflow can automatically start running.
ii. Large Integration Library: Pipedream supports integrations with hundreds of apps including Notion, Slack, Google Sheets, GitHub, and many more. This makes it easy to connect tools you already use.
iii. No-Code and Low-Code Flexibility: You can build workflows using simple steps without writing code. However, if you want more customization, you can add small scripts using JavaScript, Python, or Node.js.
iv. Developer-Friendly Environment: Unlike many automation tools, Pipedream provides logs and debugging tools features that make it easier to manage complex workflows.
Pipedream Alternatives
While Pipedream is a powerful tool, it is not the only workflow automation platform available. Several alternatives provide similar features depending on your needs.
i. Zapier
Zapier is one of the most popular automation platforms. It focuses heavily on no-code workflows and supports thousands of integrations. You can create workflows that help you auto-generate invoices, wedding invitation cards, contracts, shipping labels, tickets, social media images, and so much more.
Zapier also has an AI agent that assists you in setting up your workflow or help you generate a PDF document in case you run into any troubles.
It is also a powerful tool when you need to integrate third-party services to build automated workflows. For example, you can connect Zapier with CraftMyPDF to automatically generate PDFs whenever specific events occur in your workflow. If you’d like to learn more about how this integration works, you can explore the CraftMyPDF documentation. for a step-by-step guide.
ii. Make
Make (formerly Integromat) is another powerful automation tool. It offers a visual workflow builder that allows users to create complex automation scenarios between apps.
Unlike Zapier’s simpler workflow structure, Make provides a visual scenario builder which are represented as connected modules, making it easier to see how data flows between apps. Users can also add filters and conditional steps if they like. It also supports the integration of multiple apps when building complex workflows.
CraftMyPDF integrates seamlessly with Make, allowing you to automate document generation workflows without writing code. For example, you can automatically generate certificates when a user completes a training program.
You can explore a detailed example on How to Auto-Generate Certificates With Make and CraftMyPDF
iii. Integrately
Integrately is another workflow automation platform designed to simplify the automation process. Unlike some tools that require building workflows from scratch, Integrately focuses on one-click automation.
With Integrately, users can activate workflows quickly using ready-made templates which is perfect for beginners. It also allows users to automate complex tasks across multiple applications and integrates well with many business tools and SaaS platforms. To see how you can set up Integrately and understand its workflow, check out this CraftMyPDF tutorial on How to Automate Employee Offer Letters With CraftMyPDF and Integrately
iv. Knack

Knack is slightly different from the other automation tools mentioned. Instead of focusing purely on workflow automation, Knack is primarily a no-code database and application builder. It allows users to create custom databases, dashboards, and internal tools without writing code.
Knack becomes especially powerful when combined with automation tools like CraftMyPDF. For example, you can store data in a Knack database and automatically generate reports or documents when records are created or updated.
If you’d like to see how this works in practice, you can explore the CraftMyPDF blog tutorial on How to Automate PDF Reports With Knack and CraftMyPDF. This guide walks through how to connect Knack with CraftMyPDF to automatically generate PDF reports based on data stored in your database.
Why Use CraftMyPDF for Document Automation?
CraftMyPDF is a document automation platform that allows you generate professional PDFs automatically using templates and dynamic data. With CraftMyPDF, you don’t have to manually create documents from scratch every time you need one, instead, it lets you design a reusable template and then populate it with data from within your applications.
Once your template is ready, CraftMyPDF can generate PDFs automatically using integrations with workflow automation tools such as Zapier, Make, Pipedream, and Integrately, or through direct API calls from your application. This makes it easy to connect CraftMyPDF with platforms like Notion, Airtable, Google Sheets, or web forms.
For example, when new data is added to a database, that data can be sent to CraftMyPDF to automatically generate a formatted PDF report. This approach eliminates repetitive manual work and ensures that documents are created consistently every time.
Advantages of Using CraftMyPDF
i. Template Based PDF Generation
One of the biggest advantages of CraftMyPDF is its template-based document generation system. Instead of designing a document from scratch each time, you create a template once using the CraftMyPDF editor.
The template defines the layout of your document, including elements such as text fields, images, tables, and headers. When the template receives data, CraftMyPDF automatically fills in the placeholders and generates a finished PDF. This ensures that all documents follow a consistent design and structure.
ii. Dynamic Data Injection
CraftMyPDF allows you to insert dynamic data placeholders inside your templates. These placeholders act as variables that are replaced with real data when the PDF is generated.
For example, a template might contain fields for customer’s name, invoice number, order details, dates, payment totals, and so on.
When data is sent from a workflow automation tool or API request, CraftMyPDF replaces these placeholders with the corresponding values. This allows you to generate personalized documents automatically at scale.
iii. Simple REST API
CraftMyPDF also provides a simple and developer-friendly REST API that makes it easy to generate PDFs programmatically.
Developers can send structured data (usually in JSON format) to a template and receive a generated PDF in return. This allows CraftMyPDF to integrate easily with web applications, backend services, and automation platforms.
Because the API is straightforward and well documented, developers can quickly add automated document generation to their applications without building complex PDF generation systems from scratch.
Common Use Cases of CraftMyPDF
CraftMyPDF can be used in many business workflows where documents need to be generated automatically. Instead of manually creating documents each time new data appears, CraftMyPDF allows you to generate them instantly using templates and dynamic data. Below are some common document types that businesses automate using CraftMyPDF.
i. Invoices: Businesses can automatically generate invoices whenever a customer completes a purchase or payment. Order details such as the customer’s name, items purchased, price, and transaction date can be inserted dynamically into an invoice template.
ii. Receipts: After a successful payment, a receipt can be generated and sent automatically to the customer. This is commonly used in e-commerce platforms, SaaS products, and payment systems.
iii. Certificates: Organizations that run online courses, training programs, or events can automatically generate personalized certificates for participants who complete a program or pass an assessment.
iv. Reports: Teams often need to convert structured data into reports. For example, data stored in Notion, Airtable, or Google Sheets can be automatically transformed into professional PDF reports for internal reviews or client presentations.
v. Contracts and Agreements: Legal documents such as contracts, service agreements, or NDAs can be automatically generated by inserting customer or client information into predefined templates. Teams already using legal AI tools for contract drafting or review can pair them with CraftMyPDF to automate the full document generation pipeline
vi. Offer Letters and HR Documents: Human resource teams can automate the creation of documents such as employee offer letters, employment contracts, onboarding documents, and salary letters when new employees are added to a system.
vii. Tickets and Event Passes: Event organizers can generate personalized event tickets or passes with attendee details, QR codes, and event information.
viii. Purchase Orders: Businesses that manage inventory or supplier relationships can automatically generate purchase orders when new orders are created in their system.
ix. Shipping Labels and Delivery Notes: Logistics companies and online stores can automatically generate shipping labels or delivery notes when orders are processed.
x. Proposals and Quotations: Sales teams can automatically generate professional proposals and price quotations by inserting client details, product information, and pricing into a template.
xi. Documents with Barcodes and QR Codes: Many businesses also generate documents that include barcodes or QR codes for identification, tracking, or scanning purposes. For example, QR codes can be used in event tickets, certificates, or digital passes, while barcodes are commonly used in invoices, inventory labels, and shipping documents.
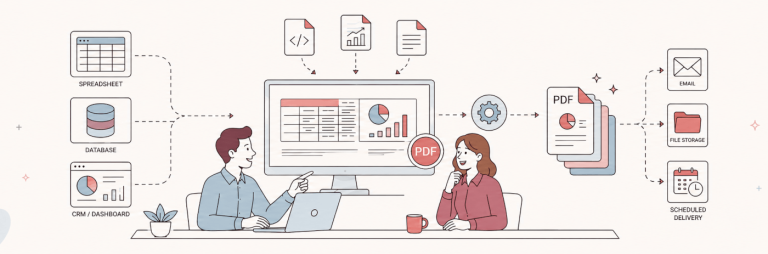
Overview of Workflow
For this tutorial, we will build a simple automated workflow that generates a PDF report whenever a new record is added to an Airtable database.
Imagine a team that tracks weekly project updates in Airtable. Each team member adds their updates to a shared database. Instead of manually compiling these updates into a report, this workflow can automatically generate a weekly PDF report every time a new record is added. Here’s an overview of the workflow
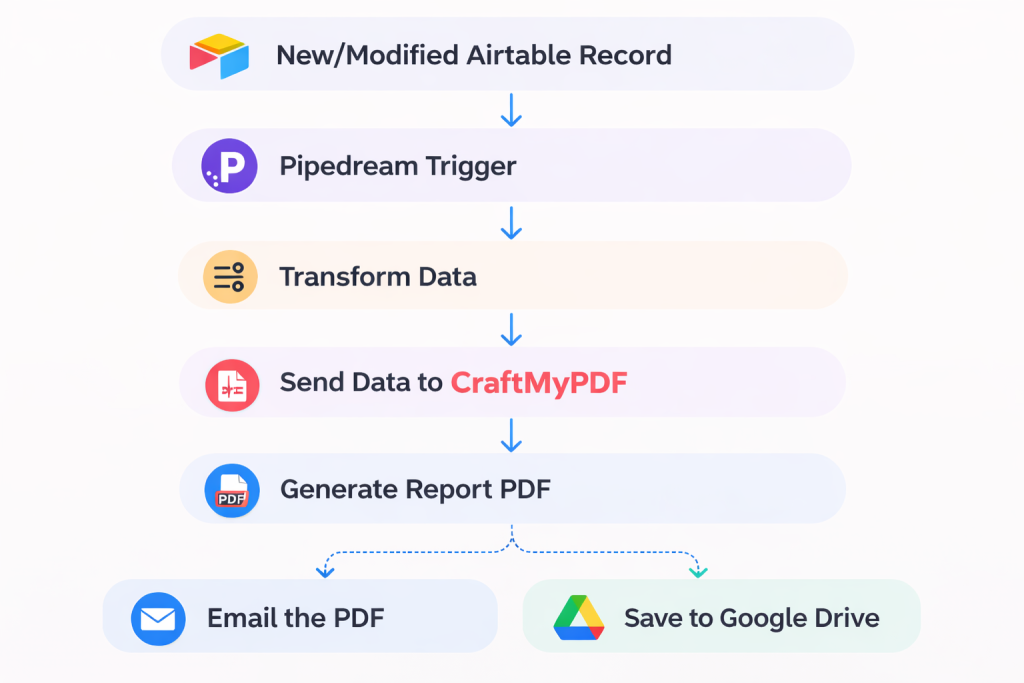
This process will run automatically using Pipedream and CraftMyPDF.
Prerequisites to Automate PDF Generation
Before setting up the workflow, there are a few things you need to prepare. These tools and basic knowledge will help ensure the automation works smoothly.
i. Airtable Set Up: You will need an Airtable base where the data for your reports will be stored. Each new record in this database will act as the trigger for the automation workflow. For example, the database might contain fields such as client name, Ad spend, Revenue, and any other information you want to include in the generated PDF.
ii. CraftMyPDF Account and Template: You’ll need an active CraftMyPDF account and a PDF template created in the template editor. The template defines the layout of your report and includes placeholders that will later be filled with data from Airtable. Once the template is ready, CraftMyPDF can automatically generate a formatted PDF using the data sent from Pipedream.
iii. Pipedream Account: A Pipedream account is required to create the workflow that connects Airtable with CraftMyPDF. Pipedream will monitor your Notion database for new records, process the data, and send it to CraftMyPDF to generate the PDF.
iv. Basic Understanding of JSON: Since data is sent to CraftMyPDF in JSON format, having a basic understanding of JSON will be helpful. JSON is simply a structured way of organizing data using key–value pairs. This makes it easier to map fields from Airtable to the placeholders in your CraftMyPDF template.
Once these prerequisites are ready, you can proceed to building the automated workflow that generates PDF reports from your Airtable data.
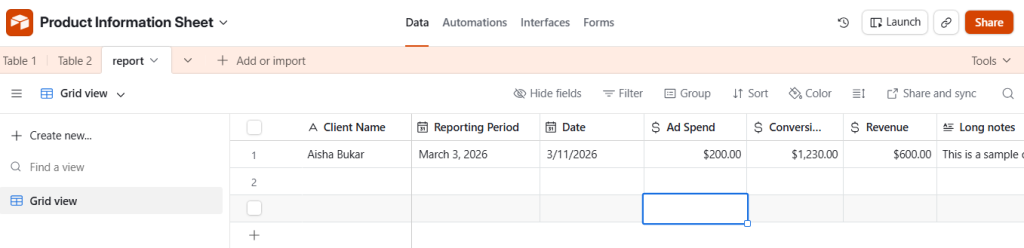
Structure Your Airtable Base
The first step is to create a table in your Airtable base where the data for your reports will be stored. This is where all the reports record will be stored and later converted into a PDF. To get started, create an account on Airtable (if you don’t have one already), create a base (rename it to your choice), then create an empty table and add your data fields:
i. Client Name (Text): This field stores the name of the client or project associated with the report.
ii. Reporting Period (Date or Text): Use this field to indicate the time range the report covers, such as January 2026 or Week 1 – Week 4.
iii. Ad Spend (Number): This field records the total advertising spend for the reporting period.
iv. Revenue (Number): Use this field to capture the total revenue generated during the reporting period.
v. Conversion Rate (Number): This field stores the percentage of visitors or leads that converted into customers.
vi. Notes (Text): This field can be used to include additional insights, campaign observations, or recommendations.
At the end, your notion database should look like this with some sample data
After setting up the database, the next steps will be to set up our CraftMyPDF report template
Create an Invoice Template in CraftMyPDF
Once your database is ready, the next step is to create a PDF template in CraftMyPDF. This template will define the layout and structure of the report that will be generated automatically.
Instead of manually designing a new report every time, the template acts as a reusable document where dynamic data from Airtable will be inserted into predefined placeholders.
Step 1: Create a New Template
Log in to your CraftMyPDF dashboard and open the Template Editor. From there, create a new template for your report. I used the Blank Report Template
The WYSIWYG (What You See Is What You Get) editor in CraftMyPDF allows you to design your documents visually, similar to editing a document in Microsoft Word or Google Docs. You can easily drag elements onto the canvas, type and format text, insert tables, or add placeholders for dynamic data without writing any code. What you see while designing the template is exactly how the final PDF will appear when it is generated.
For users who prefer more control over the layout, the editor also provides a code view. If you’re comfortable working with HTML, you can switch to this mode and paste your custom HTML directly into the editor. This gives you the flexibility to design your template either visually or through code, depending on your preference.
When designing your report template, you can include elements such as text fields, images or company logos, tables for structured data, charts or sections for key metrics, and also headers and footers.
For example, your report might include a report title, company logo, summary section, and a metrics table that displays advertising performance data.
If you’d like to learn more about how the editor works, you can explore the detailed tutorial on the CraftMyPDF blog, which walks through the features of the WYSIWYG editor and how to use it effectively when building templates.
Step 2: Open and Edit Your Template
Navigate to your template and click the Edit button to open it. In the Designer tab, locate the HTML/Rich Text component in the left-hand panel and drag it into the editor canvas.
Next, double-click the component, select Tools → Source Code, and paste the HTML code provided below.
<div class="header">
</div>
<h1>Marketing Performance Report</h1>
<div class="details"><strong>Client:</strong> {{client_name}}<br /><strong>Reporting Period:</strong> {{reporting_period}}<br /><strong>Report Generated On:</strong> {{date}}</div>
<p> </p>
<div class="section-title">Campaign Performance Overview</div>
<div class="overview">This report summarizes the marketing performance for the selected reporting period. The metrics below highlight advertising spend, generated revenue, and overall campaign effectiveness.</div>
<div class="section-title">Key Metrics</div>
<table>
<tbody>
<tr>
<th>Metric</th>
<th>Value</th>
</tr>
<tr>
<td>Ad Spend</td>
<td>${{ad_spend}}</td>
</tr>
<tr>
<td>Revenue Generated</td>
<td>${{revenue}}</td>
</tr>
<tr>
<td>Conversion Rate</td>
<td>{{conversion_rate}}%</td>
</tr>
</tbody>
</table>
<div class="section-title">Notes</div>
<div class="notes">{{notes}}</div>After pasting the code, click Confirm and then Return to apply and save your changes.
Step 3: Add your JSON Test Data
Next, go to the Data tab in the template editor and paste the JSON sample data provided below. This test data helps simulate the information that will later come from your Airtable base. After adding the JSON, click Save, then select Preview to see how the data is populated within your report template.
{
  "client_name": "Acme Marketing Ltd",
  "reporting_period": "7 January 2026 - 3 February 2026",
  "date": "2026-01-31",
  "ad_spend": 12500,
  "revenue": 48500,
  "conversion_rate": 3.8,
  "notes": "Paid social campaigns performed strongly this month, particularly on Instagram and Facebook. Conversion rates improved after optimizing landing pages and updating audience targeting."
}
This data will populate the placeholders that are currently in our report template.
Step 4: Save Your Template
After designing the template, save it in CraftMyPDF. Each template has an ID, which will be needed later when configuring the automation workflow in Pipedream. The template ID tells CraftMyPDF which template to use when generating the PDF.
Once your template is ready, the next step will be to set up the Pipedream workflow that listens for new records in your Airtable and sends the data to CraftMyPDF.
How to Autogenerate Reports Using CraftMyPDF and Pipedream
Now that your Airtable data and CraftMyPDF template are ready, the next step is to create a workflow in Pipedream that will automatically trigger when new data is added to your Airtable base.
Create a Workflow in Pipedream
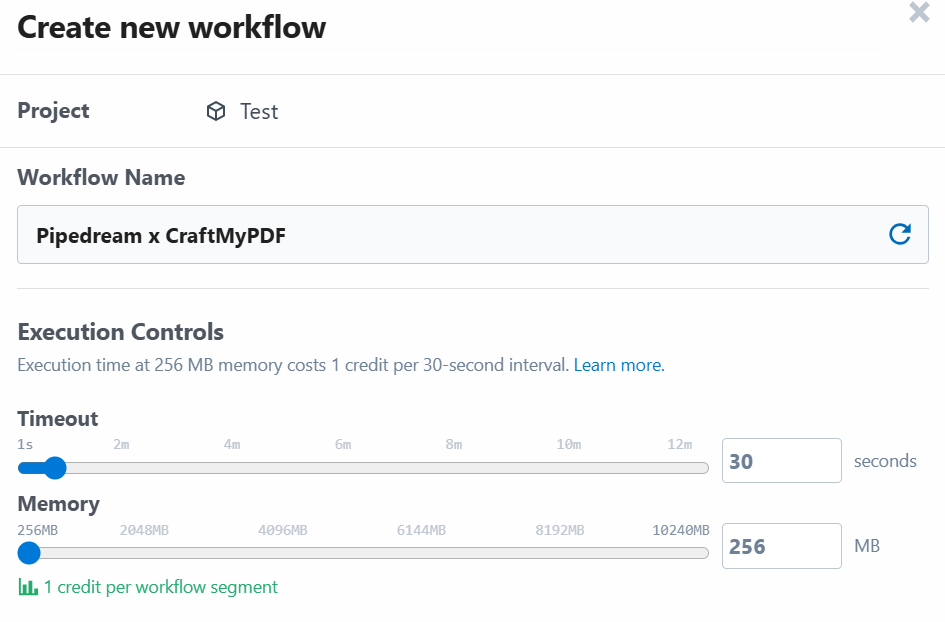
Step 1: Create Workflow
Log in to your Pipedream dashboard and click “New Workflow.” This will open the workflow builder where you can configure triggers and actions.
Step 2: Choose an App
The next step will be to choose the app you would like to integrate Pipedream with.
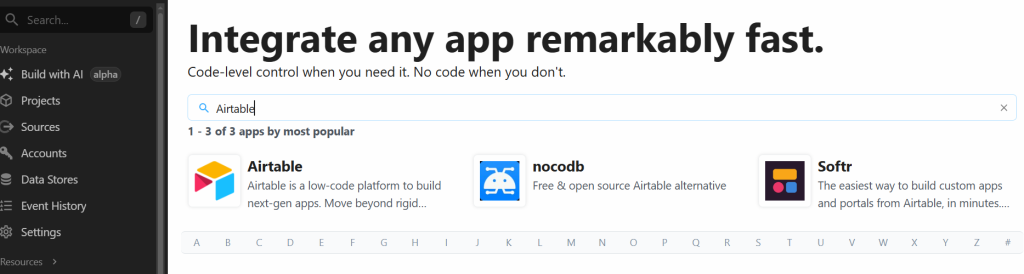
After this, you will be prompted to select an app to connect Airtable with, this is where CraftMyPDF comes in. By connecting CraftMyPDF to Pipedream, you can automatically create a PDF every time a new record is added or updated in your Airtable base.
Step 3: Set up the Trigger
After choosing CraftMyPDF, you will be required to set up a trigger. The trigger will monitor New or Modified Records from the Airtable base. For this article, we will be using the “New or Modified Records (Instant) from the Airtable API

Click on ‘Use This Trigger”.
Step 4: Connect Airtable account and Select Your Airtable Base
The next step is the actual set up. Connect Account, then follow the prompts to grant Pipedream permission to access your Airtable account. During this process, you will be prompted to select the base or tables Pipedream is allowed to access.
Make sure you select the base you created earlier so Pipedream can monitor it for changes. Once your account is connected, Pipedream will display a list of available tables. Choose the table you created for your reports.
Since our workflow begins when new data is added to the Notion database we created. This will act as the trigger to the workflow.
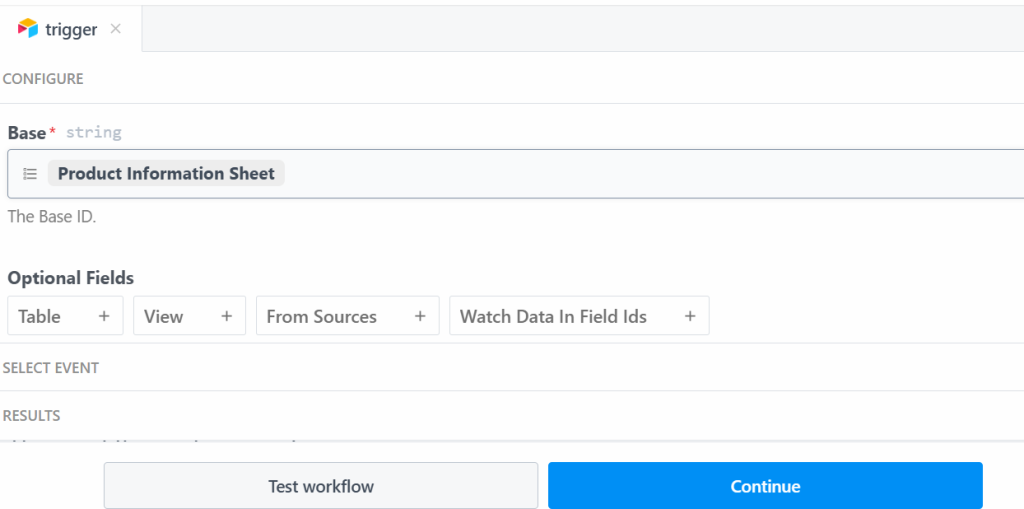
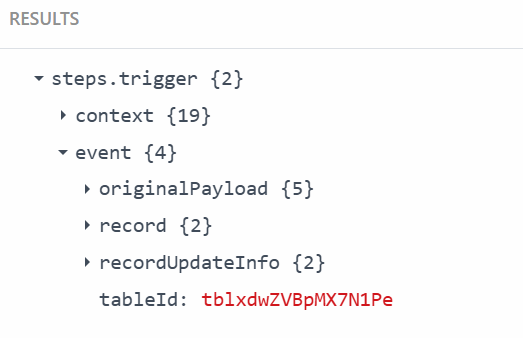
The next step will be to test the workflow to make sure the trigger is working and returning the expected data. You should get a result similar to this
Step 5: Set up CraftMyPDF as an Action
Add the CraftMyPDF “Create PDF” action to your workflow. You will be required to connect your CraftMyPDF account. After doing that, you will need to configure your data as a JSON based on the CraftMyPDF’s template structure, so it accurately links the data coming from the Airtable base to the template created in CraftMyPDF. Here’s an example of what the JSON data might look like:
{
 "client_name": "{{steps.trigger.event.record.fields["Client Name"]}}",
 "reporting_period": "{{steps.trigger.event.record.fields['Reporting Period']}}",
 "date": "{{steps.trigger.event.record.fields.Date}}",
 "ad_spend": "{{steps.trigger.event.record.fields['Ad Spend']}}",
 "revenue": {{steps.trigger.event.record.fields['Revenue']}},
  "conversion_rate": {{steps.trigger.event.record.fields['Conversion rates']}},
  "notes": "{{steps.trigger.event.record.fields['Long notes']}}"
  }
The next step will be to add the exact template that was created earlier to match the data into your Pipedream workflow.
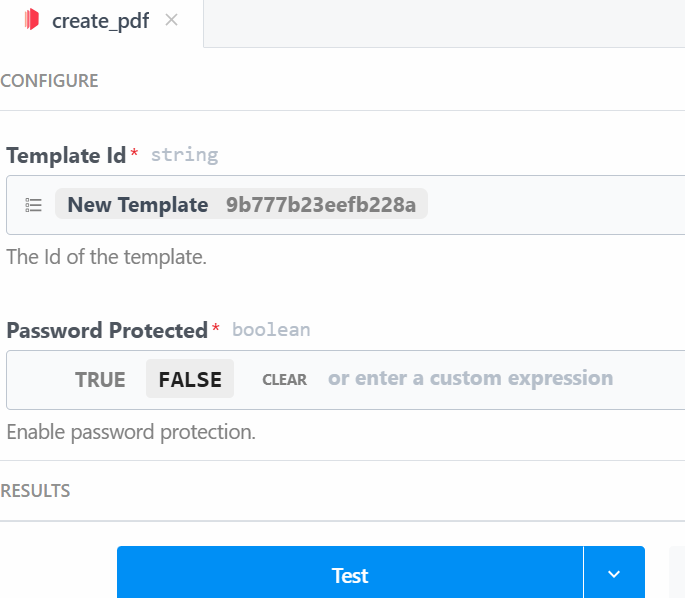
Then, you can set up a password for your PDF or just set it to FALSE since this is a test workflow.
Step 6: Test the Workflow
Proceed to test the workflow to make sure everything works. You should get a successful response as well as the URL information, template ID, expiration date, and other important information about the generated PDF.
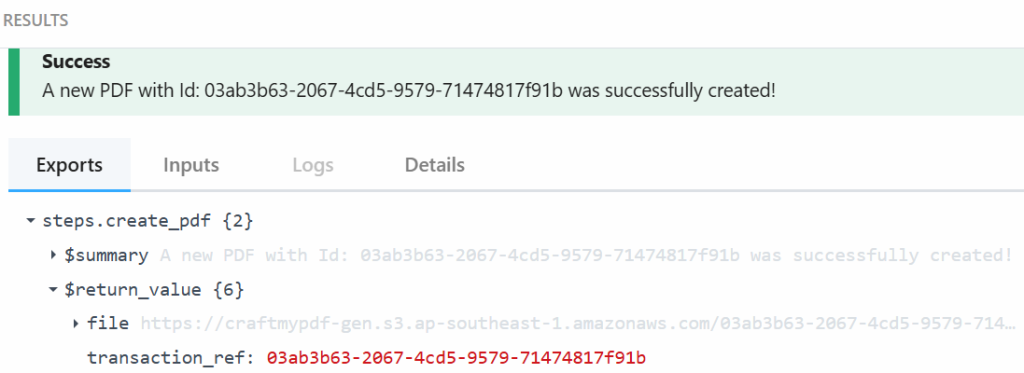
Copy the file URL and paste it into your browser to download the generated PDF.
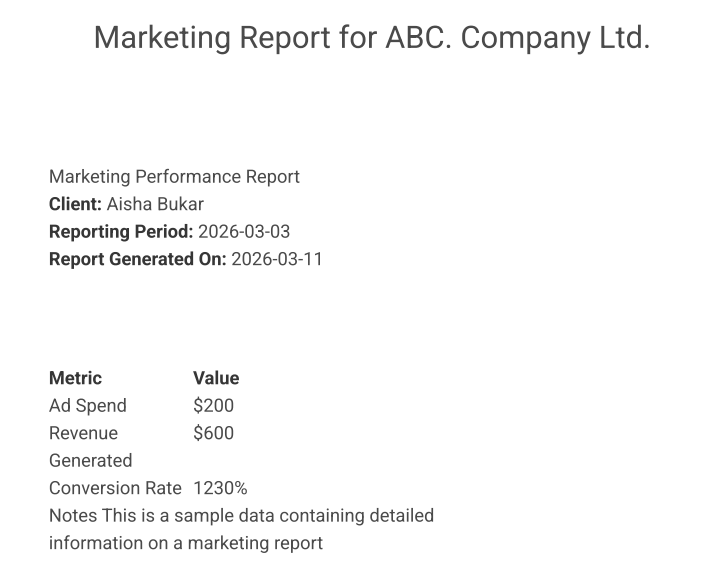
This is a sample of the generated PDF
Conclusion
In this tutorial, we walked through how to automatically generate PDF reports using Airtable, Pipedream, and CraftMyPDF. From structuring your Airtable database, to setting up a trigger in Pipedream, and finally generating a PDF using a CraftMyPDF template, you now have a complete workflow that runs automatically with little to no manual effort.
Automating PDF generation comes with several advantages. It helps you save time by reducing repetitive tasks and ensuring consistency across all your documents.
If you’re looking to simplify your document workflows and build powerful automation systems without writing much code, CraftMyPDF is a great place to start. You can sign up, create your first template, and begin generating PDFs in minutes.
Give it a try and start automating your document generation today